

Introduction
As many of us know, there are a lot of guides and information on penetration testing applications on Windows and Linux. Unfortunately, a step-by-step guide doesn’t exist in the macOS domain to help us through the penetration testing process. This means we had to spend even more time searching the web and experimenting with different tools and techniques to find the most effective approach for our testing. As the popularity of macOS and its apps continues to grow, it also increases the risk of potential attacks targeting them. To ensure the security of these applications, penetration testers need access to relevant information.
We created this blog to share our experience and provide a valuable resource for other security researchers and penetration testers facing similar challenges when testing macOS applications. This blog is the first part of an “A Deep Dive into Penetration Testing of macOS Applications” series. Part 1 is intended for penetration testers who may not have prior experience working with macOS.
TL;DR
We will define what a macOS application is. Also, we will create a simple application in Swift programming language and configure App Sandbox capabilities. It also covers basic GUI and network testing, including the configuration of Burp Suite and how SIP relates to this.
Application Structure
Let’s start with defining what a macOS application is. A macOS application is software designed to run on Apple’s macOS operating system (formerly OS X). It consists of a collection of files and resources bundled together in a specific format and usually has a user interface. Some popular macOS applications include Safari, Chrome and Word. Swift and Objective-C are the most commonly used programming languages for creating a macOS application, but macOS also supports other languages like C and C++.
Many applications are obtained from the App Store, but users also have the option to download and install apps from third-party resources. After installation, the application is usually located at the /Applications or ~/Applications path but can also be stored in another location. For example, system applications are accessed through the /System/Applications path. It’s important to note that macOS applications can be distinguished by looking for the “.app” extension and are stored as packages, also called Application Bundle:
“A bundle is a directory with a standardized hierarchical structure that typically contains executable code and the resources used by that code. Bundles fulfill many different roles: apps, app extensions, frameworks and plug-ins are all bundles. Bundles can also contain other bundles.”
Although a bundle appears as a single file in Finder, it’s actually a directory. To view the application’s content, right-click on the file name and select Show Package Contents. Inside the Content directory, you can find several subdirectories as follows (Figure 1):
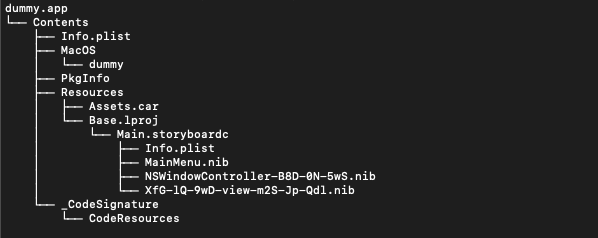
Figure 1: Application content
The basic structure of the macOS application bundle includes the following:
- Info.plist: This file contains configuration information for the application, such as Bundle Identifier and Bundle Version.
- MacOS: This directory contains the main executable file.
- Resources: This directory contains the application’s resources, such as images, localizations and interface files.
Other directories that you may find in the application bundle:
- Frameworks: This directory contains frameworks and dynamic libraries loaded by the main executable.
- Plugins: This directory contains app extensions and plug-ins, which are software components that extend the functionality of an application. Plugins are usually developed as shared libraries that provide a specific application-defined API and interface. They can add new features to a particular application, such as accessibility plugins that improve its usability for people with disabilities. Extensions, on the other hand, are a type of plugin that modifies the operating system’s behavior, such as adding new features to the Spotlight search function.
- Library: This directory may contain a variety of subdirectories, including:
- LaunchServices: This directory includes privileged helper tools installed by the Service Management Framework that allow applications and processes to perform system-level tasks requiring administrative privileges. They run in the background, communicating with the main application using interprocess communication (IPC) mechanisms such as Mach messages or XPC. These tools are typically Implemented as launch daemons or launch agents and are responsible for managing background processes. Application agents are launched when a user logs in and continues running in the background, while application daemons run continuously in the background from system boot-up. They are defined in plist files located in /Library/LaunchAgents and /Library/LaunchDaemons, respectively.
- SystemExtensions: This directory includes system extensions that allow software like network extensions and endpoint security solutions to extend the functionality of macOS without requiring kernel-level access. These extensions are, nowadays, used as an alternative for kernel extensions (kexts).
- XPCServices: This directory includes XPC services used in macOS applications to enable communication between processes. XPC services are implemented as a separate binary executable that runs in the background and can be used by multiple processes.
The complete list can be found in Apple’s documentation.
Dummy Application
We searched for a dummy application that includes some misconfiguration, such as:
- Unencrypted data over the network
- Various entitlements
- Invalid code signature
- Load dylibs that can be hijacked
But we couldn’t find one that suited our needs. So, we decided to create our own application (Figure 2).

Figure 2: The dummy app
Luckily, we found an interesting blog that provided us with helpful guidance throughout the development of an application in Swift language.
While building our application, besides a bare-bones application, we added some code that includes the functionality of sending HTTP requests to our server.
You can find the code of the “complex” application below (Code snippet 1):
//
//  ViewController.swift
//  dummy
//
//  Created by juliaminin on 23/03/2023.
//

import Cocoa

class ViewController: NSViewController {§
    @IBOutlet weak var textField: NSTextField!
    @IBOutlet weak var textLabel: NSTextField!

    @IBOutlet weak var jhonny: NSImageView!
    override func viewDidLoad() {
        super.viewDidLoad()

        jhonny.isHidden = true
    }

    override var representedObject: Any? {
        didSet {
        }
    }
    @IBAction func buttonClicked(_ sender: Any) {

        var text = textField.stringValue
        if text.isEmpty {
          text = "Boom"
        }
        let start = ">> \(text)!"
        textLabel.stringValue = start
        jhonny.isHidden = false
    }

    @IBAction func sendRequest(_ sender: Any) {

        let url = URL(string: "https://127.0.0.1:9999")!
        var request = URLRequest(url: url)
        request.httpMethod = "GET"

        let session = URLSession.shared
        let task = session.dataTask(with: request) { (data, response, error) in

            if let error = error {
            } else if let data = data {
            } else {
            }
        }
            task.resume()
    }
}
Code Snippet 1: Dummy application code
By creating a new macOS app in Xcode, it receives the App Sandbox entitlement and a default set of capabilities.
To allow our app to create network requests, we added a capability for outgoing connections, which added a com.apple.security.network.client entitlement to our app (Figure 3). We will explain more about entitlements in the next blog in this series.
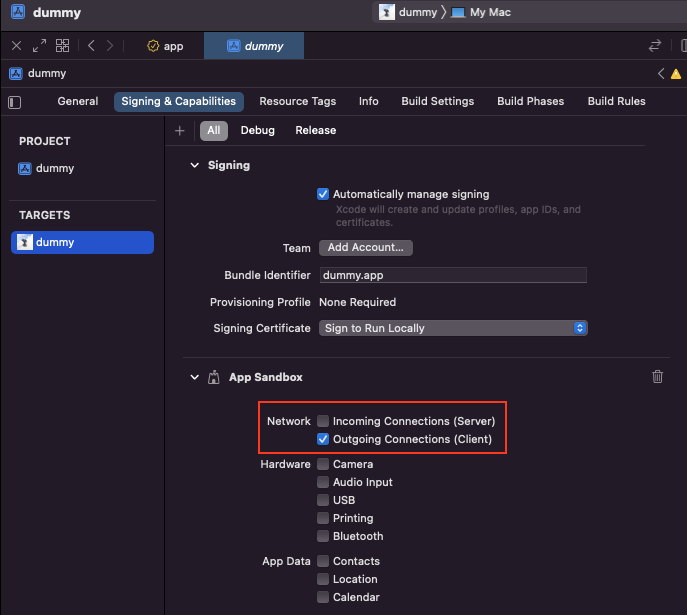
Figure 3: App sandbox capabilities in Xcode
App Sandbox restricts access to system resources and user data in macOS apps. Access can be allowed through entitlements.
Capabilities and entitlements are two mechanisms that determine an application’s permissions and access levels. Capabilities define what the app needs to use, like the camera or the internet. At the same time, entitlements grant access and permissions for the app to interact with the operating system and other apps.
For some operations, we needed to add specific capabilities, such as the following:
- To access the internet, we added the capabilities of incoming/outgoing connections, which will automatically provide com.apple.security.network.* entitlements to the application.
- To access the hardware, such as the built-in camera, we added the capabilities for specific hardware, which provides com.apple.security.device.* entitlements to the application.
- To access files, we added the capabilities for specific files and permissions, which provides com.apple.security.files.* entitlements to the application.
By default, in macOS 10.15 or later, all Mac apps must be “notarized” by Apple to launch. Please see the Apple documentation on notarizing macOS software before distribution for more details. If we had to distribute the application through the app store, it would be necessary to pass additional security checks for notarization.
We can view the application bundle of the dummy app by following these steps:
- Click on “Product” in the Xcode menu.
- Choose “Archive.”
- Right-click and select “Show in Finder” from the context menu (once you see the archive).
GUI Testing
Like with Windows and Linux clients, the first step will be identifying the common user input surfaces and testing them for security vulnerabilities, such as SQL injection or cross-site scripting.
Additionally, understanding the application’s behavior and functionality is essential. This involves understanding how the application processes user input, what data it stores and collects and how it interacts with external systems.
Network Testing
Analyzing network communication between the application and the server is essential to penetration testing. We can detect sensitive information transmitted without encryption or over an insecure channel by examining network traffic.
However, in macOS, we have SIP enabled by default. First, let’s understand what SIP is.
System Integrity Protection
SIP (System Integrity Protection) is a security feature that prevents malicious software from modifying protected files and folders on a Mac system. It restricts the root user account and limits the actions the root user can perform on protected parts of the operating system.
System Integrity Protection comprises several mechanisms, including:
- Filesystem protection: Prevents any modifications to the /System, /sbin, /bin and /usr directories, as well as certain system files and folders.
- Runtime protection: SIP limits the ability to attach debuggers and prevent code injection.
- Kernel extensions protection: Limits the installation of kernel extensions (kexts) to only those approved and signed by Apple.
The SIP mechanism in macOS prevents us from monitoring network activities, so disabling SIP is necessary for our needs. We do not recommend disabling SIP, but we will disable it for testing.
To disable SIP, follow these steps: Launch Terminal from the Utilities menu in Recovery mode, run the command csrutil disable and restart the macOS. Once you’re logged in as a user, open the terminal and run the command csrutil status to check if SIP has been successfully disabled. You can watch the following video if you need a more detailed guide.
It’s important to remember that disabling SIP can leave your system vulnerable to malicious attacks, so be sure to re-enable it once you’re done with your research. You can enable SIP by following the same steps mentioned above, but instead of running csrutil disable, run csrutil enable.
Proxy Like a Boss
Now that SIP has been disabled, we can proceed with configuring our proxy to intercept and analyze the network activities of the dummy app.
For this purpose, we will use the BurpSuite tool, which will allow us to intercept, manipulate and analyze HTTP and HTTPS traffic between a web application and its server.
Below are the steps to configure a proxy on macOS systems.
- Download and Install the BurpSuite:
You can download the tool from the PortSwigger website; installation is straightforward. - Configure BurpSuite Proxy:
To do this, we will navigate to the “Proxy” tab and choose the “Options” tab. Here we will set a few options, such as a proxy listener and port. In the next step, we should export the Burp certificate in .der format and save it in some local folder (Figure 4).

Figure 4: Exporting the Burp certificate
3. Install the exported certificate and enable its usage by the system (Figure 5):
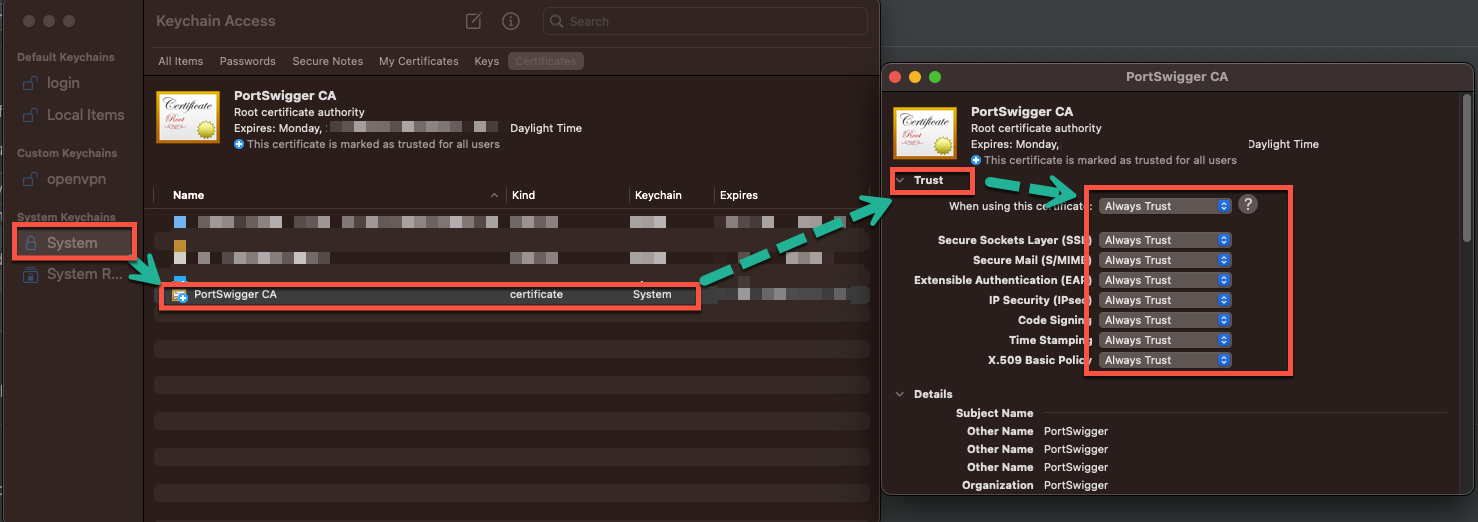
Figure 5: Installing the certificate to the system
4. Configure macOS Network Settings:
To do this, navigate to the “System Preferences” menu and select “Network.” Here we will choose the network adapter and click the “Advanced” button. In the “Advanced” menu, we will select the “Proxies” tab and configure the proxy settings (Figure 6). We will set the proxy type to “HTTP” and the proxy server to “127.0.0.1”. We will also set the port to “8080”.
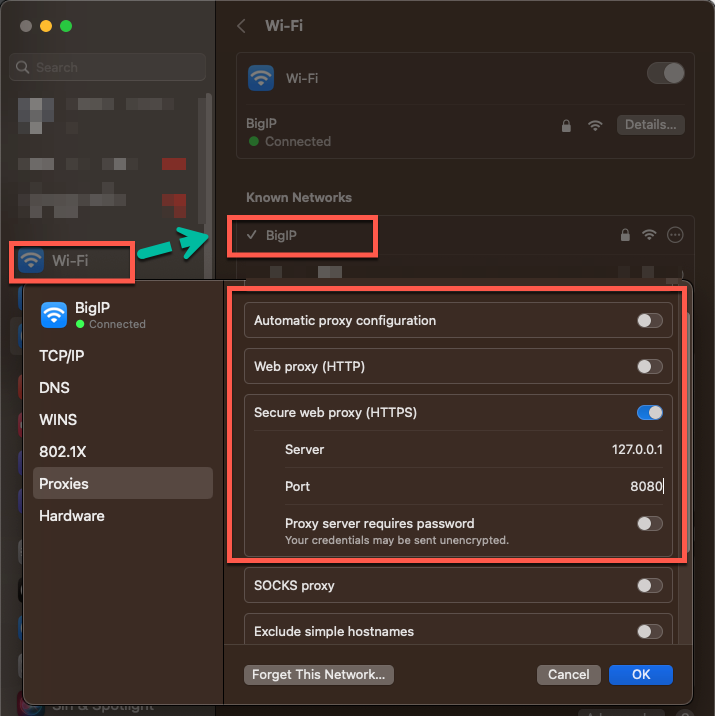
Figure 6: Configuration of proxy
5. Verify the Proxy Configuration:
We can launch a web browser and navigate to a random website to verify everything works. We will then return to the BurpSuite tool and verify that the network activity has been captured.
Wireshark
In addition, network traffic analysis can be performed by using Wireshark.
Wireshark is a network protocol analyzer that can capture and analyze network traffic. We can use it to detect security weaknesses in network communications, such as clear-text passwords, insecure protocols and sensitive information (Figure 7).
- We won’t be covering the traffic analysis with Wireshark in this blog, as numerous public resources are already available on the topic, such as Wireshark For Pentester: A Beginner’s Guide.
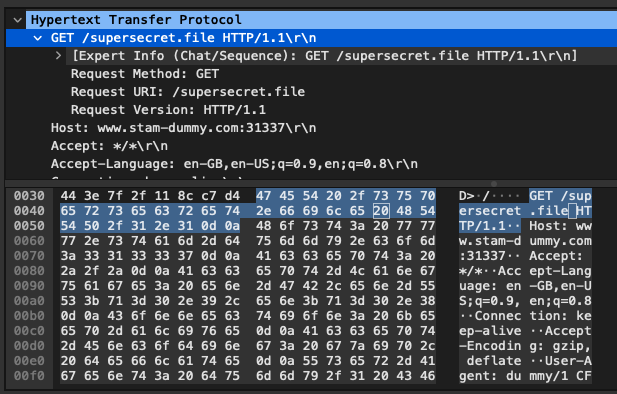
Figure 7: Wireshark unencrypted traffic
Summary
In Part 1 of this blog series, we’ve learned about macOS applications, their structure and demonstrated how to build a dummy application. We also talked about SIP and how to configure common network interception tools.
In the next part, we’ll dive deep into file and binary analysis, including the code signing mechanism, hardened runtime exceptions and entitlements. Also, we will present several tools and techniques for these purposes.
References:
- https://developer.apple.com/documentation/bundleresources
- https://developer.apple.com/documentation/bundleresources/information_property_list
- https://developer.apple.com/documentation/servicemanagement/
- https://developer.apple.com/documentation/bundleresources/placing_content_in_a_bundle
- https://www.kodeco.com/731-macos-development-for-beginners-part-1
- https://developer.apple.com/documentation/security/app_sandbox?language=objc
- https://developer.apple.com/documentation/xcode/configuring-the-macos-app-sandbox/
- https://developer.apple.com/documentation/security/notarizing_macos_software_before_distribution
- https://support.apple.com/en-il/HT204899
- https://developer.apple.com/library/archive/documentation/Security/Conceptual/System_Integrity_Protection_Guide/FileSystemProtections/FileSystemProtections.html#//apple_ref/doc/uid/TP40016462-CH2-SW1
- https://developer.apple.com/documentation/security/disabling_and_enabling_system_integrity_protection?language=objc
- https://www.youtube.com/watch?v=c8Iqbydj4IU
- https://www.hackingarticles.in/wireshark-for-pentesters-a-beginners-guide/


