As vulnerability researchers, our primary mission is to find as many vulnerabilities as possible with the highest severity as possible.
Finding vulnerabilities is usually challenging. But could there be a way, in some cases, to reach the same results with less effort?
Intro
In my previous research, I’ve found multiple classic memory corruption bugs in kernel modules. Finding these bugs took time and effort, making me wonder whether there’s an easier way to find similar bugs.
In that research, I focused on the Linux kernel, where most of the code base is open-sourced and written in C. Therefore, Static Code Analysis, or SCA, instantly popped into my mind. I assumed that even in 2023, SCA could yield fairly good results targeting kernel code projects, as it is usually most effective when it comes to memory corruption bugs. For example, detecting buffer-overflows, integer overflow and Null Pointer Dereference is a ubiquitous functionality that even the most straightforward SCA tools implement and could be discovered before run-time.
TL;DR
This blog post will showcase how we used Static Code Analysis tools to find a Pre-Auth Remote DoS (CVE-2023-0122) caused by a NULL Pointer Dereference in the NVMe driver of the Linux kernel.
Static Code Analysis Overview
Static Code Analysis or SCA usually refers to scanning the source code, without execution, to discover possible vulnerabilities and bugs. It does so by using techniques such as Data Flow Analysis, which aims to gather information about the possible values of the variables in the program.
There are a few considerations before choosing our tool, which depends on the programming language of the targeted source code and whether you’re looking for a free, open-source or commercial product.
The major downside of using SCA is false positives. The SCA tool produces many potential issues, but only a few will contain exploitable bugs. This often occurs because the tool fails to determine the integrity and the state of the data as it flows through the application. False negatives are also likely to happen (i.e., the tool fails to discover existing vulnerabilities).
One of the key aspects I focused on was using the simplest tool I could find. And since I was tinkering around with the Linux kernel – where the code is written in C – I decided to use CppCheck.
CppCheck is a general-purpose tool that can be used for C/C++ projects and doesn’t require additional setup like Sparse or Smatch, which are designed to check the Linux kernel specifically. Using CppCheck is as simple as it is well-documented. The tool is available on your preferred supported package manager or it be self-compiled from the sources.
After installation, running the tool is as simple as passing in the target sources (e.g.,
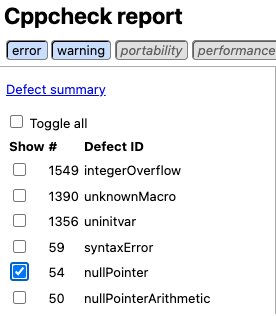
cppcheck source/test.c). CppCheck has an interactive UI feature to view the scan results in HTML. One of the main reasons to use it is because it is easy to navigate between the different types of alerts. For instance, if you only wish to view potential NULL Pointer Dereferences, you can easily select it in the navigation bar:

Figure 1: CppCheck report
If we’re installing CppCheck from the sources, we can use the tool as follows:
./cppcheck source/test.c --xml 2> my_check.xml
htmlreport/cppcheck-htmlreport --file=my_check.xml --report-dir=my_check_html
firefox my_check_html/index.html
CppCheckRobust.sh
Unleashing SCA
Right around the time when I started to wonder whether I could find vulnerabilities using SCA tools, NVIDIA open-sourced its Linux GPU kernel drivers. So for me, it was the perfect chance to give my assumption a shot.
Surprisingly, using the SCA showed great results! The NVIDIA Open GPU kernel drivers had NULL Pointer Dereference bugs. For example, in CVE-2022-31615, the bug was a missing NULL pointer check on the device variable after calling acpi_bus_get_device:
void NV_API_CALL nv_acpi_methods_uninit(void)
{
    struct acpi_device *device = NULL;
    ...
#if defined(NV_ACPI_BUS_GET_DEVICE_PRESENT)
    acpi_bus_get_device(nvif_parent_gpu_handle, &device);  // device could remain NULL

    nv_uninstall_notifier(device->driver_data, nv_acpi_event);  // device dereference
#endif

    device->driver_data = NULL;  // device dereference
    nvif_parent_gpu_handle = NULL;

    return;
}
nv_acpi_methods_uninit.c
Encouraged by the successful NVIDIA findings, I wanted to find more vulnerabilities, and since I’m playing around with the Linux kernel, why not try the kernel itself?
Again, around the same time, there was some drama happening around the new NTFS3 Linux Kernel driver by Paragon Software. The driver, which implemented the support for the Microsoft NTFS file-system and got introduced into the Linux kernel in version 5.15, wasn’t properly maintained after its introduction, both in term of bugfixes and major updates. It even reached a point where the primary Paragon maintainer of the driver went “virtually radio silent.”
Does a Linux kernel driver in the mainline with few maintenance updates sound like a good target? Well, my colleague, Alon Zahavi, and I thought it did.
After some SCA-ing, we found yet another NULL Pointer Dereference, which was easily exploitable and could have caused DoS. This is the code snippet of the vulnerable code. Can you spot the bug?
int attr_punch_hole(struct ntfs_inode *ni, u64 vbo, u64 bytes, u32 *frame_size)
{
    ...
	struct ATTRIB *attr = NULL, *attr_b;
    ...
    attr_b = ni_find_attr(ni, NULL, &le_b, ATTR_DATA, NULL, 0, NULL, &mi_b);
	if (!attr_b)
		return -ENOENT;

	if (!attr_b->non_res) {
		u32 data_size = le32_to_cpu(attr->res.data_size);  // Dereference attr which is NULL
    ...
}
attr_punch_hole.c
Check out my colleague Alon’s blog post to read more about this vulnerability.
At this point, I was already convinced that my assumption was valid – even in 2023, you can find vulnerabilities in big kernel code repositories and in the Linux kernel itself by using the most simple-to-use SCA tool. After finding the NTFS3 bug, I was even more driven to find more kernel vulnerabilities in that manner. Only this time, I wanted to aim for a higher impact.
Raising the Stakes with NVMe
Multiple factors can be considered when looking for an interesting target project for vulnerability research. To name a few: The size of the target code base, the number of affected users/clients or personal preferences such as attraction to a specific domain. In my case, I desired to target, once again, the Linux kernel. Around the same time, a new RC (release candidate) version was released for Linux Kernel 6.0 (rc1). Among the changes: base commits for upcoming features, bug fixes, and driver updates. As for testing my assumption again, a new feature for the NVMe kernel driver seemed like the perfect fit.
In Linux kernel 6.0-rc1, a new feature for the NVMe Linux Kernel driver was introduced, implementing in-band authentication for NVMe-TCP according to the new NVMe specifications.
Before we go on the offensive, let’s take a moment to understand what NVMe is. NVMe stands for Nonvolatile Memory Express protocol, a transport protocol for accessing nonvolatile storage media. NVMe over Fabrics (NVMeoF) is a specification-defined extension to NVMe that enables NVMe-based communication over connections other than PCIe. For instance, there is NVMe over FC (fiber channel), NVMe over TCP, NVMe over RoCE (RDMA over converged Ethernet), and so on.
In simpler terms, NVMe is a protocol that allows remote interaction with storage, and NVMeoF is an NVMe extension that enables this interaction over Ethernet or Fiber.
The exciting thing about NVMe is that it is used everywhere – from public clouds (Amazon EBS) to on-premises NetApp machines. Therefore, finding vulnerabilities in NVMe will potentially have a significant impact.
RDoS Vulnerability
After some research, where I’ve mostly statically reviewed the new source code of the new feature and followed the leads of the SCA, I encountered this piece of code. Can you spot something odd?
int nvmet_setup_auth(struct nvmet_ctrl *ctrl)
{
	....
	ctrl->ctrl_key = nvme_auth_extract_key(host->dhchap_ctrl_secret + 10,
					       host->dhchap_ctrl_key_hash);
	if (IS_ERR(ctrl->ctrl_key)) {
		ret = PTR_ERR(ctrl->ctrl_key);
		ctrl->ctrl_key = NULL;
	}
	pr_debug("%s: using ctrl hash %s key %*ph\n", __func__,
		 ctrl->ctrl_key->hash > 0 ?
		 nvme_auth_hmac_name(ctrl->ctrl_key->hash) : "none",
		 (int)ctrl->ctrl_key->len, ctrl->ctrl_key->key);
    ...
	return ret;
}
nvmet_setup_auth.c
First, by looking at the code as it is, we can see this ctrl_key member under ctrl, which is extracted from the dhchap_ctrl_secret member of host.
If there is a problem while extracting this key (checking for errors), ctrl_key is reassigned to NULL and then logs something to the kernel logs based on struct members under ctrl_key.
Um… What? Reassigning ctrl_key to NULL and dereferencing it to print its value to log? Alright, that’s clearly a problem, and if we compare this piece of code to the rest of the code in this function, we can simply see that there is a missing goto statement for handling the invalid ctrl_key, which is a mistake. However, is it even exploitable?
Exploiting NVMe bug
One of the prime things we need to know while researching a big project (like the Linux kernel) is not to get too carried away. There are plenty of functions and features we can delve into that aren’t relevant to the thing we’re researching. Focus is key here.
Following the logic above, if we are to see how we can exploit the bug, we shouldn’t necessarily be deep-diving into how the NVMe protocol works. Instead, we can try to see how to reach the vulnerable code with minimum effort.
As observable from the vulnerable code snippet (nvmet_setup_auth), the name of the vulnerable function is nvmet_setup_auth, which stands for setting up the authentication for something – but what exactly?

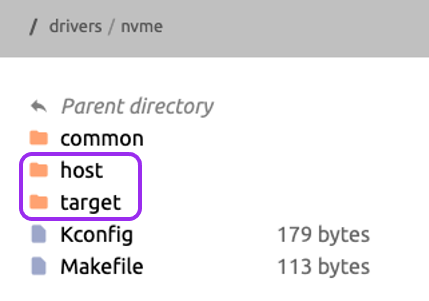
Figure 2: NVMe sources
By tinkering around the code base, we see that two objects keep showing up: host and target. From a quick search on mighty Google and looking around the code base, we can understand that host stands for the client of the NVMe and target stands for the server (where the storage is) so that the target (server) will expose the NVMe storage to the hosts (clients).

Figure 3: NVMe Topology
Since the code we’re looking at is in auth.c under the target code directory, this code might be reachable while connecting to the server (target) – but how exactly?
According to the LWN article about this new authentication feature, the first attempt to implement the feature was for NVMe-TCP – “… and seeing that it provides some real benefit especially for NVMe-TCP here’s an attempt to implement it…”.
As we learned what NVMeoF is, we can assume this code is reachable via a TCP connection! But first, let’s verify it by viewing the code (open-source FTW).

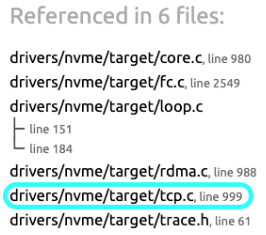
Figure 4: nvmet_setup_auth call stack
If we go up the call stack of nvmet_setup_auth, we can see that we’re getting into a function called nvmet_req_init, which initiates and assigns multiple variables to the req variable.
multiple variables to the req variable.
bool nvmet_req_init(struct nvmet_req *req, struct nvmet_cq *cq,
		struct nvmet_sq *sq, const struct nvmet_fabrics_ops *ops)
{
	u8 flags = req->cmd->common.flags;
	u16 status;

	req->cq = cq;
	req->sq = sq;
	req->ops = ops;
	req->sg = NULL;

    ...
}
nvmet_req_init.c
If we look at where req comes from, we can see that it is implementation dependent – meaning, it depends on the protocol of the NVMeoF we’re using. And indeed, we can see the TCP implementation over there!

Figure 5: NVMe-oF implementation
Going up the call stack of the NVMe-TCP implementation, under nvmet_tcp_try_recv_pdu, the call for kernel_recvmsg made it even more compelling.
static int nvmet_tcp_try_recv_pdu(struct nvmet_tcp_queue *queue)
{
    ...
	iov.iov_base = (void *)&queue->pdu + queue->offset;
	iov.iov_len = queue->left;
	len = kernel_recvmsg(queue->sock, &msg, &iov, 1,
			iov.iov_len, msg.msg_flags);
	if (unlikely(len < 0))
		return len;
    ...
}
nvmet_tcp_try_recv_pdu.c
To prove that the bug is triggerable remotely, we need to test it, and for that, we will have to prepare a working environment. By searching once again in the fountain of knowledge – Google — we can easily find documentation on creating a working NVMe environment, even specifically for NVMe-TCP.
On the other hand, for finding out how to configure the new authentication feature, the search was way more complex. Eventually, I encountered the GitHub repository of the test framework for the Linux kernel block layer and storage stack – blktests, which helped me create my very own NVMe-TCP setup script for debugging.
NVMe Environment
traddr="XXX.XXX.XXX.XXX"
adrfam="ipv4"
trsvcid="4420"
hostnqn="$(cat /etc/nvme/hostnqn 2> /dev/null)"
hostid="$(cat /etc/nvme/hostid 2> /dev/null)"
trtype="tcp"
subsys_name="testnqn"

modprobe nvmet
modprobe nvmet-tcp
modprobe null_blk nr_devices=1

hostkey="$(nvme gen-dhchap-key -n ${subsys_name} 2> /dev/null)"
ctrlkey="$(nvme gen-dhchap-key -n ${subsys_name} 2> /dev/null)"

# Create nvmet subsystem
echo "Creating nvmet subsystem"
mkdir /sys/kernel/config/nvmet/subsystems/${subsys_name}
mkdir /sys/kernel/config/nvmet/subsystems/${subsys_name}/namespaces/1
echo "/dev/nullb0" > /sys/kernel/config/nvmet/subsystems/${subsys_name}/namespaces/1/device_path
echo "1" > /sys/kernel/config/nvmet/subsystems/${subsys_name}/namespaces/1/enable

# Create port
echo "Creating port"
mkdir /sys/kernel/config/nvmet/ports/1
cd /sys/kernel/config/nvmet/ports/1
echo ${traddr} |sudo tee -a addr_traddr > /dev/null
echo ${trtype}|sudo tee -a addr_trtype > /dev/null
echo ${trsvcid}|sudo tee -a addr_trsvcid > /dev/null
echo ${adrfam}|sudo tee -a addr_adrfam > /dev/null

# add subsys to port
echo "Linking subsystem to port"
sudo ln -s /sys/kernel/config/nvmet/subsystems/${subsys_name} /sys/kernel/config/nvmet/ports/1/subsystems/${subsys_name}

# create host
echo "Creating host"
mkdir /sys/kernel/config/nvmet/hosts/${hostnqn}
echo "0" > /sys/kernel/config/nvmet/subsystems/${subsys_name}/attr_allow_any_host

echo "Linking allowed host to subsystem"
ln -s /sys/kernel/config/nvmet/hosts/${hostnqn} /sys/kernel/config/nvmet/subsystems/${subsys_name}/allowed_hosts/${hostnqn}

echo "Configuring host dhchap key"
echo "${hostkey}" > /sys/kernel/config/nvmet/hosts/${hostnqn}/dhchap_key
echo "${ctrlkey}" > /sys/kernel/config/nvmet/hosts/${hostnqn}/dhchap_ctrl_key
nvmet_setup.sh
There are multiple steps for configuring the NVMe-TCP environment, and the most crucial step will be to expose the NVMe device to the network (#23). Since I didn’t use actual NVMe devices, the use of a generic null block device was enough (#20). To activate the authentication feature, the environment needs to have the allow_any_host attribute turned off (#39) and host objects (which are created under the general nvmet directory) linked to the allowed_hosts under our specific NVMe subsystem (#42).
Every host on the NVMe network is identified via an NQN (NVMe Qualified Name), and all the authentication keys are under the host directory (#44).
Finally, after we’ve got a working server environment in a VM, let’s install the nvmecli util to ease the interaction with the server.
If we jump back to code snippet nvmet_setup_auth.c section, we see that dhchap_ctrl_secret is being used to extract the auth key from host, and host is the host configuration in the hosts directory under the NVMe configuration (#44). Thus, we can assume that dhchap_ctrl_secret must be taken from the file under the relevant host we want to interact with.
By looking at the vulnerable code piece in nvmet_setup_host, we can see that the bug can be triggered if there is a problem in the extraction of the host ctrl auth key, which is done in nvme_auth_extract_key.
But what exactly makes a key invalid? If we take a look under nvme_auth_extract_key, we can see that there are multiple conditions to make a specific key invalid: the key isn’t base64 encoded, the length isn’t 36, 52, or 68 and more:
struct nvme_dhchap_key *nvme_auth_extract_key(unsigned char *secret,
					      u8 key_hash)
{
    ...
       key_len = base64_decode(secret, allocated_len, key->key);
       if (key_len < 0) {
           pr_debug("base64 key decoding error %d\n", key_len);
           ret = key_len;
           goto out_free_secret;
      }

      if (key_len != 36 && key_len != 52 &&
          key_len != 68) {
          pr_err("Invalid key len %d\n", key_len);
          ret = -EINVAL;
          goto out_free_secret;
      }

      if (key_hash > 0 &&
         (key_len - 4) != nvme_auth_hmac_hash_len(key_hash)) {
          pr_err("Mismatched key len %d for %s\n", key_len,
                 nvme_auth_hmac_name(key_hash));
          ret = -EINVAL;
          goto out_free_secret;
      }
 ...
}
nvme_auth_extract_key.c
For us, the easiest way to make an invalid key is by ensuring its length is less than 36 bytes. It is mandatory that the key have a prefix of DHHC-1. We could just supply DHHC-1:00: AAAA: as the dhchap_ctrl_secret key.
PoC Time
Now that we’ve got our environment ready, let’s test it!
At that point, I was very happy – I found an exploitable Remote DoS 🙂 However, this DoS still relied on sending a packet from an authorized host. Without being authorized, the exploit would fail.
![]()
Figure 6: NVMe connetion denied
NVMe Authorization Bypass
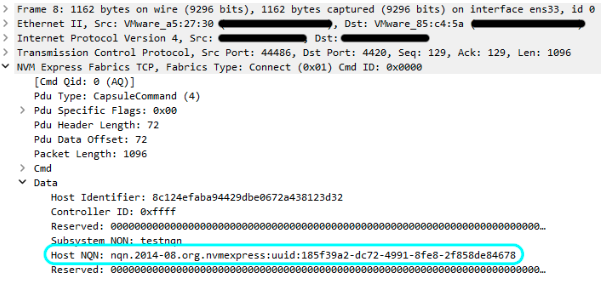
After thinking about how to overcome this limitation, I decided to sniff the connection request. The main connect packet looked like this:

Figure 7: NVMe connection packet
As you can see, our NQN is transferred in the packet (Host NQN) in plain text, thus obtainable via simple network sniffing. What if the server trusts the data we send? Can we fake our NQN to an authorized NQN to bypass the process? To test it, we can simply set the hostnqn flag of the nvme connect command, which overrides the default NQN for the connect request.
And “bam!” As we can see, due to a slight misconfiguration, we can not only cause a DoS but also trigger the vulnerability from an arbitrary machine bypassing the authentication feature. This vulnerability risks every server being exposed on the network, whether on a cloud provider or on-premises.
Conclusion
We have seen that static code analysis tools are still powerful! Sometimes the most robust projects involve low-hanging fruits, which can be picked using SCA. A large code base could be overwhelming, so I advise focusing on the minimal call stack that leads to the code in question. Whether you are a vulnerability researcher or a developer, you can find vulnerabilities or other bugs with simple and accessible tools.
Disclosure
● August 2022 – Bug found
● August 23, 2022 – Bug reported to the driver maintainers
● August 31, 2022 – Fixed in mainline (https://github.com/torvalds/linux/commit/da0342a3aa0357795224e6283df86444e1117168)
● January 10, 2023 – CVE assigned (CVE-2023-0122)


