
Know Your Enemy
In the previous post (Part 1), we covered several rootkit technique implementations. Now we will focus on kernel rootkit analysis, looking at two case studies of rootkits found in the wild: Husky Rootkit and Mingloa/CopperStealer Rootkit.Through these case studies, we’ll share our insights about rootkit analysis techniques and methodology.
Before we dive into the analysis, here are several guidelines about how we approached this Windows kernel driver and some prior knowledge that will assist in understanding the purpose of key functions in the binary.
DriverEntry
Let’s start with the binary’s entry point. In the case of a Windows kernel driver, it is DriverEntry.
The DriverEntry usually includes the following blocks of code:
- Calls to IoCreateDevice and IoCreateSymbolicLink.
- Initialization of the Major Function array with function pointers to various handler functions.
- Assignment of the DriverUnload routine with a function pointer to a handler function.
The following snippet (Snippet 1) showcases how a DriverEntry for a simple Windows kernel driver would be implemented in C language.
extern "C" NTSTATUS DriverEntry(PDRIVER_OBJECT DriverObject, PUNICODE_STRING RegistryPath)
{
	UNREFERENCED_PARAMETER(RegistryPath);

	DbgPrint("Hello World!\n");
	UNICODE_STRING deviceName;
	UNICODE_STRING symbolicLink;
	RtlInitUnicodeString(&deviceName, L"\\Device\\TeaParty");
	RtlInitUnicodeString(&symbolicLink, L"\\DosDevices\\TeaParty");
	IoCreateDevice(DriverObject, 0, &deviceName, FILE_DEVICE_UNKNOWN, 0, FALSE, &ptrDeviceObject);
	IoCreateSymbolicLink(&symbolicLink, &deviceName);

	DriverObject->MajorFunction[IRP_MJ_CREATE] = DriverCreate;
	DriverObject->MajorFunction[IRP_MJ_CLOSE] = DriverClose;
	DriverObject->MajorFunction[IRP_MJ_READ] = DriverRead;
	DriverObject->MajorFunction[IRP_MJ_WRITE] = DriverWrite;
	DriverObject->MajorFunction[IRP_MJ_DEVICE_CONTROL] =

	DriverDeviceControl; DriverObject->DriverUnload = DriverUnload;
	return STATUS_SUCCESS;
}
Snippet 1: An example of a DriverEntry implementation in C.
The next snippet (Snippet 2) showcases how the disassembly of the same DriverEntry would look.
sub_140001690 proc near

var_48= dword ptr -48h
Exclusive= byte ptr -40h
DeviceObject= qword ptr -38h
DestinationString= _UNICODE_STRING ptr -28h
SymbolicLinkName= _UNICODE_STRING ptr -18h

	push    rbx
	sub     rsp, 60h
	mov     rbx, rcx
	lea     rcx, aHelloWorld ; "Hello World!\n"
	call    DbgPrint
	lea     rdx, SourceString ; "\\Device\\TeaParty"
	lea     rcx, [rsp+68h+DestinationString] ; DestinationString
	call    cs:RtlInitUnicodeString
	lea     rdx, aDosdevicesTeap ; "\\DosDevices\\TeaParty"
	lea     rcx, [rsp+68h+SymbolicLinkName] ; DestinationString
	call    cs:RtlInitUnicodeString
	lea     rax, DeviceObject
	mov     r9d, 22h ; '"'  ; DeviceType
	mov     [rsp+68h+DeviceObject], rax ; DeviceObject
	lea     r8, [rsp+68h+DestinationString] ; DeviceName
	mov     [rsp+68h+Exclusive], 0 ; Exclusive
	xor     edx, edx        ; DeviceExtensionSize
	and     [rsp+68h+var_48], 0
	mov     rcx, rbx        ; DriverObject
	call    cs:IoCreateDevice
	lea     rdx, [rsp+68h+DestinationString] ; DeviceName
	lea     rcx, [rsp+68h+SymbolicLinkName] ; SymbolicLinkName
	call    cs:IoCreateSymbolicLink

	lea     rax, sub_140001280
	mov     [rbx+70h], rax
	lea     rax, sub_140001280
	mov     [rbx+80h], rax
	lea     rax, sub_140001280
	mov     [rbx+88h], rax
	lea     rax, sub_140001280
	mov     [rbx+90h], rax
	lea     rax, sub_1400012B0
	mov     [rbx+0E0h], rax
	lea     rax, sub_1400014B0
	mov     [rbx+68h], rax

	xor     eax, eax
	add     rsp, 60h
	pop     rbx
	retn
sub_140001690 endp
Snippet 2: Disassembly of DriverEntry.
DriverUnload
DriverUnload is a function that is invoked when the driver is unloaded.
The purpose of this handler function is to clean up any resources that were created by the driver during its initialization and execution — for example, deleting both the device and symbolic link that were created in the DriverEntry.
It would also be a great strategic function to call ExFreePoolWithTag to de-allocate any pool memory that was allocated in the DriverEntry function.
void DriverUnload(PDRIVER_OBJECT pDriverObject)
{
    UNREFERENCED_PARAMETER(pDriverObject);

    UNICODE_STRING deviceName;
    UNICODE_STRING symbolicLink;

    RtlInitUnicodeString(&deviceName, L"\\Device\\TeaParty");
    RtlInitUnicodeString(&symbolicLink, L"\\DosDevices\\TeaParty");
    IoDeleteDevice(ptrDeviceObject);
    IoDeleteSymbolicLink(&symbolicLink);
    DbgPrint("Driver unloading\n");
}
Snippet 3: An example of a DriverUnload implementation in C.
Windows Kernel Structures
To fully understand the disassembly of a Windows kernel driver, we should also be familiar with a few of the kernel structures used by the object manager and other components in the kernel.
For example, the following structure is the DRIVER_OBJECT (Snippet 4).
0: kd> dt nt!_DRIVER_OBJECT
	+0x000 Type             : Int2B
	+0x002 Size             : Int2B
	+0x008 DeviceObject     : Ptr64 _DEVICE_OBJECT
	+0x010 Flags            : Uint4B
	+0x018 DriverStart      : Ptr64 Void
	+0x020 DriverSize       : Uint4B
	+0x028 DriverSection    : Ptr64 Void
	+0x030 DriverExtension  : Ptr64 _DRIVER_EXTENSION
	+0x038 DriverName       : _UNICODE_STRING
	+0x048 HardwareDatabase : Ptr64 _UNICODE_STRING
	+0x050 FastIoDispatch   : Ptr64 _FAST_IO_DISPATCH
	+0x058 DriverInit       : Ptr64     long
	+0x060 DriverStartIo    : Ptr64     void
	+0x068 DriverUnload     : Ptr64     void
	+0x070 MajorFunction    : [28] Ptr64     long
Snippet 4: A breakdown of the DRIVER_OBJECT structure.
It is useful to map out the IRP major functions used by the driver when reverse engineering it.
For instance, by looking at the structure offsets (Snippet 4) and the disassembly (Snippet 2), we can determine that sub_1400014B0 is the DriverUnload.
We can also use the IRP major functions code values described in wdm.h/ntddk.h to conclude that sub_140001280 (in Snippet 2) is the function handler for IRP_MJ_CREATE by checking what the major function of the code is that would give us the result of 0x70 from the offset of MajorFunction (0x70) in the DRIVER_OBJECT structure. That is obviously 0x00*PointerSize (8 in x64 architecture); thus, we are dealing with IRP_MJ_CREATE.
In the same manner, we can determine what the function handlers are for IRP_MJ_CLOSE, IRP_MJ_READ, IRP_MJ_WRITE and IRP_MJ_DEVICE_CONTROL.
//
// Define the major function codes for IRPs.
//

#define IRP_MJ_CREATE                   0x00
#define IRP_MJ_CREATE_NAMED_PIPE        0x01
#define IRP_MJ_CLOSE                    0x02
#define IRP_MJ_READ                     0x03
#define IRP_MJ_WRITE                    0x04
#define IRP_MJ_QUERY_INFORMATION        0x05
#define IRP_MJ_SET_INFORMATION          0x06
#define IRP_MJ_QUERY_EA                 0x07
#define IRP_MJ_SET_EA                   0x08
#define IRP_MJ_FLUSH_BUFFERS            0x09
#define IRP_MJ_QUERY_VOLUME_INFORMATION 0x0a
#define IRP_MJ_SET_VOLUME_INFORMATION   0x0b
#define IRP_MJ_DIRECTORY_CONTROL        0x0c
#define IRP_MJ_FILE_SYSTEM_CONTROL      0x0d
#define IRP_MJ_DEVICE_CONTROL           0x0e
#define IRP_MJ_INTERNAL_DEVICE_CONTROL  0x0f
#define IRP_MJ_SHUTDOWN                 0x10
#define IRP_MJ_LOCK_CONTROL             0x11
#define IRP_MJ_CLEANUP                  0x12
#define IRP_MJ_CREATE_MAILSLOT          0x13
#define IRP_MJ_QUERY_SECURITY           0x14
#define IRP_MJ_SET_SECURITY             0x15
#define IRP_MJ_POWER                    0x16
#define IRP_MJ_SYSTEM_CONTROL           0x17
#define IRP_MJ_DEVICE_CHANGE            0x18
#define IRP_MJ_QUERY_QUOTA              0x19
#define IRP_MJ_SET_QUOTA                0x1a
#define IRP_MJ_PNP                      0x1b
#define IRP_MJ_PNP_POWER                IRP_MJ_PNP      // Obsolete....
#define IRP_MJ_MAXIMUM_FUNCTION         0x1b
Snippet 5: An excerpt from wdm.h defining the constant values for all IRP major functions.
Some other kernel structures we should be familiar with when performing our analysis are the IRP and IO_STACK_LOCATION structures.
An IRP, also known as I/O Request Packet, is the structure that represents an I/O request during its creation, while moving between different drivers in the device stack, and until the point of the request’s completion.
An IRP is created when DeviceIoControl with a certain IOCTL operation is called from user-mode on a handle of a device object acquired by the user.
0: kd> dt nt!_IRP +0x000 Type : Int2B +0x002 Size : Uint2B +0x004 AllocationProcessorNumber : Uint2B +0x006 Reserved : Uint2B +0x008 MdlAddress : Ptr64 _MDL +0x010 Flags : Uint4B +0x018 AssociatedIrp :+0x020 ThreadListEntry : _LIST_ENTRY +0x030 IoStatus : _IO_STATUS_BLOCK +0x040 RequestorMode : Char +0x041 PendingReturned : UChar +0x042 StackCount : Char +0x043 CurrentLocation : Char +0x044 Cancel : UChar +0x045 CancelIrql : UChar +0x046 ApcEnvironment : Char +0x047 AllocationFlags : UChar +0x048 UserIosb : Ptr64 _IO_STATUS_BLOCK +0x050 UserEvent : Ptr64 _KEVENT +0x058 Overlay : +0x068 CancelRoutine : Ptr64 void +0x070 UserBuffer : Ptr64 Void +0x078 Tail :
Snippet 6: A breakdown of the IRP structure.
Additionally, the IO_STACK_LOCATION represents the current location of an IRP in the device stack (and thus the CurrentLocation field in the IRP structure is a pointer to an IO_STACK_LOCATION).
The IO_STACK_LOCATION structure contains a union-typed Parameters field that specifies the different parameters to be used by different major functions in the driver.
For example, in case the current operation is IRP_MJ_DEVICE_CONTROL, the parameters of type DeviceIoControl would be used, containing OutputBufferLength, InputBufferLength, IoControlCode and Type3InputBuffer.
0: kd> dt nt!_IO_STACK_LOCATION +0x000 MajorFunction : UChar +0x001 MinorFunction : UChar +0x002 Flags : UChar +0x003 Control : UChar +0x008 Parameters :+0x000 Create : +0x000 SecurityContext : Ptr64 _IO_SECURITY_CONTEXT +0x008 Options : Uint4B +0x010 FileAttributes : Uint2B +0x012 ShareAccess : Uint2B +0x018 EaLength : Uint4B +0x000 Read : +0x000 Length : Uint4B +0x008 Key : Uint4B +0x010 ByteOffset : _LARGE_INTEGER +0x000 Write : +0x000 Length : Uint4B +0x008 Key : Uint4B +0x010 ByteOffset : _LARGE_INTEGER +0x000 DeviceIoControl : +0x000 OutputBufferLength : Uint4B +0x008 InputBufferLength : Uint4B +0x010 IoControlCode : Uint4B +0x018 Type3InputBuffer : Ptr64 Void +0x028 DeviceObject : Ptr64 _DEVICE_OBJECT +0x030 FileObject : Ptr64 _FILE_OBJECT +0x038 CompletionRoutine : Ptr64 long +0x040 Context : Ptr64 Void
Snippet 7: A breakdown of the IO_STACK_LOCATION structure.
Armed with our new understanding of Windows kernel drivers and how to find key functions in Windows drivers, let’s look at some real-world, in-the-wild examples.
Case Study #1: APT29 Brute Ratel C4 Campaign Drops “Husky” Rootkit
This research originated from looking at samples associated with a campaign that was also mentioned in a blog by Palo Alto Networks Unit 42 about Brute Ratel C4. Unfortunately, they did not provide a technical analysis of this sample, so we decided to dig deeper ourselves.
Sample Details
MD5 9b664450b36154b74d610f0e22e27814
SHA-1 af26cd435ff3858af6ad2d44c24e887e7dd0ca88
SHA-256 31acf37d180ab9afbcf6a4ec5d29c3e19c947641a2d9ce3ce56d71c1f576c069
Imphash 5b3ab951f23e44df83ede26ae92f6bee
SSDEEP 6144:+K2v/VfyLez5cjWNYXBtIhMDXdiq+o5IDvCzwg:Wv/VfyLU5cjC0QUXddgvC1
File size 284.92 KB (291760 bytes)
Sample Overview
The sample is a kernel driver signed with a leaked NVIDIA certificate from the LAP$US group. It uses the Heresy’s Gate method found by zerosum0x0 (Figure 1), which is a technique used for injecting code to user-mode from a kernel-mode driver, bypassing SMEP.
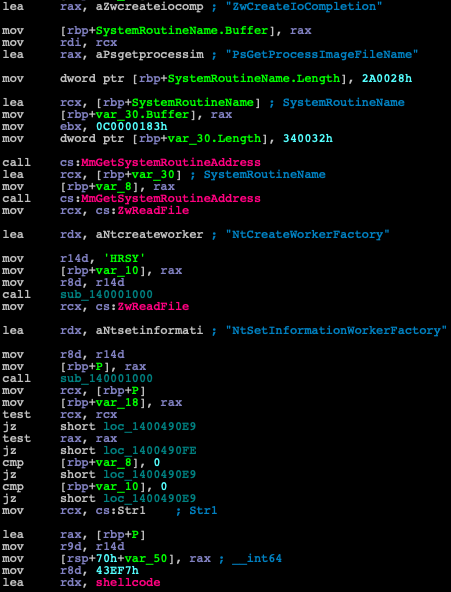
Figure 1: Disassembly of the signed driver using Heresy’s Gate method by zerosum0x0.
The injected shellcode uses classic techniques like traversing the InLoadOrderModuleList to find library handles and resolving API functions such as LoadLibraryA and GetProcAddress, which can be used to resolve any other API.
The injected shellcode is also quite long to analyze (Figure 2) and looks very similar to the shellcode described in the aforementioned Unit 42 blog, since it uses multiple push instructions to store data on the stack. The data stored in the stack includes:
- Base64-encoded config data for Brute Ratel C4
- Brute Ratel C4 payload
- Portable Executable (PE) 64 binary that is a VMProtect packed kernel driver, which is loaded later
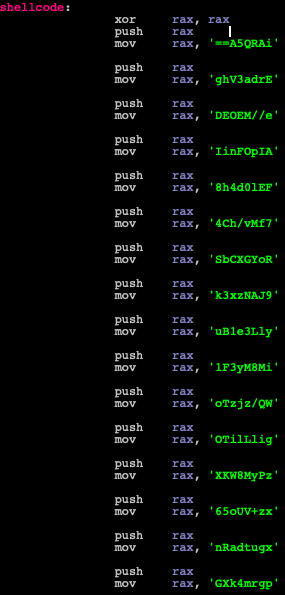
Figure 2: An excerpt from the shellcode, pushing many values to the stack and forming a Base64 blob.
The Brute Ratel C4 config can be decrypted using the following short script (Snippet 8):
from base64 import b64decode
from Crypto.Cipher import ARC4

key = "bYXJm/3#M?:XyMBF"
config = ARC4.new(key).decrypt(b64decode('bScTbyzbJIZKRbUKJNxk4KSWzypzwOlmKYpJMoODY+J6JpEARPoRxs/8XbJFbiITTg2iIZaq5GO76zB8kqR4wcMkKLxkjeqCnSYWF/s7CuFuokklDxTJRJQBDg0RYuCbfJ/kbRvGSESP3LP1rRG3z+rArJ44a3w62sKyShanpLXIcpDJPD6qxSJt2rYEP2ZY6yKeKlDvRKCaBbn3dBUK9Hgo/pPUC9nju1UGm/rEt+igbAIcyRKqK1G0MR/N7HumXP358JWc4fHJHOjJtTZVaM/9xjjPlXnWUJCA4pCNiBxzK0l/C+v5FS/nMVro34SdLE/PBDSuDr/7cI06rnupd8/h/tnJY0IaTPOWGQbQZU8DAycX8mgypjju//q3sSS47fl8Cgl94slHqnHCaM6lDmXp9UZc+Qf0FtXb+JkYQQNjGDUJi/LThu2wTV5N8aYI2gTnPSqHBfEOt781Z8uqQn8dTQv63MUv0gqpaQgY4ocM64L1WqZBxWcBDoA90W7s9NR62UIPtMp3+M3/aygdtNvXATCSxpVfwy+TlHE2/rc16NdzCE/qbtFC+B6uwWr9kOt+ep20JmOJGpcPmk/89Iix141g5ZlsVo7IDfQMwWEeB3wpastWCjQmUEwQLsybAcEkECUL3Jq903jtN5+dJ/DoDspq+ZGYkvdPXTC2YJvSPQ36hcEd3FzwkZs3TLMwQc5KGQB1v4QLL/PF01s9yigv6MUciA05buztn+Ho/8+pbIS4RP3ZyKyaLeuAZzTIh0DE4Hmm6ADZgOmEp/K/JiF2+gUtw4TxxcJt3TJzR+o/2gAmO20tFrxX+5xEZpFgTC++2gbknK3HmH/RHjH8TgGD+NUpn68ZmjHfMrrs+J/nQcPYB1G1cDlBlgRvPzO1a4UBEqSobVPNPsTrQl8hSW2rlexByS3G03aacYqj5TDG8ITXP0q9DLsH9njNgc1aOCe5YtdaLKcZIaHUCrb4cVyQLepQ7Iwv5Pj4UZY9q4BecRF6hl2x6wOFPNwHNaZO8cxMiDi/QvkpW/PoqSfcw67/DHmcCpy3b28Pu2/Ews3JeBJBpgrm4kXGxgutdaRnxz+VUo56zPyM8WKXgilLliTOWQ/zjzToiM8My3F1ylL3e1Bu9JANzx3kRoYGXCbS7fMv/hC4FEl0d4h8AIpOFniIe//MEOEDErda3VhgiARQ5A=='))
Snippet 8: A code snippet used to decode and decrypt the config from a Base64 blob extracted from the stack.
After decrypting the config, we get the following output:
[
    'PD94bWwgdmVyc2lvbj0iMS4wIj8+CjxiYXRjaD4KICAgIDxhZGQgaWQ9ImVKanhEMlZva2FDcFRwUE4iPgogICAgICAgIDxhdXRob3I+R2FtYmFsdWUsVmVsIElOQzwvYXV0aG9yPgogICAgICAgIDx0aXRsZT5YTUwgRGV2ZWxvcGVyJ3MgR3VpZGU8L3RpdGxlPgogICAgICAgIDxnZW5yZT5TWVNURU08L2dlbnJlPgogICAgICAgIDxjb3VudD4yMTEwNDI3OTg3MzExMDcwPC9jb3VudD4KICAgICAgICA8cmVsZWFzZXM+MjAwMC0xMC0wMTwvcmVsZWFzZXM+CiAgICAgICAgPGRlc2NyaXB0aW9uPg==',
    'PC9kZXNjcmlwdGlvbj4KICAgIDwvYWRkPgo8L2JhdGNoPgo=',
    '0',
    '1',
    'ds.windowsupdate.eu.org',
    '443',
    'Mozilla/5.0 (Windows NT 6.3; Trident/7.0; rv:11.0) like Gecko',
    'dZuSxhxTjFGSI5hWuuDH',
    'akrKnFLZK9IRaWVRL1LX',
    '/previous-versions/windows,/latest/developerguide/documents-batch-xml.html,/XBLWinClient/v10_video/configuration.xml,/verifyservice/servicechannel.hxs,/AS/API/WindowsCortanaPane/V2/Suggestions,/windows/status/actions,/node/report.xml,/staticsb/statics/latest/fixed/wdgts_conf.xml,/threshold/xls.aspx',
    'Content-Type: application/xhtml+xml',
    ''
]
Snippet 9: An example of the decrypted config.
The decrypted config data (Snippet 9) includes some basic configuration for the Brute Ratel C4 payload, including a C2 server address and port to start communication with, a Base64-encoded template of what a request to the C2 should look like and different paths on the C2 for various functionality and options.
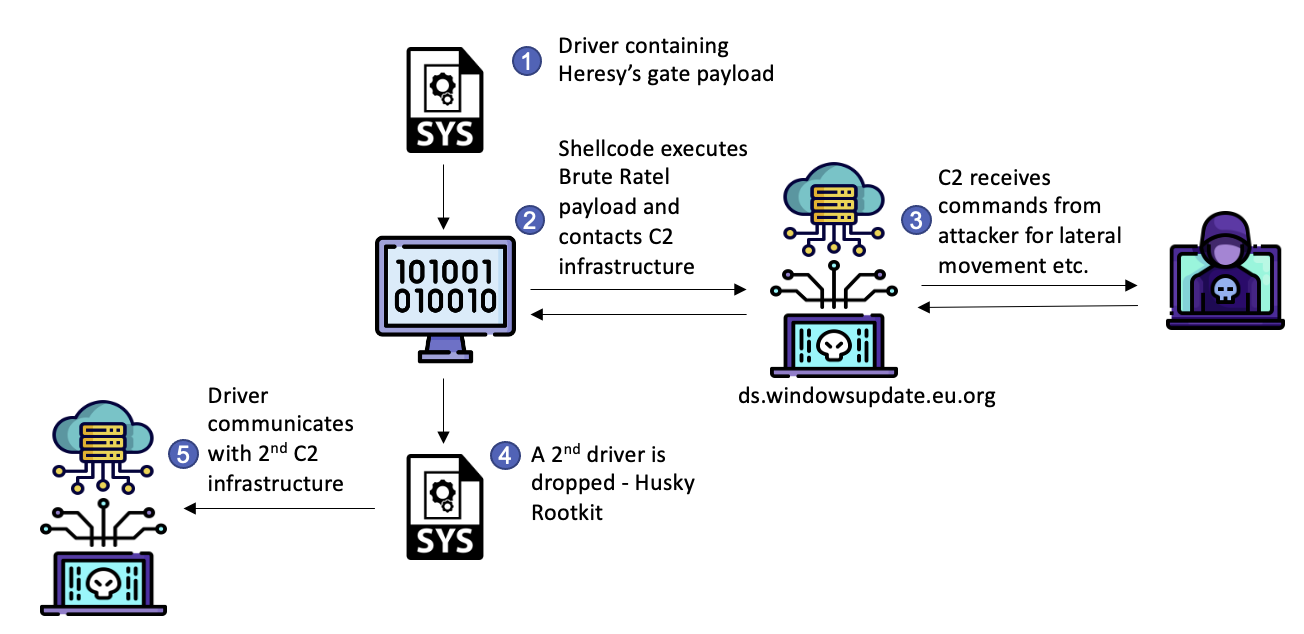
Figure 3: A breakdown of the attack scenario.
We found the x64 rootkit installed along with the Brute Ratel C4 sample on the infected machine to be more interesting, as it was completely ignored by other vendors covering this same sample.
Husky Rootkit
As we mentioned, the x64 rootkit, which we dubbed the “Husky” Rootkit, was dropped along with the Brute Ratel payload.
The kernel driver was packed with VMProtect and signed with a certificate issued to “SHANGMAO CHEN” (Figure 4).
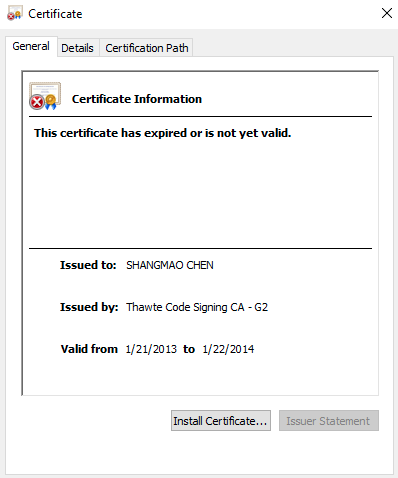
Figure 4: The certificate used by the rootkit.
DriverEntry
Since this DriverEntry (Figure 5) function is packed and obfuscated, it is hard to gather any information from it. It starts with a series of unconditional branch instructions (jmp) and basically leads to the VMProtect unpacking stub.
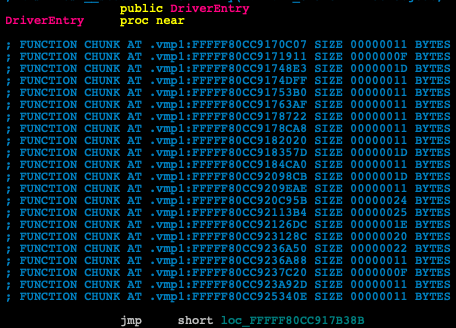
Figure 5: A VMProtected DriverEntry showing an unconditional branch instruction as its first instruction.
But after unpacking it, we found functions like GsDriverEntry that contain much more information, as well as important strings (Figure 6) that we can use in our analysis.
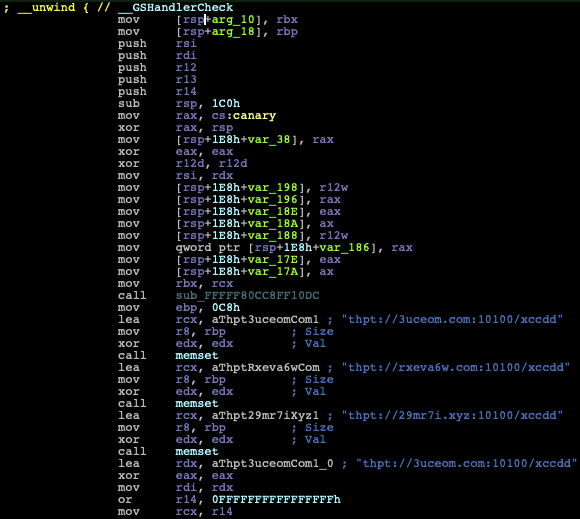
Figure 6: Disassembly of a branch from GsDriverEntry containing strings of URLs with thpt (mixed up version of HTTP) as its URL protocol.
C2 Communication
The rootkit interacts directly to and from \\Device\Tcp in order to communicate. For that reason, connections are hidden from user-mode tools such as netstat and tcpview running on the infected machine.
An alternative is to use Wireshark on the VM host machine to tap into the shared network interface of the guest machine in order to monitor all of the communication traffic of the infected VM (Figures 7 and 8).

Figure 7: Wireshark network capture of the traffic initiated by the rootkit.
The malware communicates with several domains and relative paths for each domain.

Figure 8: Web request and response from the server to the /xccdd path in the URL shows the response payload.
Steganography
The specific HTTP traffic that caught our attention were some images (JPEG – JFIF Header) that were downloaded from the following URL: https://pic.rmb.bdstatic.com//bjh/.jpeg.
The JPEG files (Figure 9) contained pictures of dogs that look quite innocent, so I named the rootkit “Husky” after those images. I must add a disclaimer that this is evidence that I have no idea about dog species since I was later told that none of these images are actually of a husky.

Figure 9: A picture of a dog that looked to me like a husky and contained a piggybacked payload.
Each JPEG also had a steganographic payload in the form of data concatenated to the end of the picture at offset 0x1769 after a separator of multiple 0’s (Figure 10).
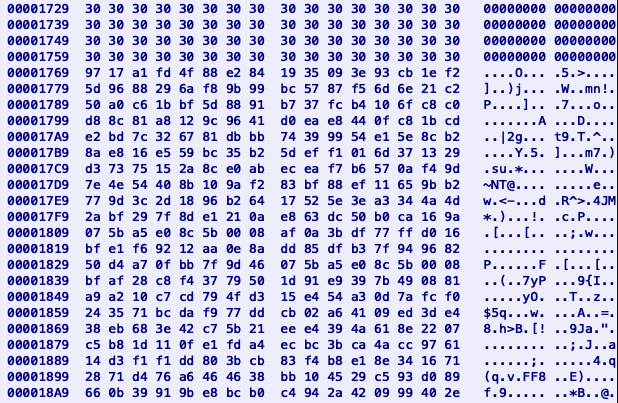
Figure 10: Hexview of the separator between the end of the picture and the beginning of the piggybacked payload in the .jpg with a picture of a dog.
By looking at the data, we can see that the first 32 bytes are the same as the server response from the previous request to hxxp://rxeva6w.com:10100/xccdd in hexlified format (Snippet 10).
“\x97\x17\xa1\xfd\x4f\x88\xe2\x84\x19\x35\x09\x3e\x93\xcb\x1e\xf2\x5d\x96\x88\x29\x6a\xf8\x9b\x99\xbc\x57\x87\xf5\x6d\x6e\x21\xc2”
Snippet 10: First 32 bytes of the payload similar across different payloads.
Ironically, the domain rxeva6w.com has 0/88 detections (Figure 11).

Figure 11: VirusTotal shows 0/88 detection rate on the rveva6w.com domain.
Encryption
The Encryption/Decryption algorithm used by the HTTP payloads is a slightly modified DES algorithm with the key “j_k*a-vb” (Figure 12).
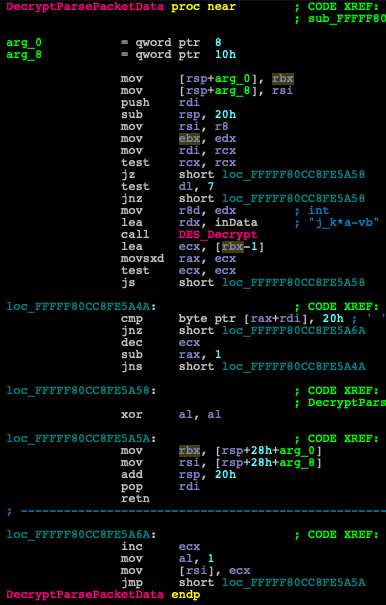
Figure 12: The decryption key is passed to the DES decryption function.
Additional Functionality
Apart from communicating over HTTP and hiding connections, this rootkit is also able to load new modules downloaded from different URLs.
Obviously, this rootkit packs additional functionality that we do not cover in this blog, so we may publish in a follow-up blog post or further update about this in the future as we continue our analysis.
Case Study #2: Mingloa (CopperStealer) Rootkit
Mingloa malware was first discovered and named by ESET in 2019.
It was later covered by Proofpoint in this blogpost and was also dubbed CopperStealer.
It is believed that Mingloa has Chinese origins, hence its name. This is due to a short routine in the user-mode component that checks if the locale is not Simplified Chinese (Figure 13) or else exits.
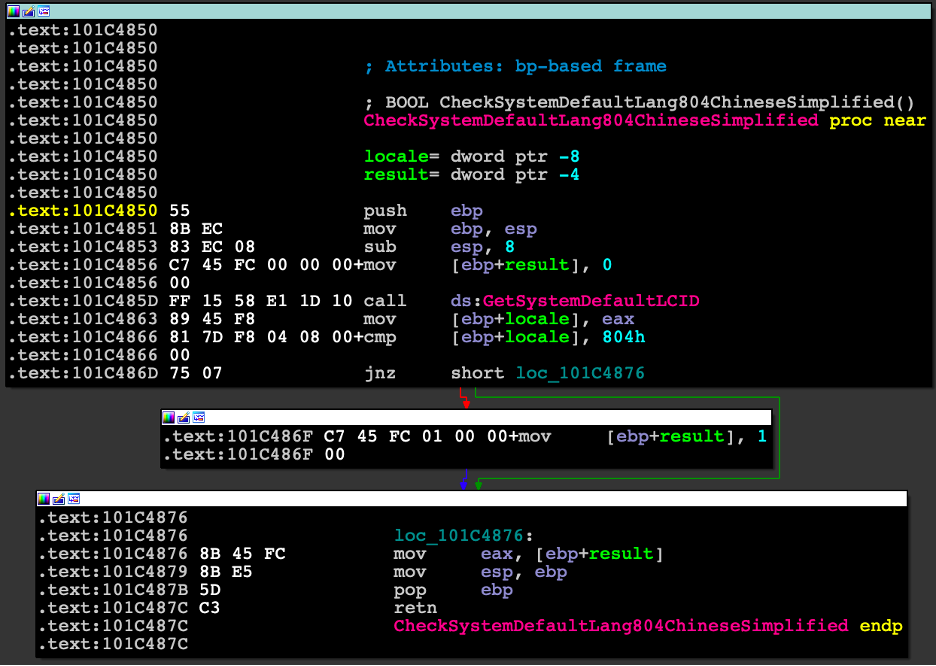
Figure 13: Simplified Chinese locale check.
The original blogpost by Proofpoint states the following: “The analyzed sample also can drop and load a kernel driver. The purpose of this driver is currently unknown.“ Of course, this statement led us to investigate.
As noted in the Proofpoint research, the malware contains the ability to find and steal saved browser passwords. In addition to the saved browser passwords, the malware uses stored cookies to retrieve a User Access Token from Facebook.
This is one of many cases where blanket credential and security token protection techniques like those included in CyberArk Endpoint Privilege Manager can significantly limit the impact of credential stealers such as CopperStealer. If these techniques are used, CopperStealer would fail to scrape the data from the infected machine (for more details on scraping of passwords from browsers, see a previous blog from CyberArk Labs).
Sample Details
MD5 6f38ca637f7978cefe7bf4dfcfeb9ad6
SHA-1 eb301689bb5154b90c0724cba47a3c8574120b42
SHA-256 d4d3127047979a1b9610bc18fd6a4d2f8ac0389b893bcb36506759ce2f20e7e4
Imphash 9192d1abce0f933180e0e907444e8bec
SSDEEP 384:ySAZEVur6CDbw+ynZDvZZvHnQZvZyEPJvHwr:yzZ0utw+yJOQr
File size 21.27 KB (21784 bytes)
Sample Overview
This malicious kernel module was compiled for both x86 and x64 architectures.
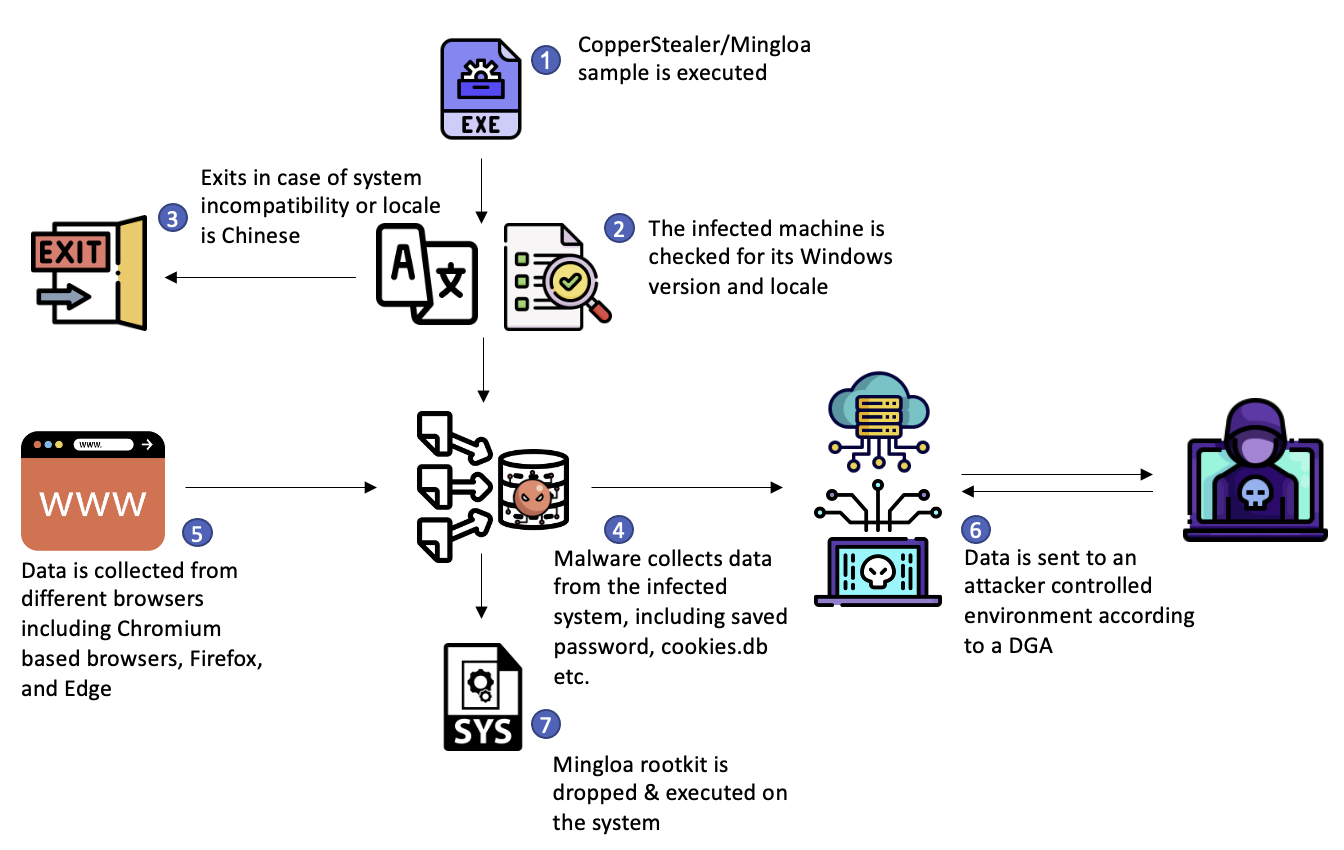
Figure 14: Breakdown of the malware attack scenario.
The driver is signed with a certificate that was issued to 大连纵梦网络科技有限公司 (Figure 15), which translates to “Dalian Longmeng Network Technology Co. Ltd” or “Dalian Morningstar Network Technology.” It is possible this certificate was stolen from an infected machine or leaked by an employee.
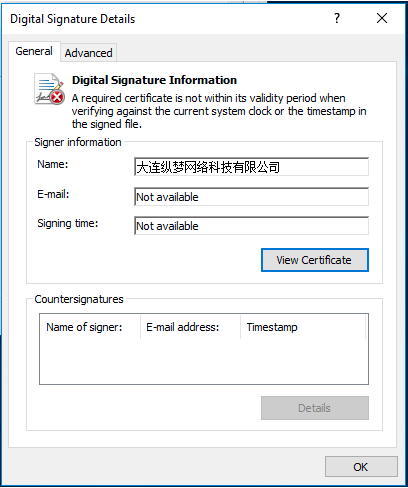
Figure 15: The certificate issued to “Dalian Longmeng Network Technology” used to sign the driver.
The Setup From User-Mode
Let’s first look at the user-mode malware infection routine that is supposed to deploy the driver (Figure 16).
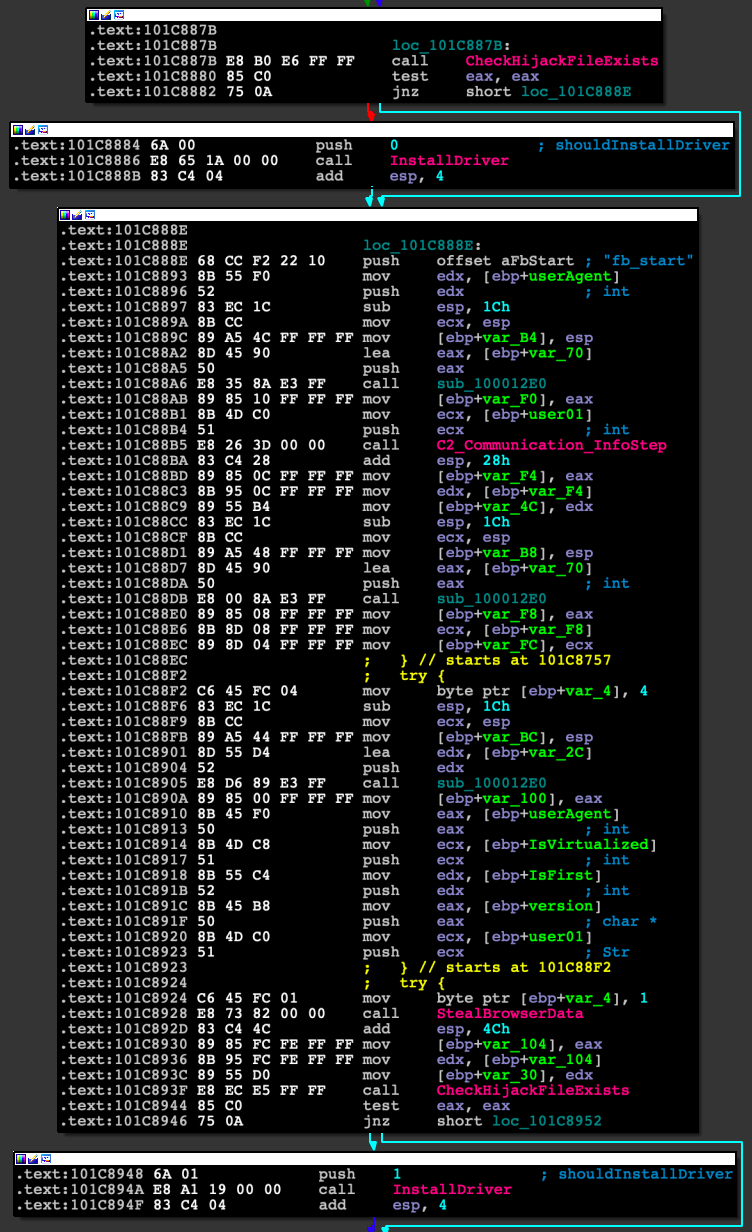
Figure 16: Disassembly of the user-mode component execution-flow to install the driver.
Looking at this snippet, we can see that the InstallDriver function receives a single argument and is first called with the argument value of 0. The second time, it is called with an argument value of 1.
If we look closely at InstallDriver, we see that it first tries to create a semaphore (Figures 17 and 18), then checks the Windows version. If any of these calls fail, it will exit without doing anything.
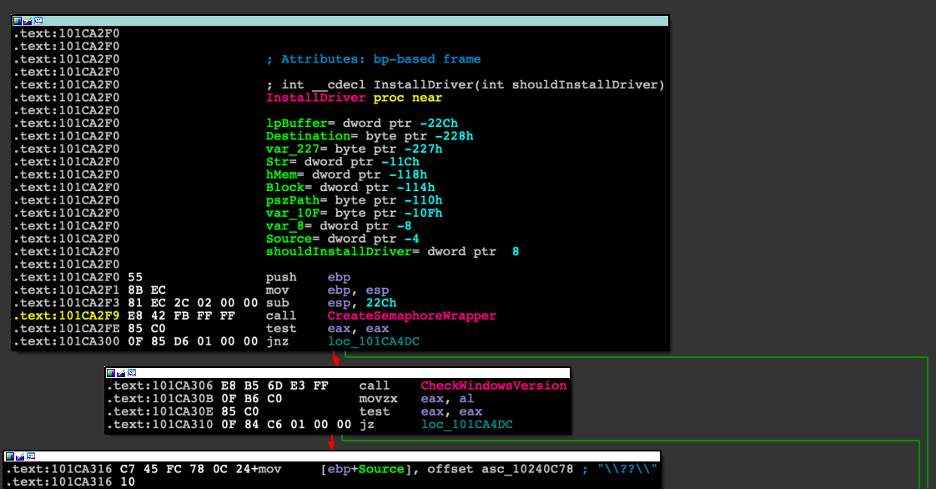
Figure 17: Disassembly of the beginning of the InstallDriver function in the binary, where it calls the CreateSemaphoreWrapper.
If the previous checks succeed, then the malware will proceed, stopping and deleting any services with the same name and finally comparing the shouldInstallDriver argument to 0.
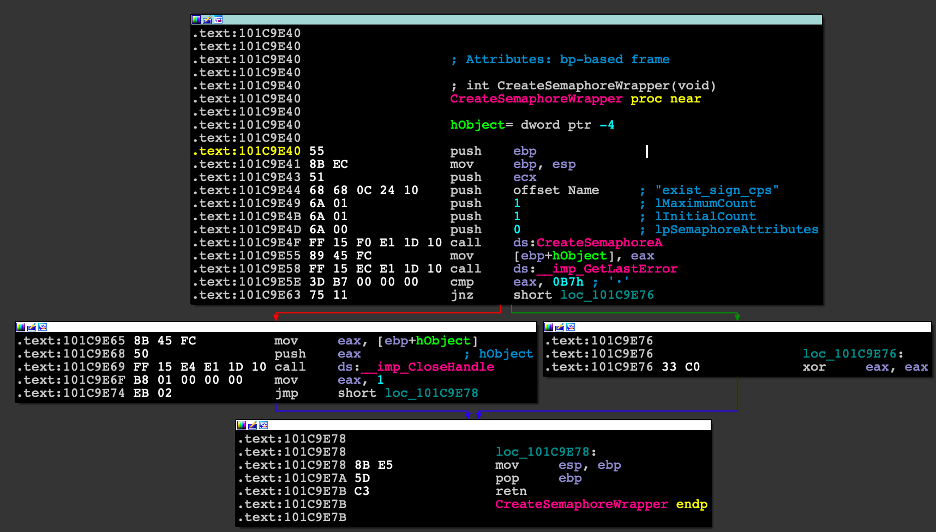
Figure 18: Disassembly of the CreateSemphoreWrapper function.
If the value of shouldInstallDriver is equal to 0, the function will return without any more instructions executed. Otherwise, it will proceed with installing the appropriate driver (Figure 19) embedded into the binary, according to the system architecture.
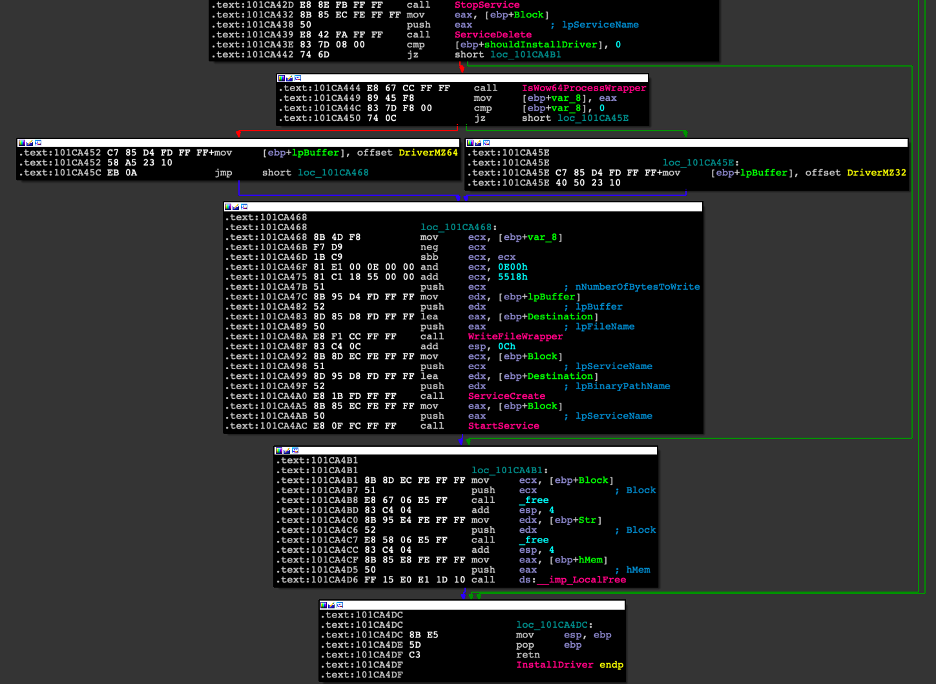
Figure 19: Disassembly of the InstallDriver function describing the flow of installing a driver on the system.
This part of the code also contains a logic bug that prevents this driver from ever being loaded.
The first call to InstallDriver, which is supposed to only delete any existing driver, would also create a semaphore.
The second call, which is supposed to also install the driver, would exit prematurely before ever installing the driver since the semaphore already exists.
This logic bug is somewhat of a mystery since malware is usually tested for these types of errors. In this case, it was either deployed in haste without any testing or was not meant to be deployed yet to any infected machines.
DriverEntry
The kernel-mode component of this malware is a Legacy File-System Filter Driver, which, unlike the more modern mini-filter driver, can modify system behavior without the use of callback filtering functions such as pre-operation callback routine or post-operation callback routine.
Legacy File-System Filter Drivers can modify file-system behavior directly and are called for every I/O operation such as CREATE, READ and WRITE.
By looking at the DriverEntry (Figure 20), we see that two major functions routines are assigned IRP_MJ_READ and IRP_MJ_SET_INFORMATION. Additionally, it registers two callback functions — one by using CmRegisterCallback and the other by using IoRegisterFsRegistrationChange.
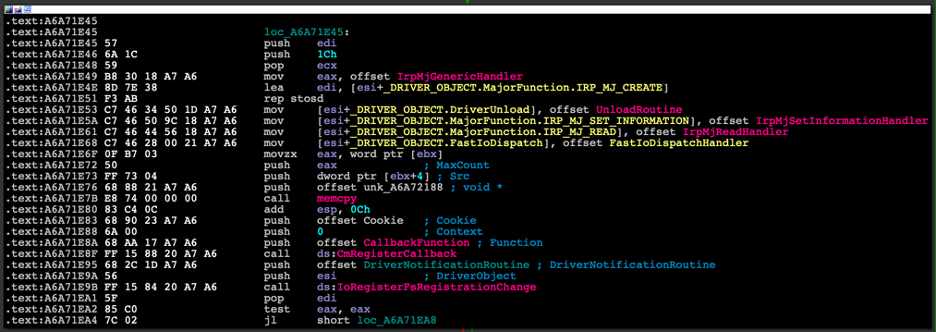
Figure 20: Disassembly of the DriverEntry of the Mingloa rootkit driver.
When IoRegisterFsRegistrationChange is called, a function pointer to DriverNotificationRoutine, whose purpose is to either attach or detach the filter driver depending on whether the file-system is active or not, is passed to it (Figure 21).

Figure 21: Disassembly of the DriverNotificationRoutine function.
The malware authors have created the driver for the following functionality that is based on the filter driver:
- Self-defense: Protection against removal
- Registry Key deletion prevention (Windows Service)
- Reading prevention for a denylist of files (except for an allowlist of processes)
Self-defense: Protection Against Removal
By attaching the driver as a filter driver to the file-system and implementing the IRP_MJ_SET_INFORMATION (Figure 22), the authors can check the filename that is meant to be deleted within the denylist.

Figure 22: Disassembly of the IrpMjSetInformationHandler function.
If the filename is denylisted, the handler will return STATUS_ACCESS_DENIED and will halt the processing of the IRP. Otherwise, it will pass it on to the underlying driver in the device stack (Figure 23).
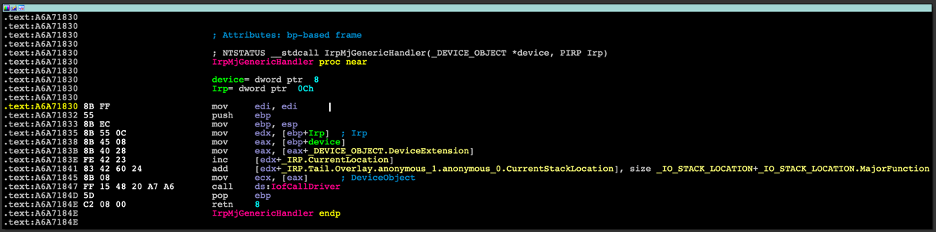
Figure 23: Disassembly of the IrpMjGenericHandler function.
Registry Key Deletion Prevention
The Registry Key Deletion Prevention feature prevents the deletion of the registry keys and values associated with the Windows service for the kernel driver.
The way this feature works is by registering a RegistryCallback routine that is triggered for every registry change and comparing the registry path with the service’s path.
Prevent Reading of Denylisted Files (Except for Allowlisted Processes)
This feature uses the same file-system filter driver mechanism described in the Self-Deletion Prevention for IRP_MJ_READ (Figure 24).
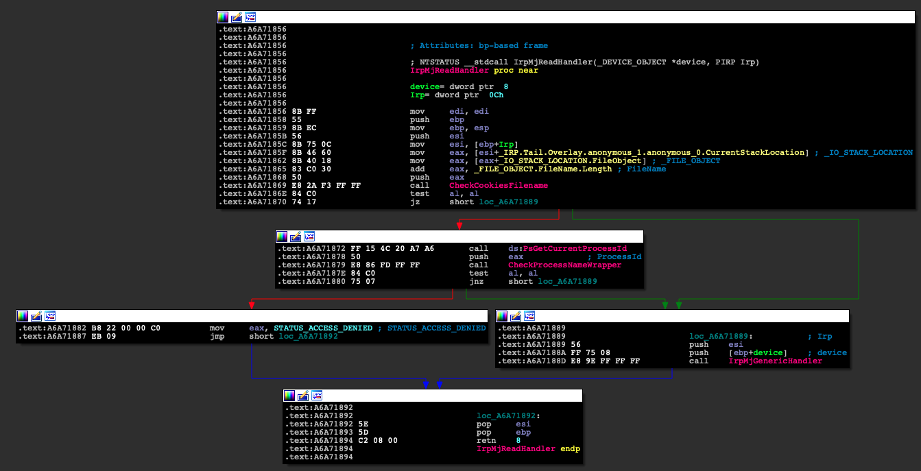
Figure 24: Disassembly of the IrpMjReadHandler function.
Basically, it first checks the name of the file being accessed, then checks whether it contains or ends with one of the following denylisted strings:
- \\cookies.db\x00
- \\cookies.sqlite\x00
- \\Login Data\x00
- \\Cookies\x00
- \\WebCacheV01\x00
If the string is not denylisted, then the filter function will forward the IRP to the underlying driver in the device stack. But if the string is denylisted, it will first check whether the process attempting to access the file is an allowlisted process from the following list:
- \\explorer.exe\x00
- \\firefox.exe\x00
- \\Chrome.exe\x00
- \\opera.exe\x00
- \\Yandex.exe\x00
- \\baidu.exe\x00
- \\MicrosoftEdge.exe\x00
- \\MicrosoftEdgeCP.exe\x00
- \\rundll32.exe\x00
If the process name is allowlisted again, the filter function will forward the IRP to the underlying driver in the device stack. But if it is not, it will block the request by returning STATUS_ACCESS_DENIED, causing the read request to fail (Figure 25).
![]()
Figure 25: An example of an attempt to output the contents of the cookies.db file when the rootkit is loaded.
String Obfuscation
In multiple instances, the rootkit hides important strings such as the filename denylist or the process name allowlist with the following obfuscation. It initializes a string with REGISTRY\MACHINE\SOFTWARE and uses different bitwise arithmetic manipulations (Figure 26) to uncover the multiple strings, such as:
- \\explorer.exe\x00
- \\firefox.exe\x00
- \\Chrome.exe\x00
- \\opera.exe\x00
- \\Yandex.exe\x00
- \\baidu.exe\x00
- \\MicrosoftEdge.exe\x00
- \\MicrosoftEdgeCP.exe\x00
- \\rundll32.exe\x00
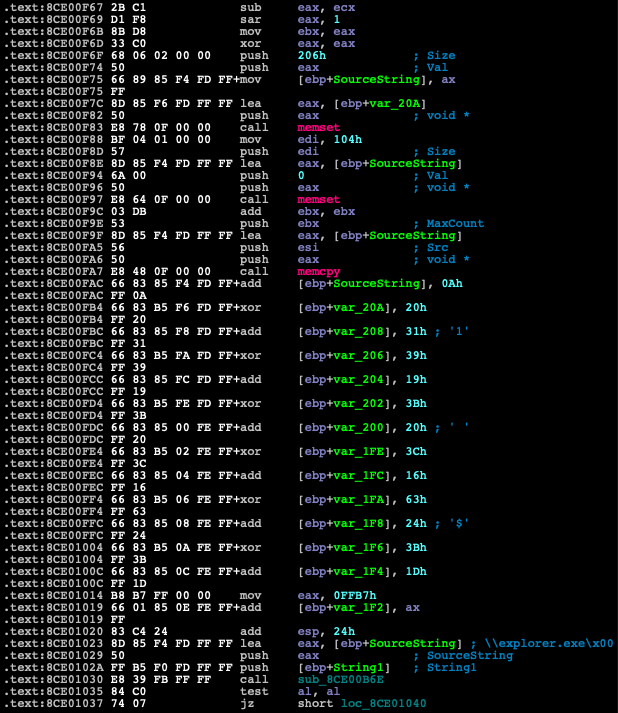
Figure 26: Disassembly view of the string de-obfuscation technique.
Although we would have liked to create a script to uncover these obfuscated strings, unfortunately, the authors made it hard for us to do so by randomizing the bitwise operations and values used for every string.
Hunting For Rootkits
Unlike user-mode malware, which imports mainly from libraries such as kernel32.dll and ntdll.dll, kernel-mode rootkits import their API functions almost exclusively from ntoskrnl.exe, which is the kernel itself. This fact is useful while hunting for rootkits in VirusTotal (VT) since it makes it easy to find drivers with malicious intent.
For instance, we can use the following query (Snippet 11):
not tag:signed and not tag:trusted and tag:peexe and imports:ntoskrnl.exe and positives:13+
Snippet 11: An example of a VirusTotal query to find malicious drivers.
The query will look for PE format files that are not signed or trusted and import them from ntoskrnl.exe.
Another option is to use a Yara rule when looking for a more specific set of files.
We could also employ a unique API usage with an additional binary pattern or strings to find new samples of our malicious driver or rootkit.
Just like when we’ve already analyzed a sample and want to find similar files (older or newer), we could use some properties of the code, such as the tag used in ExAllocatePoolWithTag and .pdb symbols to find related files to our initial binary.
An example of such a rule would be as follows (Snippet 12):
import "pe"

rule CopperStealerDriverx8664
{
    strings:
        $a0 = { 5f 4c 45 5f }
        $a1 = { 5f 45 4c 5f }
        $a2 = "_EL_" ascii wide
        $a3 = "_LE_" ascii wide
        $b = /f:\\sys\\objfre[0-9a-zA-Z_\\]*\\FsFilter(32|64)?.pdb/
    condition:
        uint16(0) == 0x5A4D
        and uint32(uint32(0x3C)) == 0x00004550
        and (
                pe.machine == pe.MACHINE_AMD64
                or pe.machine == pe.MACHINE_I386
            )
        and $b
        and pe.imports("ntoskrnl.exe", "ExAllocatePoolWithTag")
        and any of ($a*)
}
Snippet 12: An example for a Yara rule to hunt for malicious drivers (a.k.a. rootkits).
Conclusion: “Rootkits Are Not a Thing of the Past”
As we have seen in the case studies in this blog, rootkits are still active and targeting modern versions of Windows, including Windows 10 and 11 in both x86 and x64 architectures.
We have seen that rootkits have evolved from Hooking and DKOM-based techniques, which we covered in the last blog, to other techniques like file-system filter drivers and signed drivers by stolen certificates to avoid triggering PatchGuard and “bypass” DSE mitigations, as well as EDR (endpoint detection and remediation) solutions.
Products such as CyberArk Endpoint Privilege Manager can prevent such threats from succeeding by using least privilege controls or by just removing the administrator account from the system and thus preventing new drivers from being installed, as no unprivileged user on the system has the permissions to install a driver.
Resources
https://codemachine.com/articles/kernel_structures.html
https://docs.microsoft.com/en-us/windows-hardware/drivers/ifs/registering-fast-i-o-dispatch-routines
https://github.com/apriorit/file-system-filter


