
TL;DR
Whether working at home or in the office, when conducting cybersecurity research, investigating the dark web forums or engaging with any dangerous part of the internet, staying safe is critical. While most researchers use a virtual machine to mitigate risks to the host PC, there is an overlooked and unprotected attack surface: the network. This post will illuminate potential risks and introduce a new solution to keep your network safer without hindering your workflow.
Please keep in mind that our solution, SafeNet, is intended to add another layer of protection to your existing security s tack and is not a replacement for other forms of risk mitigation. Additionally, SafeNet should be set up as described in this post and the accompanying GitHub repository. Tinker with the configuration carefully, as it can render the solution ineffective or worse, pose a danger to your network.
Introduction
SafeNet is our proposition to change a widely adopted approach requiring virtual machines used for research to be disconnected from the internet. We all do this for a good reason. By default, no virtualization software provides us with the ability to protect the local network and connect to the internet at the same time. The next best thing is the practice of turning on and off the internet connection as required.
This lack of a stable internet connection is a huge time waster at the very best. Sometimes it’s impossible to work with tools like IDA Pro require consistent connection to their license server to work normally; they will simply close in the middle of researching a file if they lose connection.
SafeNet’s design was partially inspired and guided by the concepts used in creating nation-level encryption appliances, which I had a chance to learn at the start of my career. And while SafeNet is not flawless and still has room for improvement, it is more than capable of seamlessly enhancing the protection of the local network while granting internet access to our virtual machines.
We do this through a combination of a specific network architecture and a virtual router that runs a firewall to protect the local network. A Virtual Private Network (VPN) tunnel for all outbound communication provides a further layer of protection to the network and us as researchers.
We will not use any solution daily if it is hard to use or maintain, however, SafeNet is simple to operate, only requiring a quick visit once in a while to the web management interface and updating the router if there is a new version!
Who Is This For?
SafeNet was designed for professionals who are looking for a safer way to conduct research in the cybersecurity domain and reduce local network risk from any actions they take inside their virtual machines.
Dangers of Local Network Access
We would love to bring you back to May 12, 2017, a day that had one of the most significant ransomware events in recent history: WannaCry. WannaCry used the then-new EternalBlue exploit to spread itself. In just four days, it is estimated that WannaCry racked up an unfathomable 300,000 infected computers across 150 countries.
Its reach was so immense because it was an easy-to-exploit vulnerability. This exploit leveraged a vulnerability in Microsoft’s implementation of the SMBv1 protocol. It only required network access to the target machine to infect it. At the time, SMBv1 was enabled by default on all modern Windows operating systems, making every Windows version vulnerable at the same time.
Now imagine yourself analyzing ransomware with similar capabilities, one that uses a zero day to spread itself over the local network. You would not want it to be able to access your local network, right?
Setting Up SafeNet
SafeNet is a whole network architecture with a custom-configured router at its heart. We wanted the solution to be available to everyone, no matter the hardware or software you are running. As such, we landed on the following set of criteria:
- Minimal hardware requirements: 1 GB RAM, 1 CPU core and 10 GB hard drive space
- Router operating system that is free, open sourced, maintained by — and benefits from — a large community with community support and transparency
- Virtualization software agnostic, making the solution accessible to all
- Host OS agnostic
- As easy to configure as possible
Architecture of SafeNet
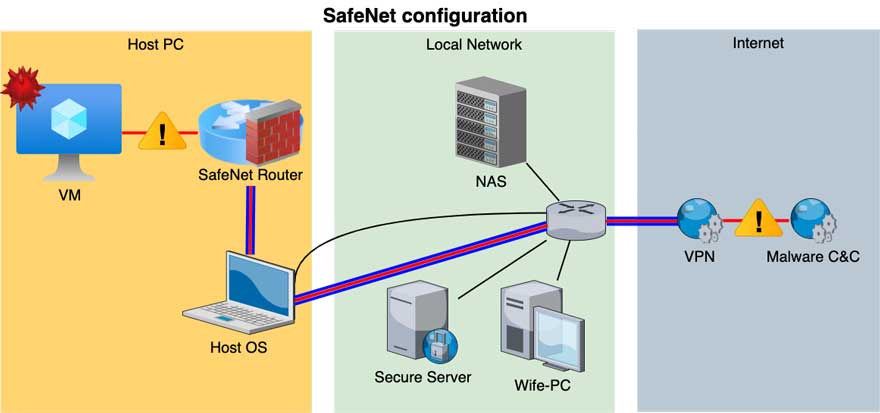
Figure 1: SafeNet architecture – NAT mode illustration
As illustrated in Figure 1, SafeNet is comprised of a router with two interfaces:
- LAN interface connected to the “dirty” network with all the virtual machines
- WAN interface connected to the internet, either through NAT or bridged network mode
The router has two major roles. The first is to block all unwanted malicious network traffic from reaching the local network by utilizing strict firewall rules. Additionally, using a firewall allows you to whitelist certain IP addresses and enables your machines to access servers in the network, such as an IDA Pro License server or a local file sharing service.
The second role is to route all malicious traffic through a VPN tunnel (illustrated by the red line encased in blue), allowing the virtual machines to connect to the internet so as not to endanger local network resources.
We suggest you speak with your IT department prior to setting up SafeNet, as this will allow them to adjust their setup accordingly, provide a better security perimeter and maybe help you with the setup. We suggest discussing the mode to connect the WAN side, as there are differences between NAT and Bridged. For additional information, refer to the Additional Resources section.
Choosing the Right Sense
After scouring the internet for different solutions available for router operating systems, we landed on two options:
We opted to use pfSense because we are more familiar with its interface and feature set, but we highly suggest you do your due diligence and select the appropriate operating system for your needs. We require the ability to run a firewall and an OpenVPN client.
Because both OPNSense and pfSense are similar, you can follow the setup tutorial on both but realize you may need to make alterations.
Installing the Router
It’s time to set up the router, the virtual network and connect it to our research machines. After doing so, we will configure the router to make it act as described above (figure 1).
To speed up the configuration times, we’ve exported a configuration template for you to use. We’ll share more on that after the router setup.
Requirements:
- Favorite router OS ISO image
- A VPN server or a VPN provider subscription
- 1 GB RAM and ~10 GB of available hard drive space
- VMware, VirtualBox, Parallels or any other virtualization software that supports virtual networks
- A VM inside our SafeNet virtual network
- ~30 minutes of free time
Setting Up a Virtual Network
It is best to create the virtual network before setting up the router, as this is a prerequisite for the rest of the system. As mentioned previously, this network will serve as the “dirty” network for our research virtual machines to connect to. It contains and segregates all potentially malicious traffic from affecting our local network.
VMware Workstation
In VMware Workstation, there is no option or need to create a virtual network before creating the virtual router. This is due to the 20 pre-created virtual networks we can use; choose one of them that is not reserved for a special role (e.g. not VMnet1 or VMnet8).
VMware Fusion (macOS only)
Setting up a virtual network here is rather straightforward.
VMware Fusion → Preferences → Network → Unlock to change → Add a new network by pressing the plus sign on the lower left → Uncheck all options (DHCP, Connect Mac to this network).
VirtualBox
There is no need to create a custom network. There is an option for “Internal Network” out of the box. Make sure you don’t connect any clean machines to it because they will be at risk from the dirty VM.
Parallels
Parallels Desktop → Preferences → Network → Unlock to change → Add a new network by pressing the plus sign on the lower left → Uncheck “Connect Mac to this network” and “Enable IPv4 DHCP.”
Virtual Router Setup
Start by downloading your preferred router OS. We will use pfSense, although OPNSense works just as well.
Go through the usual stages of setting up a VM through your virtualization solution and give the machine the following resources:
- 1 GB ram
- 10 GB hard drive space
- 2 network adapters (the order is important)
- The first is for the outbound network traffic, so connect it as a NAT interface.
- The second one is for communicating with the virtual machines in the network. Connect it
to the virtual network you have already set up.
- 1 CPU core
Once the machine has started, proceed with the installation process of the router OS. Feel free to skip this step if you are comfortable installing it on your own. It’s not difficult, and we are using default settings throughout.
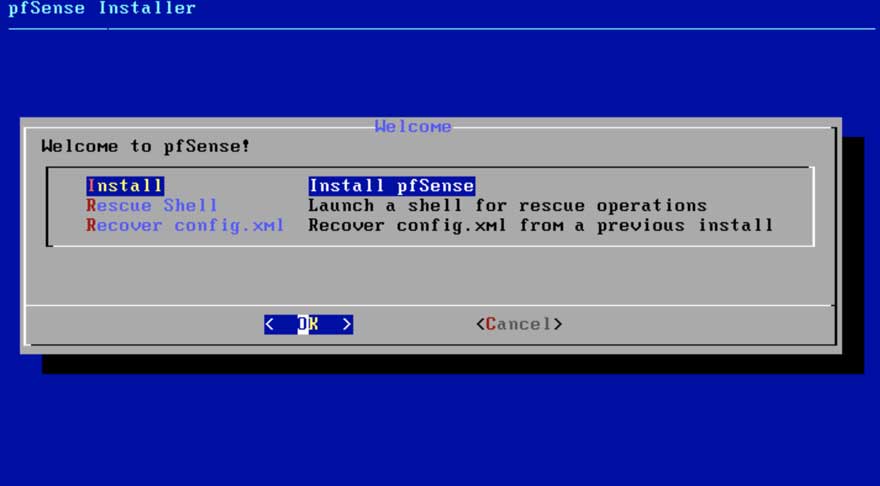
Figure 2: Setup Step 1
Figure 2 is what you will be greeted by when you boot up pfSense’s install media for the first time. We will use default settings throughout most of the installation. At this point, you need to choose the appropriate keymap.
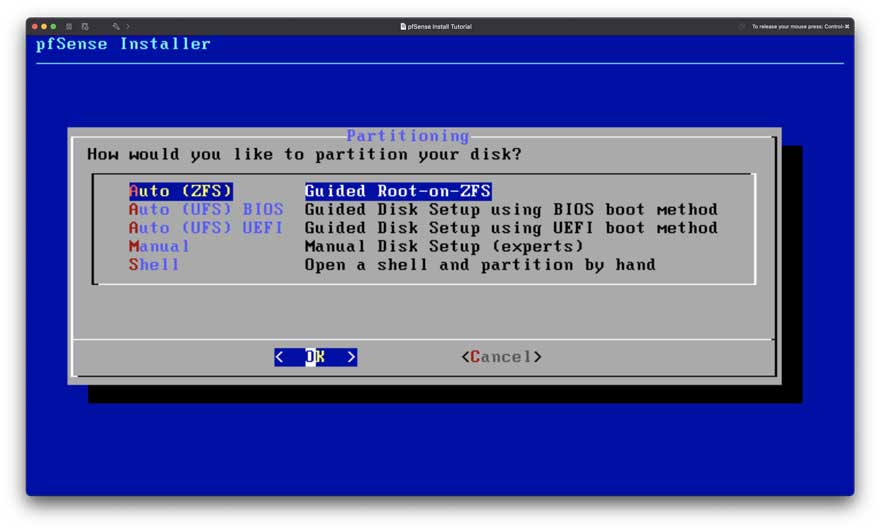
Figure 3: Setup Step 2
As for disk file system and partitioning (Figure 3), we can revert a snapshot if needed because it is a very small disk and a virtual machine. Use the “Auto” option.
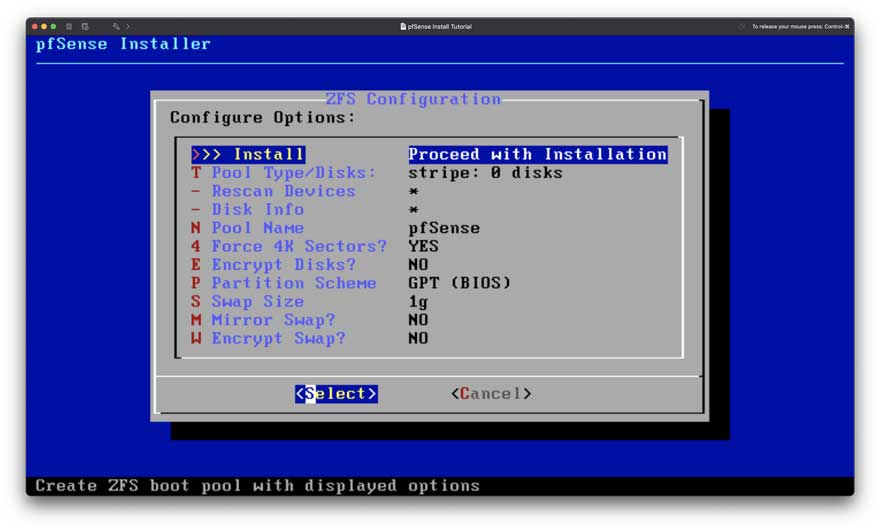
Figure 4: Setup Step 3
Don’t change anything in Figure 4. Default settings are more than good enough; the pool name will not affect the router name.
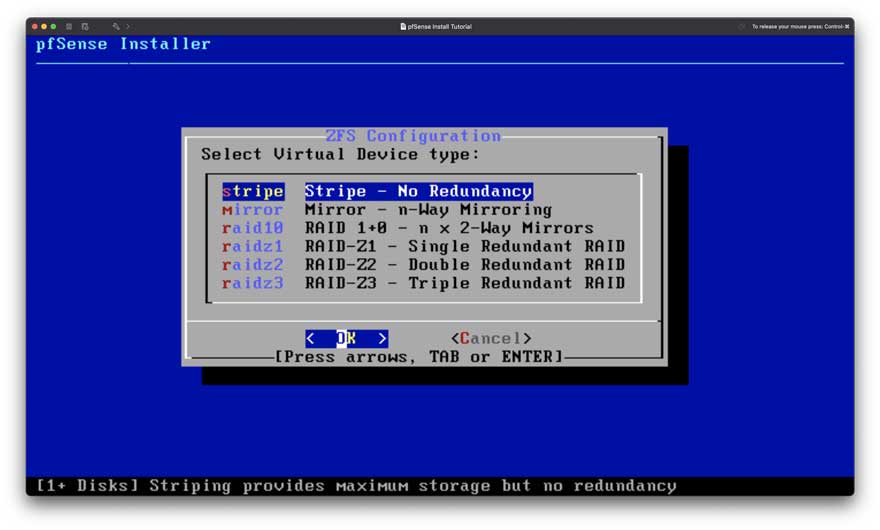
Figure 5: Setup Step 4
As mentioned earlier, there is no need to bloat our hard disk, so choose “stripe” (Figure 5), which requires the least amount of space.
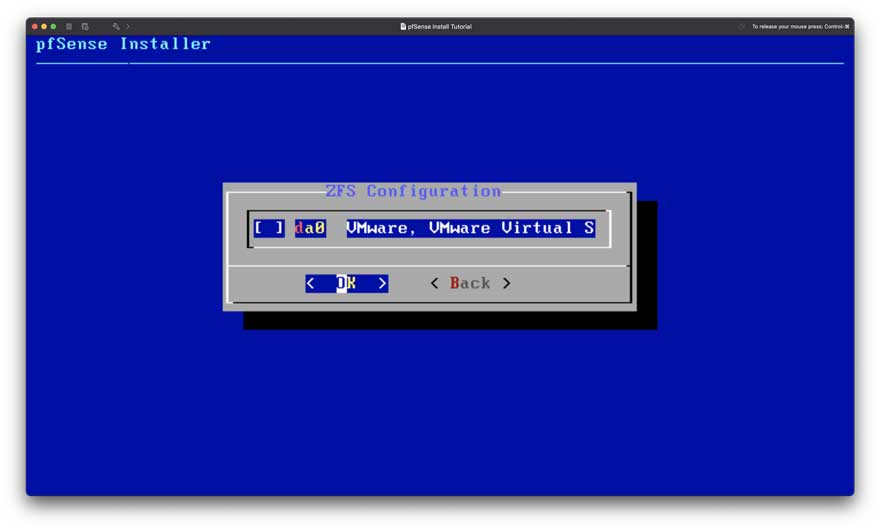
Figure 6: Setup Step 5
Select your hard drive by pressing “Space” and continue by pressing “Enter” as seen in Figure 6.
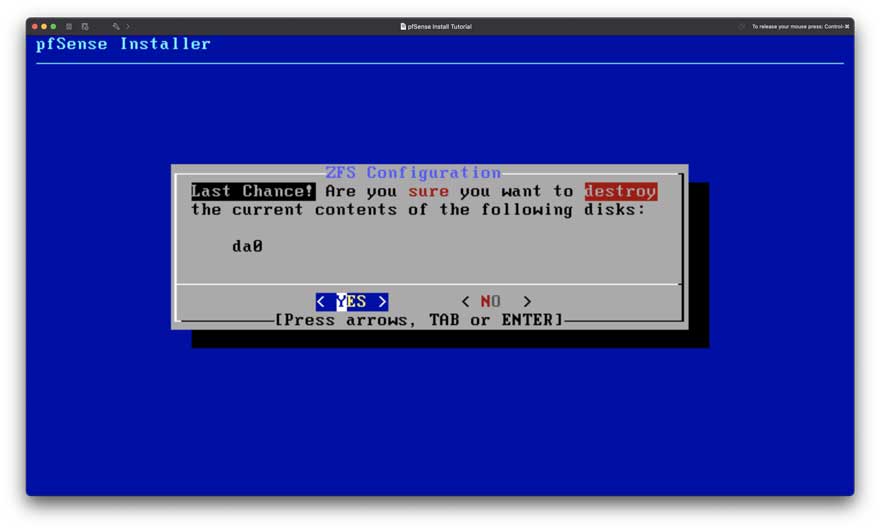
Figure 7: Setup Step 6
Confirm. We are just setting up the initial install, and there is no important data on our disk (Figure 7).
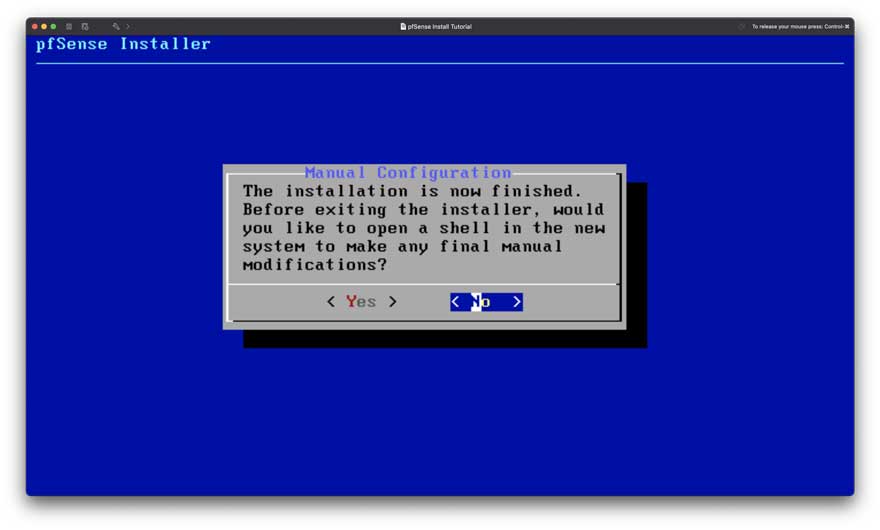
Figure 8: Setup Step 7
Figure 8 is after the installation finishes. You will see an option to do final manual modifications. Select “No” and then “reboot.”
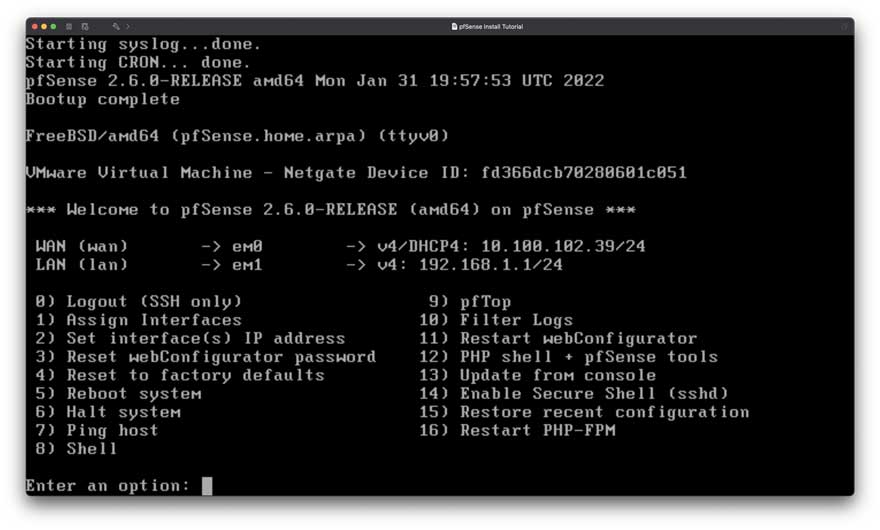
Figure 9: pfSense CLI interface
After the reboot, you should see the image on Figure 9. This means you installed everything properly and are well underway toward setting up your very own SafeNet router!
Lastly, you will need to login into the web management and finish the setup. To do so, we recommend temporarily disabling the firewall so that you can access the router from your host PC.
To disable the firewall, choose the Shell option in the router and run the following command:
pfctl -d
In your preferred browser, navigate to the WAN interface address with https, and the pfSense web management login screen should appear:
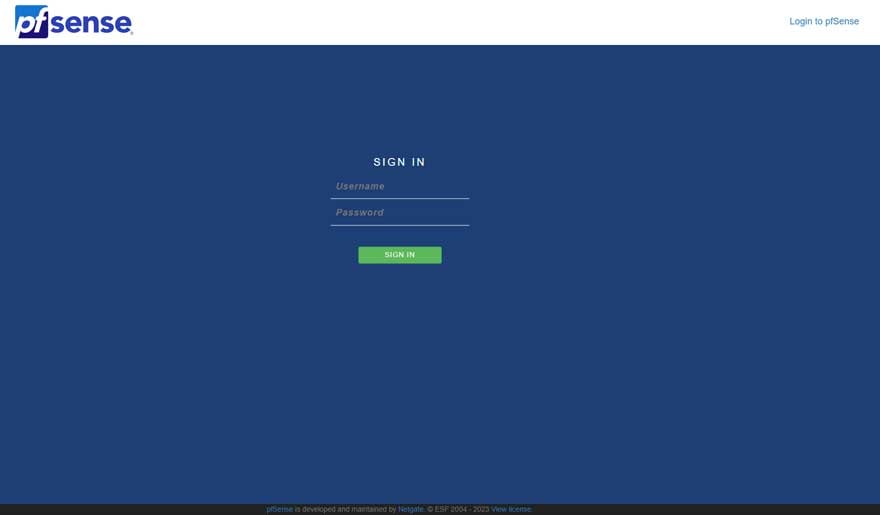
Figure 10: pfSense web management interface
The default login details are:
- Username: admin
- Password: pfsense
Once you are in, follow the pfSense setup steps. Don’t worry about messing something up, as you can always redo the setup by selecting the system dropdown and choosing the “Setup Wizard” option.
Keep in mind the following:
- Change the default admin password.
- Check for updates.
- Ensure that the DHCP range does not collide with the existing one of either your local home network or your workplace network.
If you cannot reconnect to the web interface after you finish the setup, you might need to run the firewall disable command again.
Configuring the Router
After installing the router OS of your liking, it is time to configure it to behave in a manner that suits our design:
- Only configure from a clean network.
- In contrast to the standard design of routers, we want our management interface to be
accessible from the WAN network; in our case, it is the clean(er) side.
- In contrast to the standard design of routers, we want our management interface to be
- Route all outbound networks through a VPN.
- Block all outbound networks from accessing the local network and its resources.
For your convenience, we’ve exported a base template for you to use that has all but the VPN tunnel setup. You can find it in the next section, or you can set the router from scratch by following our instructions starting from “Enabling Management from the WAN Interface” below.
Fast and Easy Configuration
We have created the configuration described, and we would love to share a set of config files that contains all the needed changes on our GitHub: https://github.com/cyberark/SafeNet.
You can load the config file from the settings menu on pfSense at General → Import Config. To gain access to the pfSense management site, you must run the firewall disable packet filtering command:
pfctl -d
After loading the configuration, you can skip to inputting your VPN login information. Then you are pretty much done.
Enabling Management From the WAN Interface
To allow management from the WAN interface, we must create a new firewall rule through the management system. In the top bar, navigate to Firewall → Rules and on the WAN side with the following parameters:
Action: Pass
Interface: WAN
Address Family: IPv4
Protocol: TCP
Source: Your IP Address OR Your local network IP range OR Any (not recommended!)
Destination: This firewall (self)
Port: HTTPS (443)
Disabling Management From the LAN Interface
Because our LAN network is considered dirty, we need to harden our router and block access to it from the LAN interface while not hindering communication. We can do this by adding two new firewall rules to the LAN interface. Create the following rule to block all access to the router from the LAN interface:
Action: Block
Interface: LAN
Address Family: IPv4 + IPv6
Protocol: Any
Source: Any
Destination: This firewall (self)
Description: Block all access to router from LAN network
After creating the two management related rules, ensure that they are at the top of the list by clicking and dragging them to the LAN interface. Delete the two rules that start with “Default allow LAN”. It should look something like this (Figure 11):
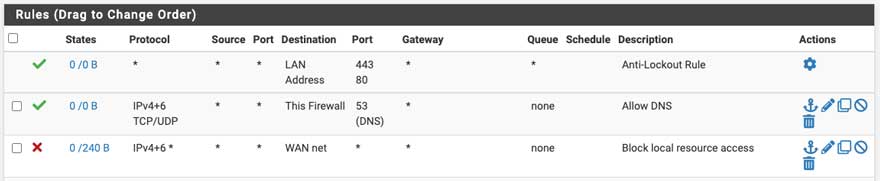
Figure 11: pfSense block all router access from LAN to router
You might notice that we don’t have a rule blocking access from the LAN to the WAN, meaning our local network is still accessible from inside the virtual machine. Now is the time to add it:
Action: Block
Interface: LAN
Address Family: IPv4 + IPv6
Protocol: TCP / UDP
Source: Any
Destination: NOT LAN address
Port: Any
Description: Block access to local network
Lastly, disable the anti-lockout rule that enables access to the router by going to System → Advanced → Check the box on “Disable webConfigurator anti-lockout rules.”
Go back to the LAN firewall rules, which should resemble the following (Figure 12):

Figure 12: pfSense final rules before VPN tunnel
Setting Up VPN Tunnel
At this point, your dirty network is cut off from the world, and you should have access to the management interface from your host PC browser. Now it is time to set up a secure VPN tunnel to the internet.
Due to the popularity of the pfSense, most VPN providers maintain a tutorial on how to set up a VPN tunnel with their service. You can find the tutorial for your provider by searching “ pfSense setup.”
If you get lost, here are the general steps of setting up a VPN tunnel. Depending on the VPN vendor, your steps might vary a little bit:
- Add your VPN provider Certificate Authority.
- Add a new OpenVPN client to the server of your liking with your credentials.
- Assign a new interface to the OpenVPN client.
- Change the DNS settings based on your VPN’s instructions.
- Change the Outbound NAT rule to route all traffic from the LAN network to the OpenVPN tunnel.
- Delete the IPv6 LAN rule in the firewall and change the IPv4 rule to forward to your VPN gateway.
After setting up the VPN tunnel, your firewall rules at the LAN interface should look like
Figure 13. Make sure the order is the same because firewall rules activate from top to bottom, and their order matters. At this point, you can add a rule to allow access to specific resources. Be sure you place that rule above all the current rules; in our example, we grant access to 13.37.13.37 :
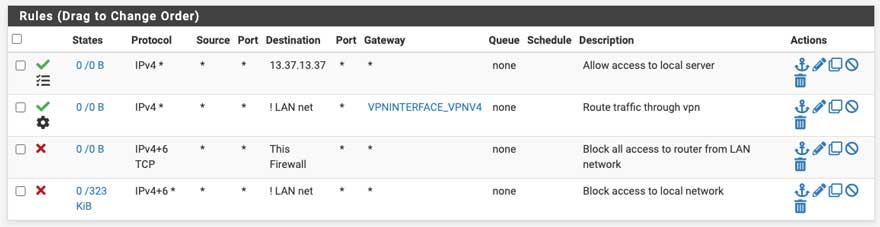
Figure 13: pfSense final rules including giving access to a local resource
We need to make one final change. Ensure that when the VPN tunnel is down we don’t allow any outbound network connections by enabling the following option:
System → Advanced → Miscellaneous → Skip rules when gateway is down
Switching Your VMs to SafeNet
Switching your Lab VMs to the SafeNet is a straightforward process:
- First, ensure that your machine’s network adapter is connected to the dirty virtual network.
- Second, ensure that DHCP is enabled or manually define a static IP address in the range you defined inside the router.
- Third, enjoy researching while not worrying about endangering your local network.
Testing Your Installation
Now that you have finished setting up SafeNet and connected your virtual machine to work with it, it is time to test it. Try pinging different addresses from inside our virtual machine to see if we get the expected result:
| Command | Expected | Potential Issues |
|---|---|---|
| ping <YOUR PC IP> | Fail | Firewall configuration, block LAN to WAN rule |
| ping <SafeNet router IP> | Fail | Firewall configuration, access to router from LAN rule |
| ping 1.1.1.1 | Success | VPN tunnel is not working |
| ping google.com | Success | VPN tunnel is not working or SafeNet Router DNS isn’t setup |
Conclusion
Connecting a research VM or lab to the internet is paramount in some research situations. The biggest challenge is how to do so without endangering your network and its resources. That’s why we created SafeNet, because we could not find a solution that allowed us to do protect our network, and it has proven to be invaluable, enabling us to download samples from inside the research machine and run malicious samples without the fear of it propagating through the network. We hope that this tool will be as useful and fruitful for you as it has been for us.
Disclaimer
SafeNet is provided on an “as is” basis, without warranties or guarantees of any kind, expressed or implied. You acknowledge that the use of the software is at your own risk and discretion. The developers and contributors disclaim any responsibility for the functionality, performance or suitability of the software for specific purposes.
You are strongly advised to conduct thorough testing in a controlled environment before deploy-ing the software in production. Potential defects, errors or unexpected behaviors may exist, and users acknowledge the inherent risks associated with its use.
Under no circumstances will the developers or contributors be liable for any direct, indirect, in-cidental, special, exemplary or consequential damages arising from the use of this software.
Additional Resources
VM Networking 101
To better understand the different networking configurations in popular virtualization solutions, we’ve collected a set of valuable resources on the various modes available for each popular
solution:
- VMware – https://docs.vmware.com/en/VMware-Workstation-Pro/17/com.vmware.ws.using.doc/GUID-D9B0A52D-38A2-45D7-A9EB-987ACE77F93C.html
- Parallels – https://kb.parallels.com/4948
- VirtualBox – https://www.virtualbox.org/manual/ch06.html
What a Firewall?
A firewall is a security solution that monitors and controls the incoming and outgoing network traffic based on predetermined security rules. It acts as a barrier between devices and networks, allowing only authorized traffic to pass through to specific endpoints. We use the firewall to keep our local network safe by blocking all outgoing dirty network communication to the local network and instead tunneling the communication through a VPN tunnel.
What Is a VPN Tunnel?
A VPN tunnel is a secure connection between two devices over the internet. In this instance, it is a connection between our router and a VPN server (we use a public VPN provider) implemented via an OpenVPN client that is running on the router. It serves us by:
- Protecting our local network infrastructure through encryption of the malicious network, eliminating its ability to affect any local devices
- Masking our original IP address, helping protect our anonymity during our research.


