

In the previous blog post, we described how the Docker research started and showed how we could gain a full privilege escalation through a vulnerability in Docker Desktop. In this follow-up blog post, we will show the other vulnerable functions we were able to exploit.
TL;DR
We found and reported several privilege escalation vulnerabilities inside Docker Desktop for Windows:
- Arbitrary file delete that can be leveraged to full privilege escalation: CVE-2022-37326, and CVE-2022-38730.
- Arbitrary file overwrite: CVE-2022-31647 and CVE-2022-34292.
We adhered to responsible disclosure guidelines, and Docker handled the notifications quickly and efficiently.
Abusing DaemonJSON through Windows Containers API to Full Privilege Escalation
We continued with our search for vulnerable API methods and found two promising methods: the start and stop functions inside the WindowsContainersController class. We can use these methods to start and stop the dockerd service from a low-privilege user. Inside the start function, we can see that it receives, as an argument, the class object WindowsContainerStartRequest (Figure 1).

Figure 1 : The “start” API route in Docker.Backend.HttpAPI namespace.
This class has three members, and we will focus on the two members that are being used in the Start function:
public class WindowsContainerStartRequest
{
	public Settings Settings { get; set; }
	public string DaemonJSON { get; set; }
	public string UserCertsDirectory { get; set; }
}
The DaemonJSON member holds the value of the path for the daemon.json file (Docker daemon’s configuration file), and the Settings member is a class that contains all the fields (Appendix A) that are inside the daemon JSON file.
Let’s first explain why the Settings member was not relevant to us. After a call to _windowsDockerDaemon.Start (Figure 1), there was a sequence of function calls where the settings argument was passed to three functions: RewriteOptions, GetServiceEnv and TryToStartService (Figure 2).

Figure 2 : Start API function.
But although it was passed as an argument, it was used only in GetServiceEnv method and only for the Proxy fields (Figure 3).
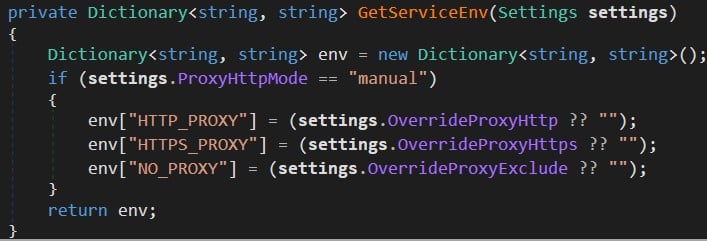
Figure 3 : GetServiceEnv function.
We understood that we couldn’t affect the argument settings to manipulate the service. We continued to the next argument controlled by us and checked the daemonOptions argument, and from the RewriteOptions function, we understood that it was being used as a parameter to the switch –config-file in dockerd (see code snippet below), which meant we controlled the dockerd settings.
public string RewriteOptions(string daemonOptions, Settings settings, string userName, bool useProtectedNamedPipe) {
  ...
  optionsObject = JsonConvert.DeserializeObject(daemonOptions);
  ...
  File.WriteAllText(this._jsonFilePath, optionsObject.ToString());
  return args + " --config-file \"" + this._jsonFilePath + "\"";
}
DaemonJSON Options
Fortunately, the Docker daemon JSON fields are documented in Docker, and you can see a lot of options there (Appendix B). One thing you will notice is that there are two separate versions – one for Linux and one for Windows – which might cause problems when there are fields that are supposed to work only on Linux or Windows.
We added the requested input to each field in the JSON file and checked if they returned an interesting output. We received some weird stuff, such as making the daemon create a new named pipe by changing the host’s field to something like that:
\"hosts\": [ \"npipe:////./pipe/docker_engine_windows5\", \"tcp://127.0.0.1:2376\" ]
From all these plays, we found two cases where custom settings allowed privilege escalation.
Abusing data-root to an Arbitrary File Overwrite
The first field from the JSON file that we are going to look at is data-root. It is a path to a directory containing all the container resources as described in the Docker documentation:
--data-root is the path where persisted data such as images, volumes, and cluster state are stored. The default value is /var/lib/docker. To avoid any conflict with other daemons, set this parameter separately for each daemon.
Usually, the default path for that field in Windows is C:\ProgramData\Docker, which is a protected place that we don’t have control over, but we can change it to anywhere we want.
We set the DaemonJSON variable with a JSON string containing the data-root field with the path C:\dataRoot:
container.DaemonJSON = "{ \"data-root\": \"c:\\\\dataRoot\" }";
After executing the start method, the directory C:\dataRoot was created, but we didn’t have access to the directory. We easily bypassed it by creating the directory before calling the API request, so that the daemon saw that C:\dataRoot already exists and wrote all the directories and files with SYSTEM privileges. Then we gained full access to the newly created directory because it inherited the default permissions the standard user had.
The next step was to search inside the directory for files vulnerable to symlink attacks. We found one named C:\dataRoot\network\files\local-kv.db. When we deleted the directory C:\dataRoot\network\files, followed by stopping and starting the dockerd service through the API (no privileges required), the daemon created the directory and then the file.
This is a classic case of using a TOCTOU attack by exploiting this race condition. We can make the daemon create the directory and, before it creates the file, change the directory to a junction directory, then create an object manager symlink pointing to any place we want (Figure 4).
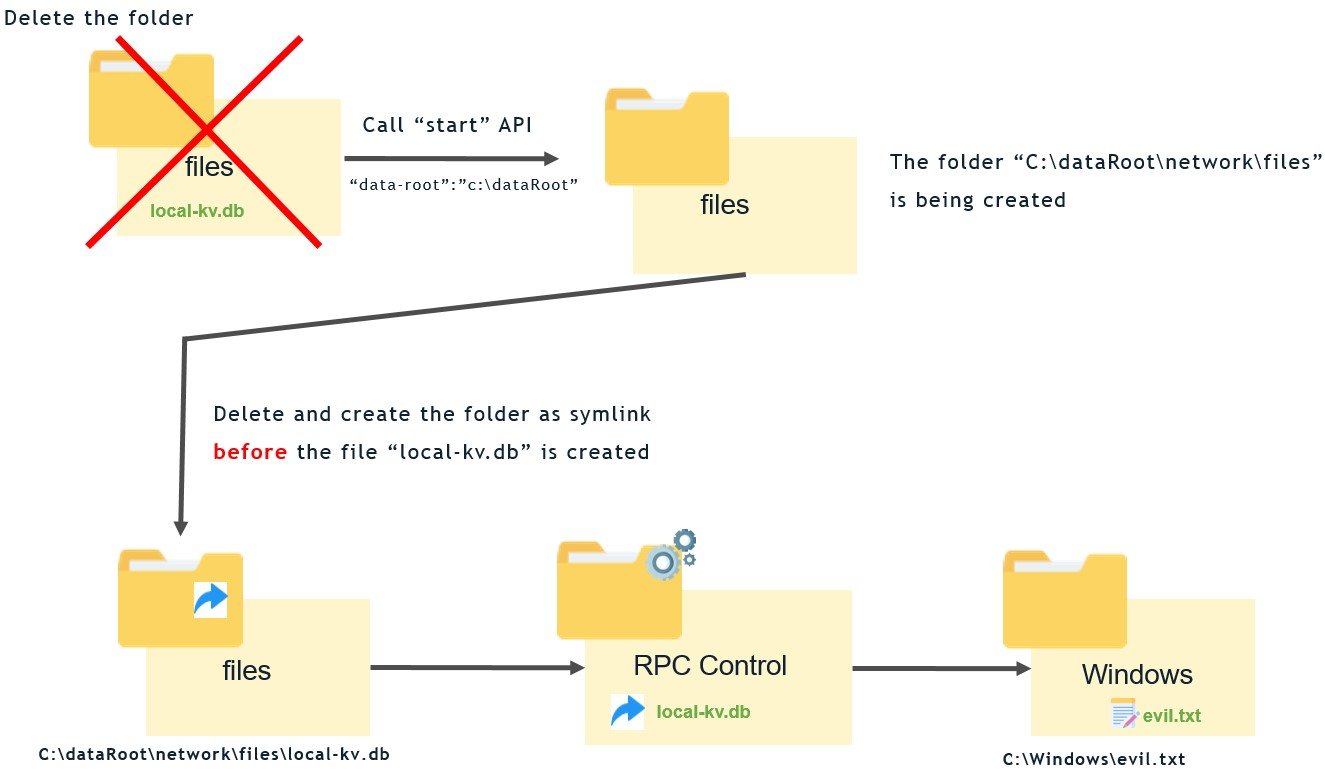
Figure 4 : Exploitation process of overwriting files.
After running the exploit, it took several attempts before we succeeded in changing the directory to a junction directory so we could write the file anywhere (without controlling the content), including protected paths, which can easily cause a denial of service (DoS) if one is creative enough.
This issue was fixed in version 4.7.0 and assigned with CVE-2022-38730.
Abusing pidfile to Arbitrary Delete and Overwrite File
The second vulnerable field is the pidfile field, which holds a file path that stores the Docker daemon’s process ID as described in the Docker documentation:
-p, --pidfile=/var/run/docker.pid is the path where the process ID of the daemon is stored. Specify the path for your pid file here.
We set the DaemonJSON object with a JSON string containing the pidfile field with a privileged location:
{ \"pidfile\" : \"c:\\\\windows\\\\evil.txt\"}
After executing the start method, it created the target file, and if we stopped the service with the stop method, it would delete it (Figure 5).

Figure 5 : Procmon logs of dockerd creating and deleting a file.
In such a way, we can delete any file we want:
From Arbitrary File Deletion to Full LPE
Deleting arbitrary files is nice, but could we leverage it to full privilege escalation? The Zero Day Initiative published an article about a technique to leverage arbitrary file delete vulnerabilities to full privilege escalation. In short, the technique exploits Windows Installer service behavior when rolling back an installation.
To do it, we needed write access to the directory C:\Config.msi, a special protected directory that low-privileged users can’t modify. But the Zero Day Initiative authors showed that if the vulnerable process calls to DeleteFileA/DeleteFileW and the directory is empty, you could delete the directory by adding the path with the following index data: C:\Config.Msi::$INDEX_ALLOCATION (check here for more details about this attribute).
In our case, dockerd used DeleteFileW to delete the file based on the pidfile field (Figure 6).
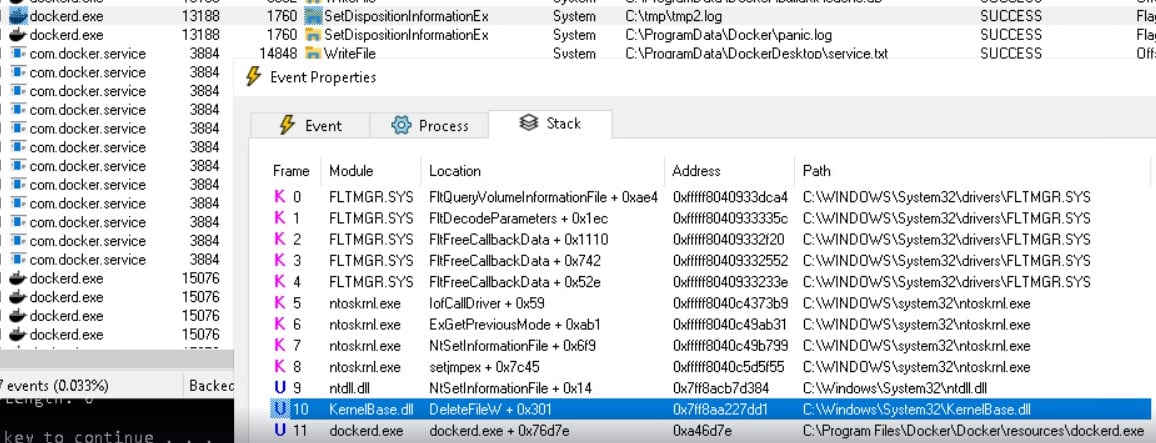
Figure 6 : Dockerd using DelteFileW.
But we couldn’t use this path like that since the first thing that happens is that a file is created from the pidfile field. In our case, it would create a file named C:\Config.Msi::$INDEX_ALLOCATION. That would cause a collision because the C:\Config.Msi directory already existed from old MSI installations (Figure 7).

Figure 7 : Procmon logs of collision when trying to create a file.
We bypassed this by passing a random file location like C:\tmp\sym\tmp.txt.
After the file was created, we deleted the file and converted the file’s directory (c:\tmp\sym) to a junction directory with an object manager symlink pointing to C:\Config.Msi::$INDEX_ALLOCATION (Figure 8).

Figure 8 : Using CreateSymlink to create symlink.
When we stopped the service, it tried to delete the directory but failed because the directory was not empty (Figure 9).
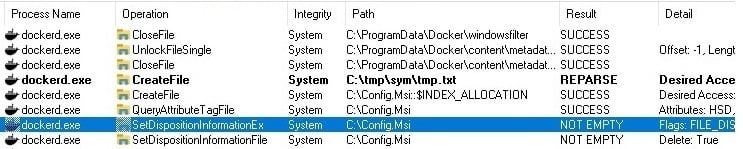
Figure 9 : Failing to delete C:\Config.msi.
An empty directory is one of the prerequisites that was mentioned in the article:
“Note that the only required exploit primitive here is the ability to delete an empty folder.”
By looking at the files inside the C:\Config.Msi directory, we saw that they were randomly generated with a name with numbers and letters. We thought about guessing the names through brute-forcing and trying to delete them, but that involved starting and stopping the service multiple times, which would be time consuming.
C:\WINDOWS\system32>dir c:\Config.Msi
 Volume in drive C is OS
 Volume Serial Number is 8CDA-914A

 Directory of c:\Config.Msi

31/07/2015  09:57        19,722,432 1011996e.rbf
31/07/2015  09:57        82,045,120 1011996f.rbf
31/07/2015  09:57         1,802,920 101199c8.rbf
16/09/2019  18:45           458,160 10119aff.rbf
31/07/2015  09:58         6,542,016 34558643.rbf
18/06/2020  08:36         1,021,048 43c89f06.rbf
31/07/2015  09:57            70,312 480e66af.rbf
31/07/2015  10:01         1,512,152 480e685b.rbf
31/07/2015  10:00         8,901,800 480e6860.rbf
The next step from our side was to look into the specific OS of Windows 11, and surprisingly, when testing it on a new fresh Windows 11, the C:\Config.msi directory didn’t exist, we created it with our permissions and the exploit worked.
This issue was fixed in version 4.7.0 and assigned with CVE-2022-37326.
*In the proof of concept, we created an empty restricted C:\Config to show it can delete it, but usually you won’t have this directory in a fresh installation.
Abusing HyperVController for Arbitrary Delete and Overwrite File
There were two more interesting API functions in the HyperVController (“hyperv”):
- hyperv/destroy
- hyperv/create
Abusing Destroy for Arbitrary File Delete
The destroy API function is implemented by the function DestroyAsync, which receives an object named settings as an argument. It then calls GetDiskPath, which returns a file path to diskpath and eventually deletes the file (Figure 10).
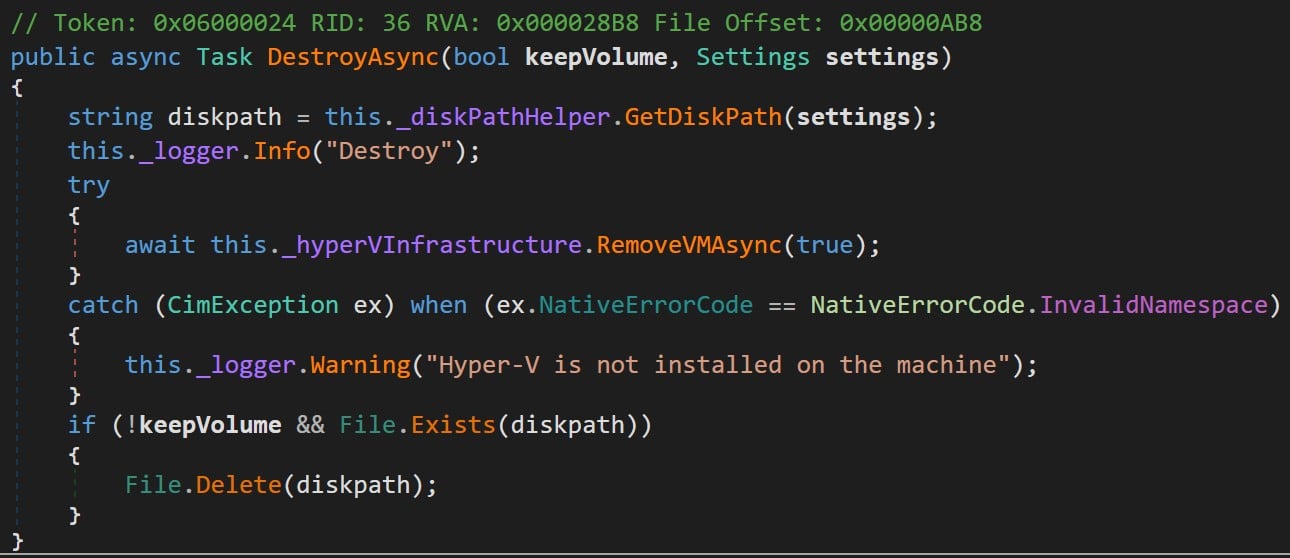
Figure 10 : Docker.Backend.HyperV class from Docker.Backend.dll.
The GetDiskPath function took the path from the settings.DataFolder (controlled by us) and concatenated it with the name DockerDesktop.vhdx (Figure 11).
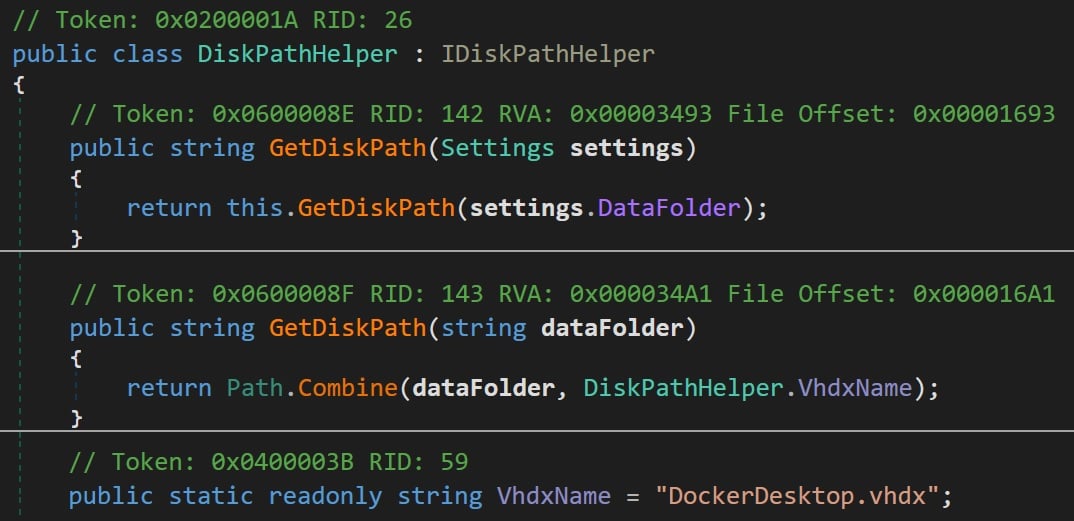
Figure 11 : GetDiskPath function.
We were able to call the API request with any file path inside the settings.DataFolder variable (i.e C:\tmp\myvhd) and delete a file with the name DockerDesktop.vhdx (Figure 12).

Figure 12 : Deleting DockerDesktop.vhdx
With the same method we used in the previous exploits, we used a junction directory with object manager symlink to change the name of the default file DockerDesktop.vhdx to any file we chose and deleted it (Figure 13).

Figure 13 : Deleting a file from a privileged location.
This issue was fixed in version 4.6.0 and assigned with CVE-2022-31647.
Abusing Create for Arbitrary File Overwrite
Similar to the previous vulnerability, the create API function is implemented by the function CreateOrConfigureAsync (Figure 14), which calls GetDiskPath to extract the DataFolder field from the settings object.
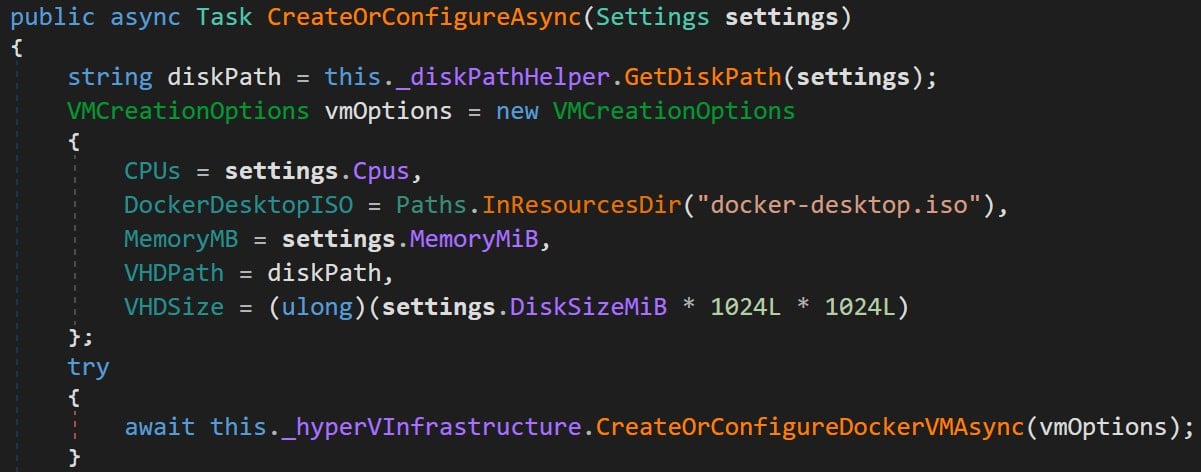
Figure 14 : Creating VM function in Docker.Backend.HyperV class.
It creates a default DockerDesktop.vhdx file based on the path in the DataFolder field. Therefore, it could be in any place we chose – for example, C:\Windows (Figure 15).

Figure 15 : Creating DockerDesktop.vhdx in C:\Windows.
In that case, the vmms.exe service was the one that created the file and not com.docker.service like in the previous examples (Figure 16).

Figure 16 : com.docker.service and vmms being redirected.
As we did in previous examples, we used the same technique to rename the file to any file we wanted in any location.
This issue was fixed in version 4.6.0 and assigned with CVE-2022-34292.
Conclusion
This is the second and final part of our research. In this part, we showed other vulnerable functions that we were able to exploit to gain privilege escalation. All the vulnerabilities were reported and handled quickly and efficiently by Docker.
Disclosure Timeline
23/02/22 — Initial report was sent to Docker.
14/03/22 — Docker released new version 4.6.0 with fix for CVE-2022-31647 and CVE-2022-34292.
17/03/22 — Docker advised that the fix to the other vulnerabilities will be pushed to version 4.7.0.
28/03/22 — Docker sent us an installation (version 4.7.0) to check.
31/03/22 — We checked, and it was fixed; we sent them our feedback.
07/04/22 — Docker released version 4.7.0 with a fix for CVE-2022-38730 and CVE-2022-37326.
References
- Part 1 of our research:
○ Breaking Docker Named Pipes SYSTEMatically: Docker Desktop Privilege Escalation – Part 1 (cyberark.com) - A Docker Desktop privilege escalation vulnerability through named pipe:
○ https://www.pentestpartners.com/security-blog/docker-desktop-for-windows-privesc-cve-2020-11492/ - Windows named pipes explanation:
○ https://csandker.io/2021/01/10/Offensive-Windows-IPC-1-NamedPipes.html - An article by Yarden Shafir and Alex Onescu about a technique to trigger a hijacked DLL to SYSTEM through the Fax service:
○ https://windows-internals.com/faxing-your-way-to-system/
○ https://github.com/ionescu007/faxhell - James Forshaw Symbolic link tools:
○ https://github.com/googleprojectzero/symboliclink-testing-tools
○ https://github.com/googleprojectzero/sandbox-attacksurface-analysis-tools/tree/main/NtApiDotNet - An article by Eran Shimony about symbolic links:
○ https://www.cyberark.com/resources/threat-research-blog/follow-the-link-exploiting-symbolic-links-with-ease
Appendix A – Settings Class
public Settings()
{
    this.SettingsVersion = 10;
    this.AutoStart = false;
    this.AnalyticsEnabled = true;
    this.OpenUIOnStartupDisabled = false;
    this.AcceptCanaryUpdates = false;
    this.DisplayRestartDialog = true;
    this.DisplaySwitchWinLinContainers = true;
    this.Cpus = Math.Min(Environment.ProcessorCount, 2);
    this.MemoryMiB = 2048;
    this.SwapMiB = 1024;
    this.VpnkitCIDR = "192.168.65.0/28";
    this.OverrideProxyExclude = "";
    this.OverrideProxyHttp = "";
    this.OverrideProxyHttps = "";
    this.UseDnsForwarder = true;
    this.Dns = "8.8.8.8";
    this.DiskSizeMiB = 65536L;
    this.DataFolder = Paths.DefaultVmDataFolder;
    this.FilesharingDirectories = new List();
    this.SynchronizedDirectories = new List();
    this.DisplayedTutorial = false;
    this.DisableHardwareAcceleration = false;
    this.LifecycleTimeoutSeconds = 600;
    this.LastLoginDate = 0L;
}
Appendix B – Daemon Windows Configuration File (daemon.json)
{
  "allow-nondistributable-artifacts": [],
  "authorization-plugins": [],
  "bridge": "",
  "cluster-advertise": "",
  "cluster-store": "",
  "containerd": "\\\\.\\pipe\\containerd-containerd",
  "containerd-namespace": "docker",
  "containerd-plugin-namespace": "docker-plugins",
  "data-root": "",
  "debug": true,
  "default-ulimits": {},
  "dns": [],
  "dns-opts": [],
  "dns-search": [],
  "exec-opts": [],
  "experimental": false,
  "features": {},
  "fixed-cidr": "",
  "group": "",
  "hosts": [],
  "insecure-registries": [],
  "labels": [],
  "log-driver": "",
  "log-level": "",
  "max-concurrent-downloads": 3,
  "max-concurrent-uploads": 5,
  "max-download-attempts": 5,
  "mtu": 0,
  "pidfile": "",
  "raw-logs": false,
  "registry-mirrors": [],
  "shutdown-timeout": 15,
  "storage-driver": "",
  "storage-opts": [],
  "swarm-default-advertise-addr": "",
  "tlscacert": "",
  "tlscert": "",
  "tlskey": "",
  "tlsverify": true
}


