
Biometric authentication is beginning to see rapid adoption across the enterprise as organizations look to incorporate passwordless solutions to help mitigate the numerous security risks inherent with password use.
One of the most widely adopted passwordless authentication systems is Windows Hello, which enables passwordless login via pin code, fingerprint or facial recognition. According to Microsoft, Windows Hello is used by 85 percent of Windows 10 users, of which an undisclosed subset utilize facial recognition.
Given Windows Hello’s prevalence, over the past few months the CyberArk Labs research team has been exploring potential weaknesses in the system in hopes of strengthening biometric security overall. What resulted was the discovery of a design flaw that allows an adversary to bypass Windows Hello’s facial recognition. The vulnerability allows an attacker with physical access to the device to manipulate the authentication process by capturing or recreating a photo of the target’s face and subsequently plugging in a custom-made USB device to inject the spoofed images to the authenticating host. We have no evidence that this attack has been used in the wild, but it could be used by a motivated attacker to target a researcher, scientist, journalist, activist or privileged user with sensitive IP on their device, for example.
Here’s the proof-of-concept video showing how we bypassed the Windows Hello authentication and login screen. You’ll see that we connect the custom USB camera device to transmit previously captured infra-red frames of our target.
While our research was specific to Windows Hello and more so the enterprise offering, Windows Hello for Business, it’s important to note that potentially any authentication system that allows a pluggable third-party USB camera to act as biometric sensor could be susceptible to this attack without proper mitigation. We have not performed practical tests to verify this, however.
We’re excited to present our findings at Black Hat 2021 on August 4-5, 2021, and to share the following summary and technical explanation of our research, including an analysis of the mitigation Microsoft issued on July 13, 2021 (CVE-2021-34466) as part of our coordinated vulnerability disclosure.
Now, let’s get into the heart of the research.
Exploring Windows Hello
Microsoft has developed two versions of Windows Hello; one meant for consumers, and an enterprise version called Windows Hello for Business (we will refer to it as WHfB going forward in this post). Launched in 2015, Windows Hello makes authentication as simple as looking into your computer screen. In addition, it enables passwordless authentication in Windows environments with native support.
As expected, the primary difference between the consumer-facing and enterprise versions is the usage, implementations, and environment in which they function. For example, the consumer-facing Windows Hello is targeted to individuals/consumer devices, i.e., home users. In contrast, WHfB is targeted to businesses and enterprises that run any Active Directory and want to implement a passwordless solution.
Passwordless authentication is defined as any authentication method in which a user can log in to a system without entering a password or similar secret like so.
Windows Hello, in general, enforces verification based on a PIN or biometric verification, and reduces the risk of keyloggers and phishing attacks as it provides an authentication alternative that doesn’t require a password. It doesn’t replace your password entirely, however.
In the background, the system still uses your password hash for authentication.
WHfB is an enhanced version of Windows Hello and takes the offered authentication features to an enterprise-grade suitable solution. Windows Hello for Business uses a PIN code backed by an asymmetric pair of public and private keys or certificate-based authentication.
While our testing focused on WHfB, the bypass is applicable to the consumer-facing Windows Hello as well, as they are both based on the same mechanism.
Authentication via Windows Hello for Business
WHfB supports on-premises and hybrid deployments.
The sole difference between the deployment solutions is that the on-premises environment is aimed at those who don’t want to connect their Active Directory to Azure, and the hybrid environment is for those who want to do so.
As part of its support with modern authentication techniques, WHfB brought into the Windows ecosystem new tokens and encryption keys that are used to authenticate a user to Microsoft online services and Azure, such as the Primary Refresh Token (PRT) and associated cryptographic keys (Session Key, Transport Key, etc.). Benjamin Delpy (@gentilkiwi) and Dirk-Jan Mollema (@_dirkjan) did fantastic work researching those tokens and keys.
Their research showed how one could extract a PRT and a session key, which enabled full access to a target’s Microsoft account, and they even implemented this extraction feature in Mimikatz.
We won’t get deep into the threats in the related browser Single Sign-On (SSO) world, but we suggest you take a look at the relevant blog posts of Dirkjan:
- https://dirkjanm.io/abusing-azure-ad-sso-with-the-primary-refresh-token/
- https://dirkjanm.io/digging-further-into-the-primary-refresh-token/
From either offensive or defensive perspectives, we need to note that when WHfB is deployed, more authentication tokens and keys exist. And as always, with new tokens and keys, new attack methods come along. Do you remember Pass-the-hash or Pass-the-ticket?
Great! Say hello to the Pass-the-PRT attack.
The Pass-the-PRT attack is similar in nature to its predecessors, but with a slight twist. An ordinary attack scenario allows the advisory to access on-premises assets. However, Pass-the-PRT allows you free access to Azure’s related resources like MSFT 365 assets.
Michael Grafnetter (@mgrafnetter) made a great video explaining the Pass-the-PRT attack and shows how you can “exploit” this.
Dissecting Windows Hello Biometric Authentication
As we mentioned, the main feature of Windows Hello is biometric authentication. When deciding what part of the system to target, we surmised that the biometric sensor was the weak link in the chain by potentially exposing the system to data manipulation attacks on the target’s device.
The sensor is a device that transmits information on which the OS, in particular Windows Hello, makes its authentication decision. Therefore, manipulating this information can lead to a potential bypass to the whole authentication system.
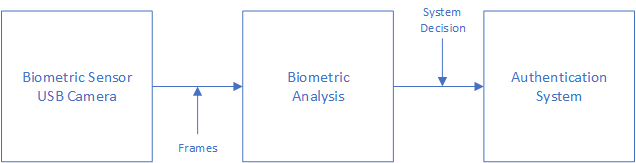
Figure 1: Flow chart of biometric authentication system
From the figure above, we can see that the collected data is coming from one source: the biometric sensor. This sensor’s input is then sent to a biometric analysis (comparing the incoming data with previously stored data). After that, the analysis result is sent to the authentication system (or any other component) that issued the flow in the first place.
In a facial recognition scenario, the biometric sensor is either a camera embedded in the device, like in laptops, or connected to the computer, in most cases via USB.
The all-system authentication flow is based on the input coming from the camera, which can create a vulnerability as we’ll soon demonstrate.
Not all USB devices are the same, of course, therefore not all USB devices input can lead to a security risk. Let’s talk about two USB devices, a keyboard and a camera, as they both can be used for authentication purposes. A USB keyboard doesn’t expose one to a security risk like a USB camera might. You must wonder why.
The answer lies in the input itself. Keyboard input is known only to the person who is typing before the information is entered into the system, while camera input isn’t.
The camera essentially sends the frame it receives from its sensors to the respective OS, which contains a person facing the camera. Then, those specific frames are passed into the computer through the biometric analysis and compared to the predefined dataset located in the computer hard drive. If the data received by the sensor is matches the registered data, then the OS either logs you in or states that the system couldn’t recognize you.
Instead of using something that only you know to authenticate, facial recognition takes “public” information (your face) to log you into the system. It is similar to stealing a password, but much more accessible since the data (face) is out there.
Our research yielded an interesting attack vector: capture a victim’s image, save the captured frames, impersonate a USB camera device, and eventually send those frames to the system for verification. At the heart of this vulnerability lies the fact that Windows Hello allows external data sources, which can be manipulated, as a root of trust.
Face Recognition Spoofing
Windows Hello facial recognition authentication requires a standard camera that supports RGB and Infra-red (IR). This type of camera has two separate sensors that work together as one USB device.
Upon investigation, we discovered that only the IR camera frames are processed during the authentication process.
To verify this, we did an experiment in which we created a custom USB device that acts as a USB camera with IR and RGB sensors. For this purpose, we used an evaluation board manufactured by NXP. With this new custom USB camera, we transmitted valid IR frames of our “target person,” while the RGB frames we sent were images of SpongeBob, and to our surprise, it worked!
With this understanding, as from an attacker’s perspective, one would need to implement a USB camera that supports RGB and IR cameras. This USB device then only needs to send genuine IR frames of the victim to bypass the login phase, while the RGB frames can contain anything.
Further, into the research, we figured out that we even don’t need many frames of the “target.”
Apparently, we only need one IR frame and an entirely black frame. When we tried to send only one valid IR frame in the buffer, Windows Hello didn’t accept our input as valid, but when we sent both the black frame and the proper IR frame, we got in. We think that there is a “Liveness” / anti-spoofing mechanism that looks for changes between every two frames that come in a row, but we did not pursue this hypothesis further to confirm.
To summarize what we’ve learned so far: We have seen that an attacker can create a custom-made USB device that Windows Hello will work with. The attacker controls the data that comes from this device. With only one valid IR frame of the target, the adversary can bypass the facial recognition mechanism of Windows Hello, resulting in a complete authentication bypass and potential access to all the victim’s sensitive assets.
Pretty neat, right?
Well, we think so too! But there is a little bit of a problem here. How would the attacker get a valid IR frame of the victim? The answer lies in the two options mentioned below:
- Capture an infra-red (IR) frame of the victim
- Convert one of the victim’s regular RGB frame to an IR one
Let’s discuss the first option, which is to take an IR frame of a victim.
A recipe for taking a good IR frame of a person is to set an IR camera as close as possible to the front of the target. This can be achieved by passing by the person with a camera or by setting this IR camera in a place that the person will go through, like an elevator. Moreover, with advanced IR camera technologies, one can take this picture even from a distance, like across the street or from a car. While this may sound a bit farfetched, motivated attackers could definitely accomplish this. An alternative method of spoofing the target’s face is to convert an RGB frame to IR, however, this can be extremely difficult.
Microsoft in 2016 at Winhec mentioned that people tend to look very different in a Near IR image vs. RGB image (Color image). We can infer from this that Microsoft also based their system on the idea that one won’t be able to convert an RGB image to an IR image, but we did not conduct sufficient testing to yield conclusive results.
The entire attack path is detailed in the diagram below:
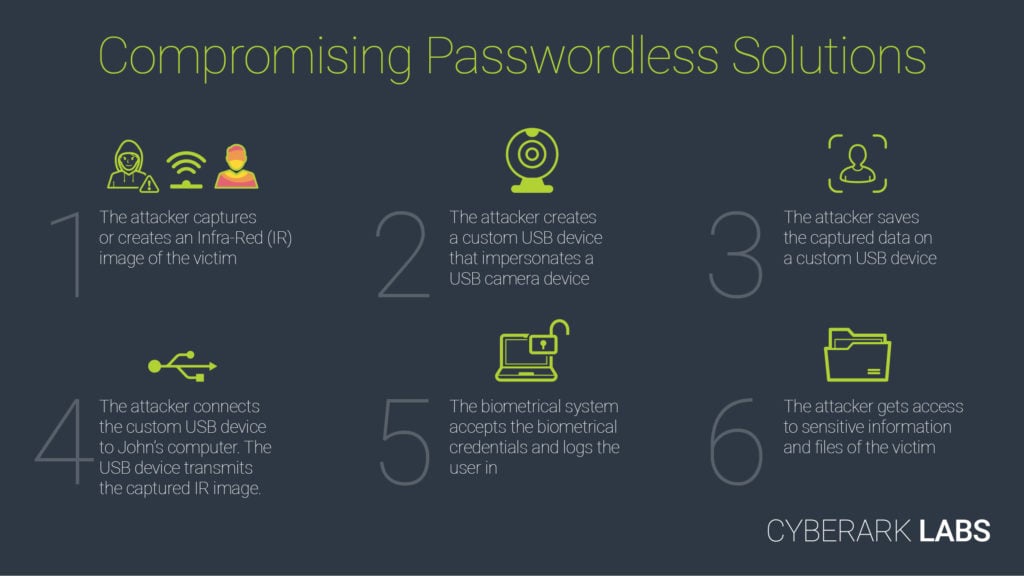
Figure 2: Attack path diagram
How We Did It
Now that we’ve provided a summary of the bypass, let’s delve into the technical detail of Windows Hello and USB devices, the process of cloning a USB camera for the purposes of this attack, and the tools we used to successfully spoof a user’s identity, among other areas.
Planning Stage
During our planning, we set out to pass the gatekeeper, Windows Hello. To do that, we looked to create a USB camera that Windows Hello can work with. Breaking this into a few parts, we needed to understand the following:
- USB Devices
- How does a USB device work?
- How does it communicate “high-level” -wise?
- What specification is it based on?
- How can one implement a custom device without getting too deep into electronics?
- USB Web Camera
- Do Web cameras have a specific protocol they use?
- Implementation – Create a custom USB device
- What are the required tools for creating a USB device?
- Should I implement a full USB stack by myself?
- Capture frames
- What data do I need to capture and how?
- How do I Inject the frames into the custom camera?
- Verifying this device works with Windows Hello
USB Devices 101
Universal Serial Bus or USB is an industry standard that establishes specifications for cables, connectors, and protocols for communication and power supply between computers and peripherals, computer and peripherals, or peripherals and other peripherals. The standard was conducted in 1996 and maintained since then by the USB-IF. Since 1996, many different USB versions were standardized and many connectors were introduced, from USB-A and USB1.X to USB-C and USB4. The significant differences between the versions of USB are the data rate it supports and the power delivery.
A USB device defines its capabilities and features through descriptors that define the device interfaces, alternate settings, and endpoints. (If you want to see one, hold tight, we will talk about it later in the blog). A USB configuration descriptor defines the capabilities and features of a device. The device can have multiple configurations, but only one is active at a time. Every configuration can have one or more interfaces that define the functionality of the device. Certain devices that expose multiple interfaces related to one function, like Web Cameras, have an interface association descriptor (IAD).
An IAD groups together interfaces that belong to a particular function.
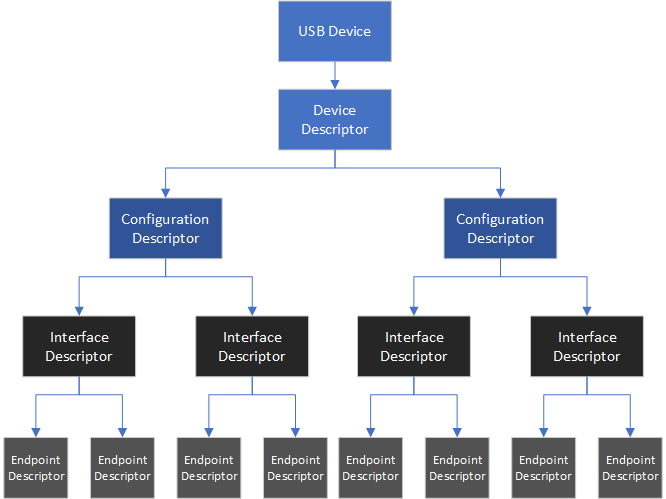
Figure 3: USB device layout
In the figure above, we can see the USB device layout and its hierarchy.
USB has a strict tree network topology and master/slave protocol for addressing peripheral devices.
Once a USB device is connected to the computer bus via the USB port, the host starts a session with the peripheral device. After the session is established between the host and the USB device, the host will send multiple requests to identify the USB device, called descriptor requests.
The host can’t identify which device is connected to the USB port, and therefore it needs to get the information from the connected peripheral device. As unbelievable as it sounds, it means that every device can present itself as whatever it wants, and the host can’t verify this. At least there is nothing in the specification that defines such a process.

Figure 4: USB descriptors
According to chapter 5 in the USB specification, there are five common descriptors:
- Device Descriptors – Represents the entire device
- Configuration Descriptors – Specifies the device’s capabilities and features
- Interface Descriptors – Grouping the USB endpoints into a functional group performing a single feature
- Endpoint Descriptors – Describes the endpoints
- String Descriptors – Provides human-readable information
(Should you want to delve into further detail on descriptors, you can read more about them here.)
The device descriptor specifies basic yet important information about the entire device, such as the supported USB version (bcdVersion), vendor id, product id, and even the number of configurations the USB device supports. Another important descriptor is the configuration descriptor which describes the device’s capabilities and features. The majority of devices have one configuration option, but they typically can support more than one configuration.
Every descriptor has a specific length specified in the USB specification, but the configuration descriptor length may vary between devices as they describe the capabilities and features of the device. Descriptors with an unknown length, like the configuration descriptor, are sent in two parts. The part contains the basic format of the descriptor, which contains the length of the descriptor. This lets the host know the amount of memory space it needs to allocate for the full configuration descriptor.
The configuration descriptor contains extensive information about the USB device, such as the way the host should communicate with the USB device, device capabilities, and maximum power consumption.
Lastly, there are String descriptors that are delivered to the host the host asks by the USB device. String descriptors provide human-readable information about the USB device, encoded in a Unicode format. These strings act as indicators, allowing us to easily identify the USB device in the device manager program.
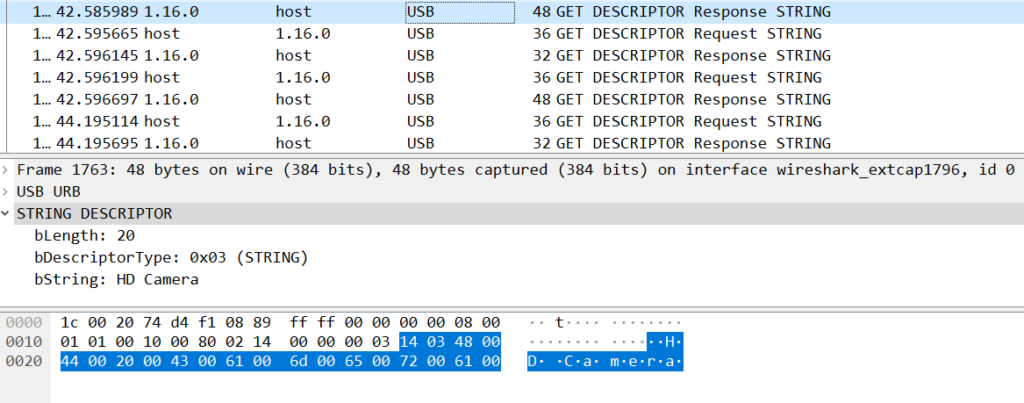
Figure 5: String descriptors
USB Devices 102 – USB Video Class
So far, we have covered the basics of USB devices, which every USB device must implement. Now let’s talk about the extension of the USB basic specification – the USB Video Class (or UVC in short.) UVC is a USB device class that describes the video streaming capabilities of devices like web cameras, still-image cameras, and more.
The latest version of the UVC specification is 1.5. The USB-IF defines the USB specification in a set of documents describing both the basic protocol (which we covered earlier) and the different payload formats that UVC supports. The UVC 1.5 supports the transmission of many compressed and uncompressed video streams, including YUV formats, MPEG formats, etc.
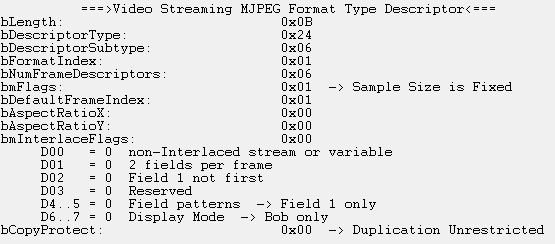
Figure 6: Video streaming format type descriptor
The UVC protocol includes a section about Video Control requests. Those requests are used to control the different sensors in the camera that it exposed from the host device; In addition, it is:

Figure 7: UVC control requests
Custom Camera – Victory Road
Now that we have the basics down, we need to choose a convenient development platform for debugging and developing our custom USB camera device. We chose to use an NXP evaluation (i.MX RT1050), which created an easy and straightforward custom eclipse IDE called MCUXpresso. NXP offers a fantastic sample project that implements a “fake” camera device, including most of the UVC stack, saving us research time.
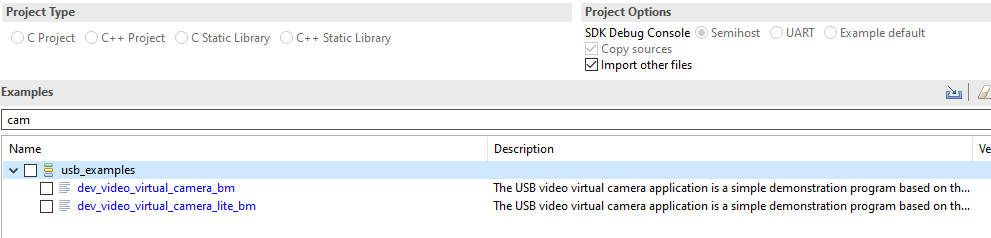
Figure 8: Example USB camera project by NXP
We need to first capture and observe the URB (USB Request Blocks) packets that our target device sends and receives. One of our options to capture USB traffic was to use USBPcap, an open-source tool that also has a plugin for Wireshark. Another option is USBview, a tool developed by Microsoft that details all the USB devices connected to your computer, including their configuration descriptor. Moreover, you can also see their parsed configuration descriptor, which is great for someone who is trying to copy or create a USB device by themselves.
As one may imagine, a lot of USB traffic comes and goes in a single PC, so looking at live USB traffic in Wireshark may be overwhelming. USBview assisted us in finding the USB device id, filtering out irrelevant USB traffic in Wireshark and avoiding a lot of overwhelming moments.
With our workspace established, we could start using it to implement our custom USB device.
To create a USB camera that works with Windows Hello, we set out to clone a Windows-compatible USB camera among the many white-label camera products that offer Windows Hello compatibility. Our custom camera was based on a Quanta Computer product, but we could have used almost any third-party camera compatible with Windows Hello.
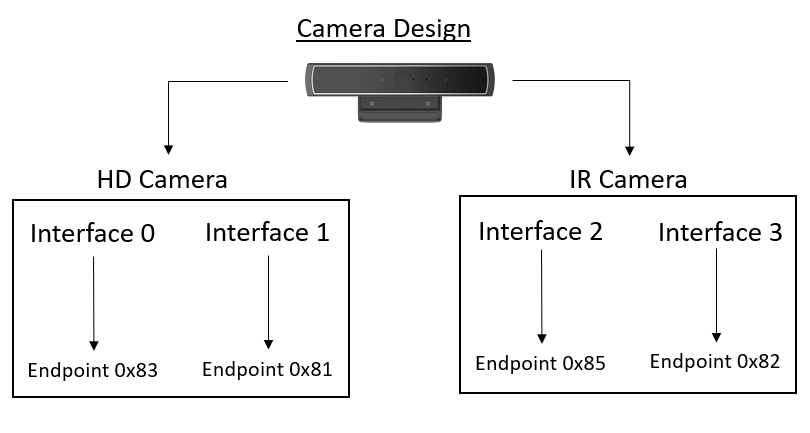
Figure 9: White-label camera design
In the figure above, we can see the USB camera design structure. As we can see, in the USB device, there are two cameras – HD camera and infra-red (IR) camera, which means that there are two IAD in this USB device that we need to clone.
In the example project that NXP developed, there is only one “camera” support. So, we need to implement another camera support which should be done mostly by looking at the existing one and copying some of it while changing the existing code to support both cameras.
We aimed to create a clone that will act as the real camera, so we copied the configuration and the device descriptors. This can be done in many ways, like querying the device directly via raw URB or by extracting this information from the OS. We extracted this data from a WireShark PCAP, which is quite easy. Then, after extraction, we replaced this with the existing configuration descriptor in the example project.
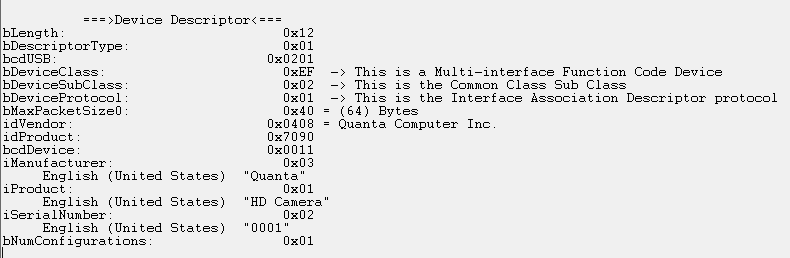
Figure 10: The device descriptor of the camera
At this point, we encountered a very interesting problem.
Whenever we changed the bcdUSB value, which defines which USB version our USB device work on, to 0x201, which is the same as the white-label camera, we encountered a USB error message. This error message shows up when a USB device doesn’t function correctly and Windows refuses to work with it. Backtracking to identify the cause, we discovered we were missing a crucial descriptor, the BOS descriptor! (MS OS 2.0 Descriptor in Windows).
It turns out that in the USB specification, in the event your USB device version is higher than 2.0, it is required to ask for a BOS descriptor. This descriptor contains information about the capabilities of the connected USB device, and it enables the OS and the USB manufacturers support features that are not in the USB specs.
The host sends this descriptor request very early in the USB session “hand-shake,” right after the device descriptor. In case the peripheral device doesn’t answer any of those requests, Windows (and probably most modern operating systems) refuses to continue the session with the USB device and asserts that the USB device isn’t functioning correctly, subsequently displaying the error message above our taskbar. But why did we miss this one? We sniffed all the USB traffic on the computer.
Apparently, USBPcap on Windows doesn’t show or capture this request, and because of that, we didn’t notice we were missing this request. But, in Linux, WireShark does show it. In any future USB research, we will consider using Linux instead of Windows, for traffic sniffing at least.
In the figure below, you can see the differences between the two.
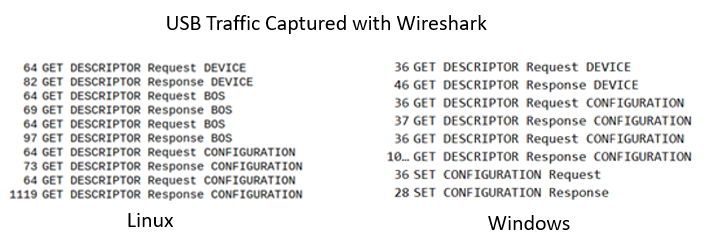
Figure 11: Compare between the different captured USB packets
As shown, we need to add support for BOS requests in our project and copy the BOS descriptor from the captured data. The idea is similar to what we did previously. We need to identify the magic bytes that represent a BOS request, then parse it in our code and send back valid BOS descriptors (there are two that need to be sent over).
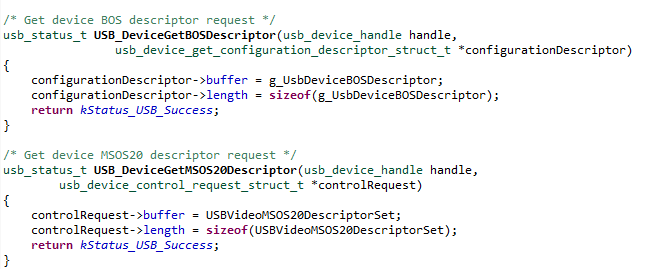
Figure 12: Part of the code handling BOS descriptors
With the added support for BOS requests, we passed another challenge along our way to make our custom USB device work with Windows Hello.
Got to Capture Them All
After creating a working custom USB camera, the last step is obtaining the user’s identifying data, which will be transmitted to the computer from the USB device. The data, or rather, the image frames of a person’s face which will be processed by the biometric system, in our case, Windows Hello, can be captured in many ways including taking pictures of a person with a camera that supports IR capturing with a relevant sensor.
Another method is to create an IR frame out of a color frame. This could be a time-consuming process that needs to be done by a skilled graphic designer who knows how to convert color images to look like IR images or by a fancy ML algorithm. Either way, the frames need to be transmitted in some way from the custom USB device to the computer.
The way we implemented the frame transmission is based on a static array of frames. Each frame is separated from one another by a magic header and footer.

Figure 13: Example frame
One important thing one should pay attention to is the format of the frame placed in the USB device.
In the white-labeled camera that we chose to clone, the format which is used is MJPG for the color images and L8 frame type (KSDATAFORMAT_SUBTYPE_L8_IR / MFVideoFormat_L8) for the IR.
In the figure below, you can see a flow graph representing the path that the data goes through from the start of the session until the end of it.
Figure 14: Dataflow
Once you have correctly captured and placed the frames in the custom USB camera, you will be able to bypass the login screen!
Conclusion
This research reveals how a system, such as Windows Hello, that implicitly trusts input from peripheral devices can expose itself to inherent security weakness. This input, in some cases, can contain “public” data like a person’s face, which can raise security issues.
Our findings show that any USB device can be cloned, and any USB device can impersonate any other USB device. Identifying a USB device by a descriptor provided by the device is the main reason for this. The OS cannot validate such a device authenticity, at least not according to the USB specification.
We used the IR frames of a person to “bypass” the face recognition mechanism. We believe that those IR frames can be created out of regular color images.
We would suggest that anyone who might want to proceed with this research idea base their work on an automated process of transforming a color image to IR. This can be achieved in many ways, from automated filters to full-blown fancy ML algorithms.
I want to thank Nimrod Stoler, @n1mr0d5, who helped us through many steps in the research.
For any questions that you might have, feel free to send me a DM over Twitter.
Thanks for reading,
Microsoft’s Mitigation
As part of our coordinated responsible disclosure process, Microsoft provided us the following statement:
Microsoft released a security update on July 13 that mitigates this issue. For more information, please see CVE-2021-34466:
https://msrc.microsoft.com/update-guide/en-US/vulnerability/CVE-2021-34466
In addition, customers with Windows Hello Enhanced Sign-in Security are protected against such attacks which tamper with the biometrics pipeline.
Enhanced Sign-in Security is a new security feature in Windows which requires specialized hardware, drivers, and firmware that are pre-installed on the system by device manufacturers in the factory. Please contact your device manufacturers for the state of Enhanced Sign-in Security on your device.
CyberArk Response to Microsoft Mitigation
Based on our preliminary testing of the mitigation, using Enhanced Sign-in Security with compatible hardware limits the attack surface but is dependent on users having specific cameras. Inherent to system design, implicit trust of input from peripheral devices remains. To mitigate this inherent trust issue more comprehensively, the host should validate the integrity of the biometric authentication device before trusting it.
We are continuing our investigation.
Addendum, 8/4/21
Following publication of this post, Microsoft provided CyberArk researchers additional detail regarding compensating controls that are designed to mitigate the issue in common use cases and make exploitation of the vulnerability less likely. This is done by creating an allow list of USB devices which are trusted to be used in the Windows Hello authentication phase. However, according to our current assessment, exploitation of the vulnerability is still possible via duplication of an external trusted USB device due to the way trust is established.
Microsoft has published a security update containing further detail of the mitigation.
Disclosure Timeline
23/03/21 — Vulnerability reported to Microsoft
28/04/21 – Microsoft acknowledges the issue
29/04/21 – Meeting with Microsoft to discuss the vulnerability details and research process
03/06/21 – Microsoft asked to confirm that the vulnerability is mitigated when limiting external cameras
04/07/21 – Microsoft assigned a CVE: CVE-2021-34466 and updated about the release of a patch
13/07/21 — Microsoft published an advisory regarding possible mitigations


